BY DR. QUINN HENOCH
If an athlete is to have a strong, pain free overhead position, the shoulder blade and the upper back must have a healthy relationship. Like any beautiful couple, if there is disharmony, then problems will arise. The focus of this article will be working to attain full shoulder elevation with a desirable spinal position and minimal compensations in other areas of the body.
A Love/Hate Relationship
The thoracic spine/ribcage is really the dominant partner in this story, as it is literally the foundation for where the scapula resides. T-spine and ribcage position dictates the function of the shoulder blade in all upper body movements. Poor position or movement in the upper back yields poor movement of the shoulder girdle.
So, the question is what is ideal thoracic position and movement and how do we get it?
The Importance of Thoracic… Flexion??
Sounds odd, I know, considering the typical idea that a very upright, extended posture is the secret to life. It is common to hear from athletes and coaches that if an athlete is having trouble with overhead movements, thoracic extension must be improved. Yes it’s true; there is relative extension that occurs in the upper back as our arms go up in the air. This is especially the case in extreme positions such as an overhead squat. However, the more I learn from the Postural Restoration Institute (PRI) about the mechanics of the thorax, the more my approach evolves.
Some athletes just don’t seem to respond to traditional t-spine exercises like sidelying or quadruped rotations, or back-to-wall wall slides, no matter how many reps they perform. It’s likely that they do not benefit from these drills designed to improve thoracic extension, because they are already STUCK IN EXTENSION. It’s really hard to achieve a motion that you have already maxed out. BOMB.
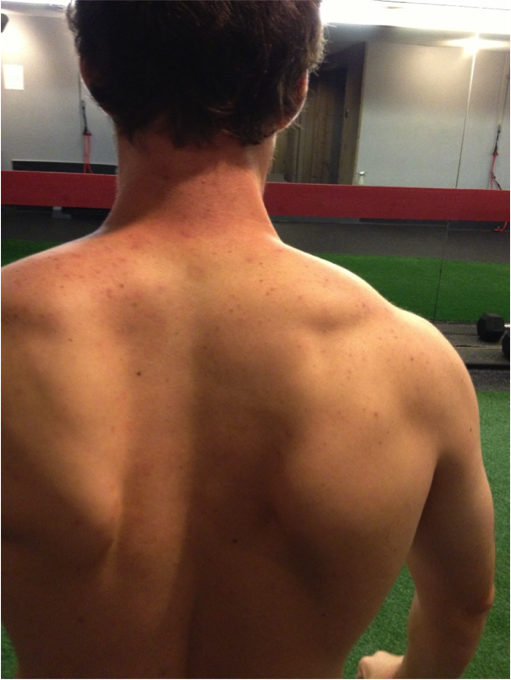
This picture demonstrates the type of thing I see in the clinic. A lot. This is an upper back that is stuck straight. This causes several problems. 1) The natural curves in our spine aid to distribute force and mitigate wear on spinal structures. A straight spine gets to enjoy more compressive forces. 2) A flat thoracic spine makes for a very poor foundation for the shoulder blades to move on. The scapular winging and tipping that you see in the picture is what happens when you stick a curved shoulder blade on a flat rib cage. It ain’t a love story at the point. Those two aren’t even sharing a bed together anymore. 3) Thoracic rotation will also be restricted because locking down motion in one plane, restricts another. Many other problems arise as well – such as, poorly leveraged muscular attachments, increased extensor muscular tone, etc.
Resting posture (such as in the above picture) doesn’t always dictate movement dysfunction, but I would guess that this athlete most likely had motion restrictions and poor scapular rhythm when going overhead. In the past, I probably would have given him some exercises to improve tspine extension and rotation and strengthen his serratus anterior to address the winging; or hammered him with tons of horizontal rows only to further increase extensor tone. All of those things have their place, but perhaps not always as an initial intervention in this case.
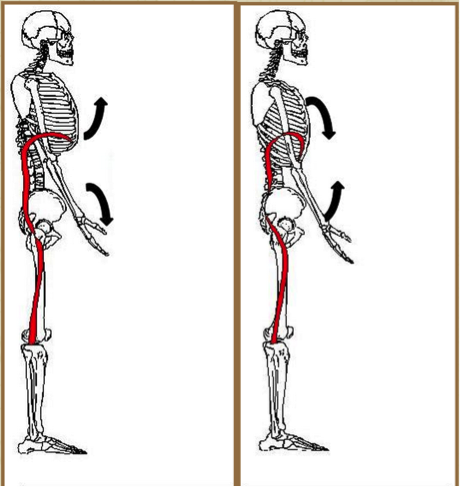
The reality is that a relative thoracic kyphosis (roughly 40 degrees) in resting posture is normal and optimal for the initiation of proper scapulo-humeral rhythm. In the picture above on the left, you see a ribcage that is tipped backwards, extending the tspine before shoulder movement even occurs. On the right, you see a spine in neutral, where the diaphragm and pelvic floor face each other. In this position, the upper back will extend as it needs to in order to achieve an overhead position, because it has been given back some slack.
So how do we get back to neutral and regain the ability to move our thoracic spine?
A. Breathe
Classic. If you’ve been following Ryan Brown and I at Darkside Strength, you probably saw this one coming. Fully inflating and deflating your lungs with air is like stretching from the inside out. Nothing will improve rib and thoracic mobility more effectively than expanding your rib cage 360 degrees over and over. Nothing will create a better relationship with the upper back and scapula, than expanding your ribcage. Nothing will free up shoulder impingement at the top of a press or jerk like expanding your apical lung. Expansion.
This video from Bill Hartman at Indianapolis Fitness and Sports Training (IFAST) is a great demonstration of what rib cage expansion should look like.
Below is the program that puts you on the road to being an overhead superstar – or at the very least, help you clear up some of your nagging shit.
90/90 Breathing
If you’re new to the breathing game, start with the supine 90/90 drill in the next two videos to get the pattern down.
The balloon is an amazing tool used to teach you how to efficiently engage the musculature needed to stabilize the trunk, and to teach you how to create and release pressure voluntarily. The carry over to breath control under the barbell is phenomenal. Only catch: DON’T PINCH OFF THE BALLOON WITH YOUR TEETH OR HANDS. Stick your tongue to the roof of your mouth in order to maintain pressure. The arm variations help to further open up the chest wall. The hip lift/posterior tilt works to inhibit extensor tone in your back. Use hamstrings for this, and NOT rectus abdominis.
**Key Points**
- Begin with an exhale to set rib position.
- Use the minimal, not excessive, amount of oblique contraction to keep lower ribs down during inhale
- Exhale fully through mouth without clamping down on your rectus abdominis (6 pack muscle).
- Pause 2-3 seconds before inhaling again.
- Inhales and exhales should be relatively effortless. Limit straining. Relaxed neck. Expand chest 360 degrees
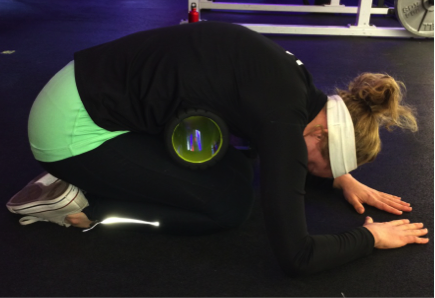
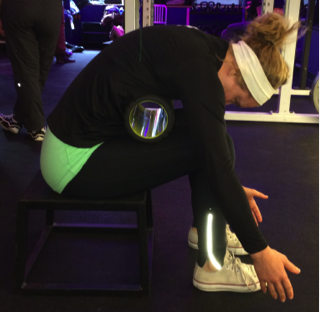
Quadruped Rockback or Seated With Reach
Now we look to bias some flexion in the upper back, in order to create that congruent platform for our shoulder blades, with drills I’ve picked up from some sharp peeps.
**Key Points**
- The more you can rock back the better.
- Remember, you’re exhaling into flexion.
- Reach and flex, but don’t strain.
The seated version, if rockback is not possible. Reeaaachhhhh and rounddddd
Wall Supported Squat with Reach and Balloon
This is an interesting one. Looks kind of like a pooping dog. Which is sort of the point. Exaggerating a position where your pelvic floor and diaphragm are parallel to each other does wonders for the trunk and pelvis in regards to inhibiting extensor tone. You may not only feel a loosening of the upper back after performing this drill, but your hips flexors may feel looser as well.
**Key Points**
- The active reaching with the arms activates scapular musculature (such as serratus) further improving the congruency of the scapula to the ribcage.
- These exercises are truly designed for the whole system. In fact, a proper overhead shoulder position starts at the PELVIS.
- Once all of the above is established and performed competently, NOWWW you perform your favorite tspine corrective exercise. There are tons – sidelying rotations, quadruped rotations, bretzle, etc. Go to the Darkside Youtube page for several. The rule is, you have to use your BREATH to increase the ROM. At least one full inhale and exhale at end range.
2. UNLOADED ACTIVE SHOULDER ELEVATION
Now that you have worked to improve thoracic mobility, let’s add some active shoulder elevation to lock it in those improvements and while addressing scapular motion. One that I use often is the wall slide – facing the wall. The focus here will be shoulder elevation and scapular upward rotation and elevation around a stable, neutral trunk.
**Key Points**
- Actively pressing your forearms into the wall as you elevate will help congruency of the shoulder blade to the ribcage.
- Don’t jam into range you don’t have, or compensate by arching your lower back. Go to your barrier, take a full breath, and come back down.
- A slight shrug at the top may help you to clear some range and aide in scapular upward rotation
He demonstrates enough thoracic spine extension to hold the weight overhead, but not an excessive amount. Low back neutral, upper back slightly extended. Love you Lu
3. TISSUE LENGTHENING
For some of you, the previous drill may not pose any issues. You may be able to achieve full shoulder elevation while maintaining a neutral spinal alignment. If that’s the case, move on to step 4. For many of you, however, the previous wall drill will yield a substantial decrease in range of motion. Much of that restriction you may feel in the area of the lat. Now is a good time to perform a little lengthening soft tissue. You’ve now used a movement pattern to identify a limitation, instead of arbitrarily stretching everything. Below is drill that will lengthen, not only the lat, but also the lateral chest wall.
**Key Points**
- This should be felt along the entire lateral chest wall, from shoulder to near pelvis
- Use the inhale to improve the stretch and further expand the ribcage
- Return to the wall slides, and see if range of motion was improved
4. LOADED SHOULDER ELEVATION
With the above protocol, you’ve improved your breathing pattern, increased thoracic position and mobility, and improved scapular mechanics during shoulder elevation. With a solid pattern, we can now load movements. We like to start people in a half kneeling position, because it is easier to keep the lower back neutral. Here are a couple exercises that will facilitate the desirable amount of upward rotation of the scapula, extension of the thoracic spine, and ultimately help to improve your overhead positions for heavier barbell training.
Half Kneeling Press
Half Kneeling Landmind Press
Program
- Supine 90/90 breathing: 60 sec
- Supine 90/90 breathing with hip lift, balloon and arm overhead: 4 sets of 4 breaths
- Rockback breathing with active elbow reach and roller under ribs (if tolerated): 4 sets of 4 breaths
- Favorite thoracic mobility drill: 2 sets of 8 to 10
- Lat stretch: 2-3 sets of 30 secs or until a change is made
- Wall slides straight forward and scapular plane (make a Y): 1-2 sets of 10 each
- Half kneeling press, and/or landmind press: 1-2 sets of 6-10 each
Depending on the amount of sets you do for certain exercises this will take 10-20 minutes. Give yourself a few weeks to become competent with these drills. Watch the videos and read the key points over again. I realize there are A LOT of cues; but they are important, so take your time becoming familiar. Add this program as a warmup for your heavy overhead days for a few weeks, and track changes. Add and subtract exercises as you mold your corrective program to what works best for you. However, the overarching concepts should remain.
If you’re one of the people that’s hammered your T-spine with corrective drills or you’ve experienced nagging shoulder pain that doesn’t seem go away, give these concepts a shot. Get your shoulder blade and rib cage to love each other again. Feel free to post comments or questions below.
Thanks to Bill Hartman and IFAST, Postural Restoration Institute, and Liz Messina from MarkFisherFitness for their contribution to this article.


Комментариев нет:
Отправить комментарий