четверг, 30 октября 2014 г.

Ignite a Lower Body Revolution with Step-ups on a Bench

Muscle Form and Function - Ignite a Lower Body Revolution with Step-ups on a BenchBy Stephen E. Alway, Ph.D., FACSM
So the holiday season has been gone for a few months, and chances are most of your New Year’s resolutions have also turned into memories rather than realities. Even if you have missed a few workouts, and have indulged a little too much this winter despite the best intentions, there is no reason to give up on good intentions. There is still plenty of time to get back on track before the summer months descend upon us, with the mandatory shedding of heavy clothes that may be covering up more than a few missed workouts.
Muscle Form and Function - Ignite a Lower Body Revolution with Step-ups on a BenchWhether you want to get kick-started again, especially for your lower body, or if you have been looking for something to super charge your lower body as a launching point for greater workout success down the road, you may just find that a simple exercise like step-ups on a bench can do all of that and more. This simple exercise is a great way to attack your thighs, hips and gluteal muscles1 so that they become more powerful and fatigue resistant while shedding the winter accumulations and revealing the look of polished granite. One of the best things about step-ups is that you do not have to wait until you get to the gym to do them.

Muscles Activated by Step-ups

Muscle Form and Function - Ignite a Lower Body Revolution with Step-ups on a BenchAll four muscles of the quadriceps femoris (“quadriceps”) of the anterior thigh are activated by step-ups.1 The vastus lateralis muscle is positioned on the lateral (outer) part of the thigh. The vastus medialis covers the medial (inner) part of the thigh. The vastus intermedius is located between the vastus lateralis and the vastus medialis and it covers the central and deeper parts of the thigh. The fourth muscle in this group is the rectus femoris. It attaches to the hip and it travels down the central portion of the thigh.2 All four quadriceps muscles come together above the knee and attach to the patellar tendon, which connects to the patella (kneecap). The patellar ligament stabilizes the patella to the top part of the tibia bone of the leg just below the knee. Together, the quadriceps femoris extends (straightens) the leg at the knee joint by pulling on the patella and through it, the patellar ligament that is attached to the lower leg (tibia bone). The rectus femoris also flexes the thigh at the hip joint by pulling the knee and thigh towards the chest. In the step-up, the rectus femoris pulls the thigh up for the initial step while all four quadriceps muscles act to extend the knee during each step upwards.
Muscle Form and Function - Ignite a Lower Body Revolution with Step-ups on a BenchThe gluteus maximus is the largest hip extensor muscle. It is most active during the push phase of the stair climb upwards3 because it helps to straighten (extend) the hip joint by pulling the thigh posteriorly (backwards). The fibers of this muscle run from the posterior side of the ilium bone of the hip and sacrum bone of the lower region of the vertebral column, to the posterior part of the femur and the iliotibial track (a tough band of tissue that runs along the lateral part of the thigh and attaches to the lateral side of the tibia bone near the knee).
The hamstring muscles of the posterior thigh are made up by the semitendinosus, the semimembranosus, the hamstring portions of the biceps femoris muscle, and the adductor magnus muscles.2 In general, the hamstring muscles attach to the hip bones posteriorly (at the ischial tuberosities projections of the hip structure that you sit on when in a chair), and these muscles run to either cross the knee joint (semimembranosus or semitendinosus, biceps femoris) or attach to the femur bone (adductor magnus).2 These muscles help the gluteus maximus extend the femur during each step upwards3 and they are active to reposition the leg for the following step.4

Step-ups

1. You should warm up your knees with stretches and knee bends before beginning step-ups.
2. Locate a step (e.g., the bottom step going up to your house or apartment), or perhaps a sturdy box. If you are in a gym, you should be able to locate a step with a non-slip surface to use for this exercise.
3. If you are at the gym, take a light weight (e.g., 10-pound dumbbell) in each hand. Keep your back straight and shoulders up (don’t lean forward).
4. Place your right foot on the step or platform. Keep your torso upright. Push off with the left leg to raise your body onto the step, placing that foot alongside your right foot. Try to avoid excessive forward movement of your torso as you lift your body onto the step.
5. Step down with the left foot, followed by the right foot.
6. After 12 step-ups with the right leg, switch so that the next 12 are done with the left leg coming up first and going down last. Complete your set with 12 steps for each leg. Rest for about two minutes and repeat the sequence. Two sets of step-ups are fine to start with, but you should work up to 4 sets.
Your balance can get a bit hairy after a few hard sets, so pay particular attention if you feel your body swaying or unsteady during the step-up. Not only will your muscles be activated after a few hard sets, your entire cardiovascular system will also be challenged, and that means more calories can be expended for reducing body fat.
Although simple, step-ups are by no means easy. Partway through your first set, your thighs, hips and calves will begin to explode with fatigue-inducing metabolites. However, when it gets too easy, you can increase the size of the dumbbells that you carry during the exercise. In the long run, step-ups might not replace squats for elevating overall thigh strength. Nevertheless, a few months of step-ups will energize a lower body revolution that transforms your thighs, hamstrings and gluteals1,4 to pillars of rock-hard power and stamina.

References:

1. Simenz CJ, Garceau LR, Lutsch BN et al: Electromyographical analysis of lower extremity muscle activation during variations of the loaded step-up exercise. J Strength Cond Res 2012;26:3398-3405.
2. Moore, K.L. and A.F. Dalley II. Clinically oriented Anatomy. Fourth Edition. Baltimore, Lippincott Williams & Williams, 1999 pp 531-551.
3. Boudreau SN, Dwyer MK, Mattacola CG et al: Hip-muscle activation during the lunge, single-leg squat, and step-up-and-over exercises. J Sport Rehabil 2009;18:91-103
4. Saad MC, Felicio LR, Masullo CL et al: Analysis of the center of pressure displacement, ground reaction force and muscular activity during step exercises. J Electromyogr Kinesiol 2011;21:712-718.Ebben, WP, Feldmann, CR, Dayne, A, Mitsche, D, Alexander, P, & Knetzger, KJ 2009. Muscle activation during lower body resistance training. Int.J.Sports.Med. 30, 1-8.
Illustrations by Bill Hamilton, CMI
- See more at: http://fitnessrxformen.com/health/muscle-form-function/muscle-form-and-function/#sthash.ixUfzy52.dpuf

6 Reasons Anterior Core Stability Exercises Are Essential


by Eric Cressey
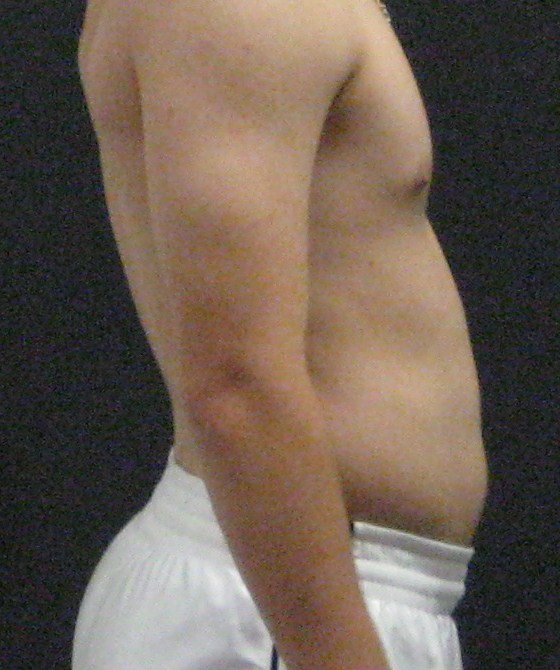
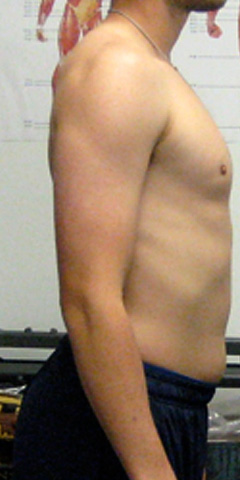
This time of year, I'm doing a lot of assessments on professional baseball players who are just wrapping up their seasons.  One of the biggest issues that I note in just about every "new" athlete I see is a lack of anterior core control. In other words, these athletes sit in an exaggerated extension pattern that usually looks something like this:
APT
And, when they take their arms overhead, they usually can't do so without the ribs "flaring" up like crazy.
This is really just one way an athlete will demonstrate an extension posture, though. Some athletes will stand in knee hyperextension. Others will live in a forward head posture. Others may have elbows that sit behind their body at rest because their lats are so "on" all the time.
latsPosture
This isn't just about resting posture, though; most of these athletes will have faulty compensatory movement patterns, too. Once we've educated them on what better posture actually is for them, we need to include drills to make these changes "stick." Anterior core drills - ranging from prone bridges, to positional breathing, to dead bugs, to reverse crunches, to rollouts/fallouts - are a great place to start. Here's why they're so important:
1. Breathing
The muscles of your anterior core are incredibly important for getting air out. The folks at the Postural Restoration Institute often discuss how individuals are stuck in a state of inhalation, with each faulty breath creating problematic accessory tone in muscles like scalenes, lats, sternocleidomastoid, pec minor, etc. These muscles aren't really meant to do the bulk of the breathing work; we should be using our diaphragm. Unfortunately, when the rib cage flies up like we saw earlier, we lose our Zone of Apposition (ZOA), a term the PRI folks have coined to describe the region into which our diaphragm must expand to function.
Zone-of-Apposition
(Source: PosturalRestoration.com)
Bill Hartman has a great video demonstrating good vs. bad breathing here:

Step 1 is to get the ribs down and pelvis into some posterior tilt to reestablish this good zone. Step 2 is to learn how to breathe in this position, emphasizing full exhalation.
Step 3, as you may have guessed, is to strengthen these "newly rediscovered" patterns with good anterior core training.
2. Resisting extension.
This one is the most obvious benefit, as the muscles of the anterior core directly combat too much arching of the lower back. If you aren't controlling excessive lumbar extension, it's only a matter of time until you wind up with lower back irritation - whether it's just annoying tightness, a stress fracture, a disc issue, or something else.
3. Better force transfer and lower back injury risk reduction.
The research on core function is pretty clear: its job is to transfer force between the lower and upper body. Spine expert Dr. Stuart McGill has spoken at length about how spine range of motion and power are positively correlated with injury risk. In other words, the more your spine moves (to create force, as opposed to simply transferring it), the more likely you are to get hurt. How do you prevent your spine from moving excessively? You stabilize your core.
4. Indirect effects on rotary stability.
For a long time, I looked at control of extension as "separate" from control of rotation at the spine. In other words, we did our anterior core drills to manage the front of the body, and our chops, lifts, side bridges, etc. to resist unwanted rotation. However, the truth is that these two approaches need to be treated as synergistic.
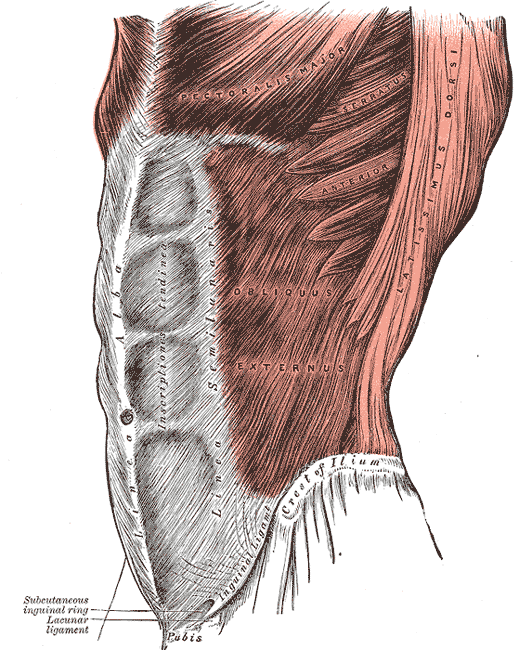
As an example, every time I've seen an athlete come our way with an oblique strain, he's sat in an extension posture and had poor anterior core control - even though an oblique strain is an injury that occurs during excessive rotation. All you need to do is take a quick glance at the anatomy, and you'll see that external obliques (like many, many other muscles) don't function only in one plane of motion; they have implications in all threes - including resisting excessive anterior pelvic tilt and extension of the lower back.
Gray392
What this means is that you can't simply ignore coaching in one plane when you think you're training in another one. When you do your chops and lifts, you need to prevent lumbar hyperextension (arching) . And, when you do your rollouts, you can't allow twisting as the athlete descends. Finally, you can add full exhales (a predominantly anterior core challenge) to increase the difficulty on rotary stability exercises.
5. Improved lower extremity function and injury risk reduction.
Lack of anterior core control directly interferes with lower extremity function, too. If the pelvis "dumps" too far forward into anterior tilt, the front of the hip can get closed down. As I described at length here, this can lead to hip impingement.
With a squat variation, while some athletes will stop dead in their tracks with this hip "block," others will slam into posterior tilt to continue descending. This is the "butt wink" we've come to see over and over again in lifting populations. When neutral core positioning is introduced and athletes also learn to manage other extension-based compensations, the squat pattern often improves dramatically. This can "artificially" be created transiently elevating the heels, turning the toes out, or by having an athlete hold a weight in front as a counterbalance.
Additionally, athletes in heavy extension patterns often carry their weight too far forward, throwing more shear stress on the knees during lunging and squatting. The more we can keep their weight back to effectively recruit the posterior chain, the better.
6. Improved shoulder function and injury risk reduction.
The lats can be your best friend and worst enemy. On one hand, they have tremendous implications for athletic performance and aesthetics. On the other hand, if they're "on" all the time (as we often see in extension-based postures), you can't get to important positions with the right movement quality. Overactive lats will limit not only shoulder flexion (overhead reaching), but also upward rotation of the shoulder blades. I covered this in quite a bit of detail in Are Pull-ups THAT Essential?. Moreover, with respect to elbow function, overactive lats can be a big issue with allowing throwers to get true external rotation, as I discussed here:
If you're using your lats as an "all the time" core stabilizer, you aren't just at risk of extension-based low back pain, but also problems at the shoulder and elbow. If you can get your anterior core control under control and normalize the length and tone of the lats, your "healthy exercise pool" for the upper body expands dramatically. Getting overhead is easier, and you'll feel stronger in that position. The same goes for external rotation; not surprisingly, pitchers always say that their lay-back feels smoother after soft tissue work on the lats, as an example.
Wrap-up
These are just six benefits of training the anterior core, but the truth is that they could have been broken down in much more detail as they relate to specific injuries and functional deficits. If you're looking to learn more on this front - and get a feel for how I like to train the anterior core - I'd encourage you to check out my presentation, Understanding and Coaching the Anterior Core.

Seated Dumbbell Lateral Raises

For Firm and Shapely Shoulders


Seated Dumbbell Lateral Raises - For Firm and Shapely ShouldersBy Stephen E. Alway, Ph.D.
Illustrations by William Hamilton, CMI
Well-shaped shoulders are not always that easy to develop, and shoulder training is complicated because shoulders can be vulnerable to injury. However, most shoulder injuries arise from poor exercise form in shoulder, chest or back exercises. Nevertheless, the risk for obtaining shoulder injuries can be minimized by paying careful attention to exercise form. Seated dumbbell raises will activate the deltoid muscle1 of the shoulder while minimizing injury risks, and a few months of effort will reshape and firm the entire muscle.

Overview of the Deltoid Muscle

Although they are not truly separate heads, the deltoid muscle does originate from three regions on the bony portions of the shoulder, and each region differs in function.     The anterior fibers of the deltoid begin on the lateral part of the clavicle (collar bone).2 These fibers flex the humerus bone at the shoulder (bringing the humerus bone forward), and also medially (internal) rotates the humerus bone at the shoulder.2 The posterior fibers of the deltoid are activated to some degree in seated dumbbell raises, if they are done with the body slightly bent forward. The fibers in the posterior part of the deltoid begin on the upper and posterior side (spine) of the scapula.2 The posterior fibers of the deltoid extend the arm by pulling the humerus bone of the upper arm posteriorly. The medial fibers of the deltoid are most strongly activated by seated dumbbell lateral raises.3 The medial fibers of the deltoid are attached between the starting positions of the anterior and posterior deltoid fibers with attachments along the acromion of the scapula.2 The fibers from this muscle converge to anchor to the anterior (front) and upper portion of the humerus bone of the upper arm.2 The medial fibers primarily produce abduction of the humerus (raising the humerus away from the side of the body). This is the primary activator of dumbbell lateral raises.3
Although the seated dumbbell raise is a deltoid exercise, it also activates part of the delicate rotator cuff musculature. The supraspinatus muscle of the rotator cuff begins near the medial side of the scapula bone and runs over to the superior part of the head of the humerus bone of the arm.2 The deltoid muscle covers the tendon of the supraspinatus muscle. Along with the lateral fibers of the deltoid, the supraspinatus acts to abduct the humerus. The supraspinatus muscle is most active between positions where the arm is nearing a position that is parallel to the floor4 in the dumbbell lateral raise. The other important function of the supraspinatus is to hold the head of the humerus into the glenoid cavity (shoulder socket) of the scapula. It is really the only muscle of the rotator cuff that does not have a rotational function.2

Seated Dumbbell Lateral Raise

Seated Dumbbell Lateral Raises - For Firm and Shapely ShouldersThis exercise activates the medial deltoid and supraspinatus strongly and the posterior deltoid is moderately activated as a result of leaning slightly forward.If one bends over excessively, it will convert to a posterior deltoid exercise, so selecting the correct starting position is important.
1. Select a set of light dumbbells and sit at the end of a flat bench with your feet firmly on the floor. Hold the dumbbells so that your palms face each other and your arms hang straight down towards the floor. Bend over just slightly (about 5 degrees). This will be your starting position.
2. Keep your torso stationary. Bend your elbows just slightly and begin to lift the dumbbells upwards (shoulder abduction).
3. Continue to lift the dumbbells upwards, but as you raise the weights, turn the hands slightly so that the little finger side of the hand is tilted upwards towards the ceiling as if you were pouring water in a glass.
Seated Dumbbell Lateral Raises - For Firm and Shapely Shoulders4. Raise the dumbbells until your upper arms are parallel to the floor. There is no need to lift higher than this, otherwise the upper fibers of the trapezius, upper back muscle, and rotator cuff muscles will be doing the work, rather than your deltoid muscles.
5. Slowly control the descent of the dumbbells towards the floor. Do not pause at the bottom, but immediately begin the lift upward. This will keep the deltoid fibers firing throughout the set. After you have completed 12-15 full repetitions, you can rest 60 to 90 seconds before starting your next set. Start with two sets and then you can add a third set after a couple of weeks of training.
The shoulder joint is vulnerable to injury if the exercise is done quickly, or if the weight is jerked upward in a quick fashion. It is more important to isolate the muscle regions of the shoulder and work in slow, smooth movements and with relatively strict movements. If you are careful in your exercise form and diligent in your training over the next few months, you will be surprised at how effective this exercise can be.
Your shoulders and particularly the medial part of the deltoid will be activated by the seated lateral raise6 and take on a whole new firmness that you will want to show off!

References

  1. Parry JS, Straub R, Cipriani DJ: Shoulder- and back-muscle activation during shoulder abduction and flexion using a Bodyblade Pro versus dumbbells. J Sport Rehabil 2012;21:266-272.
  1. Moore, KL and AF Dalley. Clinically oriented Anatomy. Fourth edition. Baltimore, Lippincott Williams & Williams. 1999; pp. 690-698.
  1. Jakobsen MD, Sundstrup E, Andersen CH et al: Evaluation of muscle activity during a standardized shoulder resistance training bout in novice individuals. J Strength Cond Res 2012;26:2515-2522.
  1. Reed D, Halaki M, Ginn K: The rotator cuff muscles are activated at low levels during shoulder adduction: an experimental study. J Physiother 2010;56:259-264.
  1. Reinold MM, Macrina LC, Wilk KE et al: Electromyographic analysis of the supraspinatus and deltoid muscles during 3 common rehabilitation exercises. J Athl Train 2007;42:464-469.
  1. Youdas JW, Arend DB, Exstrom JM et al: Comparison of muscle activation levels during arm abduction in the plane of the scapula vs. proprioceptive neuromuscular facilitation upper extremity patterns. J Strength Cond Res 2012;26:1058-1065.

Boost your total body strength with clubbells

 http://www.menshealth.co.uk/building-muscle/get-big/boost-your-total-body-strength-with-clubbells


Scott Shannon, author of The Big Book of Clubbell Training, gives you a do-anywhere full-body workout guaranteed to build muscle. Do 3-4 sets of 6-8 reps, resting 30 seconds between sets
Barbarian squat

Barbarian squat

A) Hold the club in front of you, with your arms extended.
B) Raise the club above your head.
C) Lower the club until your arms are parallel to the floor, then bend at your hips and knees to drop slowly into a squat. Straighten your legs to return to the start. “Holding the weight in front of you works your abs more than a traditional squat,” says Scott Sonnon, author of The Big Book of Clubbell Training.
Front-clean

Front-clean

A) Holding the club in both hands, drop into a squat so the end of the club rests on the floor. “Start with the weight slightly behind your feet to create the momentum to engage your core,” says Sonnon.
B) Stand and lift the club up over your head with your arms extended.
C) Keeping it above your head drop into a squat then bring it down to the start. Big legs and shoulders will be yours.
Bruiser push-press

Bruiser push-press

A) Hold the club handle, one hand higher than the other with the weighted end resting on your shoulder.
B) Lower into a squat. Drop as deep as you feel is comfortable.
C) Lower the weight to your other shoulder and repeat. Rise up and push the weight above your head. “Lock your elbows at the top,” says Sonnon. Works your abs as well as sit-ups.
Bruiser big wheel

Bruiser big wheel

A) Hold the club with your left hand on the handle and your right hand above it. Keep your left elbow tucked in and your right forearm parallel to the floor.
B) Drive from the bottom arm and rotate into a military press above your head.
C) Drop your right arm to lower the weight to the other side. “Don’t rotate your body,” says Sonnon. This develops your arms and improves coordination.
Front swipe

Front swipe

A) Lower into a squat and hold the club between your legs. “Lock your elbows to give yourself distance from the club,” says Sonnon.
B) Straighten your legs and push your hips for ward to gain momentum to swing the club over your shoulder. Bring it back to the start and go again, this time over the other shoulder. Now chopping wood will be a breeze.

Clockwork squat

A) Swing the club back and forth to warm up your back.
B) At the top, hoist the club onto your shoulder. “On your trap not the bony part,” says Sonnon. Lower to a squat.
C) Rise up then let the club swing down from your shoulder.
D) Repeat on your right shoulder. It’s great for legs and upper body.
Two-handed mill

Two-handed mill

A) Swing the club in front of you as if you were hitting a cricket ball to the left. “Keep your back straight and bend at the knees,” says Sonnon.
B) On the upswing to the right, hoist it up and over your right shoulder.
C) Twist your body left and bring the club back down to the right hand side. Repeat the movement backwards. You’ll be hitting sixes all summer. 
Clubbells available at UKkettlebells.com and Rawfit.co.uk from £32.50.

Words: Ray Klerck and Scott Sonnon; Photography: Adrian Weinbrecht; Model: Ben Kirby at Flair Talent

Работа над подвижностью: Вы делаете её неправильно (и слишком долго)


Мой приятель, пауэрлифтер, когда-то спросил меня, какие корректирующие упражнения и упражнения на подвижность я делаю регулярно. Я пожал плечами. Я готов признаться: Я мало работаю над подвижностью.
Я знаю, знаю, многие из Вас вероятно думают, что это - абсурд, думать о том, что я эксперт в этой теме. Как я могу быть так хорошо сведущим в предмете, на который я трачу меньше десяти минут на каждой тренировке? Позвольте мне объяснить.
Для чего по-настоящему нужна подвижность
Подвижность - это позиция и правильность углов. Сохранение правильных углов - это основа надлежащего выполнения движения, чтобы не быть похожим на калеку. Конечно же проще сказать, что положение Вашего тела отстой и поэтому Ваши движения отстой, хотя это тоже может быть правдой.
Это означает, что ваши мышцы забиты, они тянут Ваш скелет в странную позицию. Когда Ваш скелет находится в этих странных положениях, много мышц не могут работать правильно, что ведет к их неправильному
использованию , чтобы выполнить движение. Это удлинит Ваш путь к успеху и с большой вероятностью приведет к серьезной травме.
Работа над подвижностью, в идеале, должна быть сосредоточена на восстановлении потерянных диапазонов движения и возвращения Вашим мышцам не забитого состояния. Таким образом Вы можете переучить их так, как они должны работать. Это означает, что подвижность невероятно важна для новичков, особенно новичков преклонного возраста.
Мне потребовались три месяца, чтобы научиться приседать
Чем Вы старше, тем дольше Ваше тело будет развивать новые привычки.
Поэтому, это займет немного больше времени, чтобы сломать старые привычки. Bсе же не волнуйтесь. Преодолевая некоторые редкие генетические проблемы или часто повторяющиеся сильные физические травмы, большинство проблем с подвижностью может быть решено через несколько месяцев. Серьезно.
Как многие из Вас, когда я впервые начал тренироваться, я испытал много проблем, пытаясь достичь полную глубину в моих приседаниях и получения хорошего положения рук в оверхэдах. Я потратил много времени на разминке, сидя в нижней точке и пытаясь развернуть бедра. Я также потратил много времени с трубой ПВХ, чтобы открыть мои плечи. Я долго растягивал сгибатели бедра, лежа на полу с ногами на стене, чтобы растянуть мои приводящие и перепробовал целую кучу других штук.
Если Вы заинтересовались, то я опишу легкую шпаргалку подвижности, обрисовывающую в общих чертах то, что я сделал, но это немного выходит за рамки этой статьи. Дело в том, что мне потребовались примерно два - три месяца, чтобы достигнуть точки, где я мог просто принять положение седа, держа колени наружу, спину прямо и грудь вверх.
Активная подвижность против пассивной подвижности
В физиотерапии мы используем термины - активный диапазон движения (AROM) и пассивный диапазон движения (PROM), чтобы определить различие между способностью принять позицию через небольшое внешнее влияние (или если мануальный терапевт вручную или при помощи аппарата для растяжки\подвижности изменит Вашу позицию), что является пассивным , и способность принять это положение самому, используя правильные мышцы, чтобы достигнуть этого положения и это будет активный. Как только Вы возвращаете способность активно выполнять движение, упражнения пассивного диапазона движения больше не используют, потому что в итоге они уже не так сильно влияют на Вас.
Итак, как это затрагивает приверженца каждодневных тренировок? Различие между AROM и PROM подобно различию между тем, что я называю активной подвижностью и пассивной подвижностью. Пассивная подвижность - способность принять положение независимо от того, как Вы делаете это. Возможно Вы используете растяжку с резиной ( floss band ) или задерживаетесь в стойке. Возможно Вам просто помог приятель, чтобы занять правильное положение.
Неважно какие приспособления вы используете, пассивная подвижность означает, что принимаете положение Вы с помощью, которая позволяет Вам достигать диапазонов движений, которые Вы не способны принять сами. Реальная цель состоит в том, чтобы достигнуть этого и затем превратить в активную подвижность.
Увеличение подвижности означает, что Вы должны работать с не такими большими весами
Эта часть расстраивает много людей. В большинстве случаев, если Вы были сильны, но неподвижны, то при увеличении подвижности Вы, первоначально,
будете чувствовать себя слабее. Не то, чтобы Вы потеряли силу в диапазонах, к которым Вы привыкли, получается так, что теперь у Вас есть дополнительные диапазоны движения в Ваших суставах, которые Вы никогда не тренировали.
Самый умный способ справиться с этой ситуацией является также самым простым: сбавьте свои веса и постепенно наращивайте. Это не займет столько же времени, как если бы Вы начали наращивать силу с нуля.
Большая ошибка, которую я вижу, являются люди, которые боролись с подвижностью полчаса, пытаясь увеличить диапазон лодыжки, бедра или позвоночника, а потом идут и пытаются использовать этот новооткрытый диапазон движения для поднятия тех же весов, что и до работы над подвижностью. Это не будет подход, которым вы сорвете куш, скорей всего, вы просто потеряете всю подвижность, над которой работали.
Надлежащая механика усилит надлежащие выполнение движения, которая задействует полный диапазон движения и оптимального положения. Если Вы мобилизуете себя, чтобы достигнуть этих положений, но после этого немедленно попытаетесь нагрузить Ваше тело, то после этого вы сможете использовать только половину Вашего новооткрытого диапазона, угадайте почему? Ваше тело попытается вернуться к Вашей старой, ужасной механике. Почему? Потому что Вы не позволили ему изучить что-то другое.

Работа над подвижностью: Вы делаете её неправильно
Я постоянно бываю в нескольких спортзалах в своей области - в некоторых из- за предпочтения, в других из-за временных ограничений. На днях, когда я был в своем любимом зале, я слышал как несколько тренеров, говорили о подвижности и работой над ней. Я слышал, что одна из них сказала, как она начала делать тридцати - сорока минутную работу над подвижностью, чтобы сделать двадцати или тридцатиминутную тренировку.
Я осознал, что подвижность - это все, что они хотят сейчас, но по мне - это просто заскок и кто-то может пострадать из-за её популярности. Подвижность невероятно важна, но это - также очень ранний шаг на пути к оптимальной работе. Двадцать минут работы над подвижностью, когда Вы только начинаете, это конечно необходимо, но если у Вас нет сумасшедших проблем, Вы не должны проводить больше времени работая над подвижностью, чем тренируясь. Если Вы оказались на этом пути, то скорей всего Вы делаете это зря.
Выделяйте время для работы над подвижность и чтобы достигнуть надлежащей механики. Как только Вы достигли этого, лучший способ сохранить механику - это использовать её. Если Вы не новичок и Вам все еще требуются двадцать минут для работы над подвижностью, только чтобы начать приседать, то пора хорошо пересмотреть Вашу тренировку. Вам скорей всего не понравится то, что вы увидите. 

WOULD YOU SURVIVE A ZOMBIE APOCALYPSE?

zombieapozalypse

The way I see it, when the Zombies finally come there will be two types of people in this world of ours. Those that will make it and those that surely will not. Some of us will have our brains snacked on like a left over pot roast and some of us will be strong enough, fit enough, and brave enough to take up arms against the undead.

When the tsunami created by meteor strikes hits us, just like old Triceratops, some will sink and some will swim. When the aliens come to probe at their leisure, some of us will fight off the “phone home finger” and some will be left physically and emotionally scarred. The good news is that we can choose what to do between now and catastrophe to better the odds.

Step 1: Get Stronger

E.T.’s spindly frame may seem like a piece of cake to overpower but given his mind control abilities it may be tougher than you think. You will need to develop a base level of strength. If you are new to strength training, get a coach and get to work. Start with the basic multi joint movements like squatsdead liftspresses, and pulling exercises. These relatively simple movements will help you to gain strength and because of the huge hormonal responsethey are capable of producing they will help you gain muscle mass to make you appear larger and more intimidating when wild packs of dogs begin taking over the suburbs. Once these movements have been mastered and considerable amounts of total body strength have been gained, consider adding explosive more complex movements like Power Cleans to further improve your training and abilities.

Step 2: Train Agility

Everyone thinks Zombies are slow because Hollywood has traditionally portrayed them as so. I’m not buying it people! I have seen the movie “World War Z” and those things can move! Possessing the ability to quickly alter your direction of movement – left to right, forward to backward, zig to zag – will be of the utmost importance. The agility drill that you incorporate into your program need not be complicated. Set up 4 cones in a square 10 yards apart, give or take. Start at 1 corner and sprint to the first cone. Make a sharp 90 degree turn to the next cone and repeat 2 more times until you end up back where you started. Alternate directions each rep and do anywhere between 5 and 20 reps depending on your current abilities. Change up the movements to shuffling, backpedaling, etc. You are only limited by your imagination or what you can find on Google when it comes to agility drills. Just keep the distances short and focus on dropping the center of gravity by bending the hips and knees when changing directions.

Step 3: Don’t Ignore the Conditioning

The distance one may need to cover in a relatively short period of time is impossible to predict. But chances are it won’t be short and you will be carrying everything you hold dear with you. So get off the elliptical and spend some time outside running the way the good Lord intended. Take a heavy pack and climb the nearest mountain from time to time. Just don’t overdo the long slow distance training, that would interfere with step 1. Once or twice a week for about 20-60 min should do it. Spend most of your time while conditioning doing interval training. So instead of always just going out for a leisurely 2 mile run, do eight 400m sprints with 1 or 2 min rest between each. This will allow you to train a much faster pace and will have many of the benefits of long slow distance training without the strength zapping effects of the longer slower training.

Step 4: Train Natural

If the car needs to be lifted off a baby after the F8 Tornado strikes, you will not have time to search through the debris to find your trusty weight belt, lifting shoes, knee wraps, wrist straps, and iPod. Get used to training without all of these ergogenic aids and get strong without them. 

Step 5: Toughen Up

I once attempted to send a group of athletes on a 3 mile run that involved climbing an unpaved trail to the top of a hill. After prescribing this fantastic “end of the world survival training scenario” to 1 particular athlete, I was informed that they would not be participating because they were petrified of coming back down the trail once they reached the top. Let me tell you something, when the rabies infected grizzlies come for us all, they are not going to care if the terrain is flat and paved or not.
Can’t swim? Afraid of the water? Just afraid it will mess up your hair? It may be the only safe place to hide when Robots take over the world. Everyone knows their electronics will fail when they come in contact with water so you had better start getting wet from time to time. Face your fears when it comes to training and overcome them.

As I said before, when the metaphorical $!#% hits the fan, some of us will make it and some will not. There is no time to waste. Go to Trainheroic.com today and learn how to fend off the inevitable onslaught of vampires.

About the Author

Jason Salyer

Jason Salyer

Jason Salyer joined Train Heroic as the Dynamic Athlete coach in December of 2013 after being the head strength and conditioning coach at the University California Riverside and assisting at Wake Forest University under strength & conditioning coach Ethan Reeve. 
Sayler is a member of the National Strength and Conditioning Association (NSCA), and in his free time enjoys camping, climbing, weightlifting, fishing, hunting, riding offroad motorcycles, and watching movies.


А вы бы остались в живых во время зомби апокалипсиса?
Вижу я это следующих образом, когда, наконец, появятся зомби, в нашем мире будет два типа людей. Те, кто справятся с этой проблемой и те, кто нет. Мозгами некоторых людей закусят, как куском тушеного мяса, а некоторые из нас окажутся достаточно сильными, достаточно физически подготовленными и храбрыми, чтобы поднять руки против мертвяков.
Когда цунами, созданное ударом метеора, ударит по нам, как по старым трицератопсам, кто-то утонет, а кто-то будет плавать. Когда прилетят пришельцы, чтобы исследовать нас на досуге, некоторые будут драться, а некоторые окажутся эмоционально и физически травмированы. Хорошая новость заключается в том, что мы можем выбирать, что делать между сегодняшним моментом и катастрофой для увеличения шансов выживания.
page1image6632
Шаг 1: Станьте сильнее.
Вам необходимо будет развить базовый уровень силы. Если вы новичок в силовом тренинге, найдите тренера и работайте вместе с ним. Начните с базовых многосуставных движений, таких как приседания, становые тяги, жимы и подтягивания. Эти относительно простые движения помогут вам нарастить силу. Из-за огромного гормонального отклика, который они способны вызывать, они помогут вам нарастить мышечной массы, чтобы казаться крупнее и пугающе, и это пригодиться, когда стаи диких собак начнут занимать пригород. Как только вы освоите эти движения и нарастите значительную силу вашего тела, рассмотрите добавление более сложных, взрывных движений, таких как Power Cleans для дальнейшего улучшения ваших способностей и тренировок.
Шаг 2: Тренируйте проворство.
Все думают, что Зомби медленные, потому что Голливуд традиционно их так изображает. Я не куплюсь на это! Я видел фильм «World War Z» и эти штуки могут двигаться быстро! Владение способностью быстро изменять направление вашего движения слева направо, обратно, зиг загом будет крайне важно. Упражнения на проворство, которые вы включите в свою программу, не должны быть сложными. Установите 4 конуса квадратом на расстоянии 10 ярдов, плюс минус.
Начните с первого угла и бегите до первого конуса. Совершите резкий поворот на 90 градусов по направлению к следующему конусу и повторите 2 раза, пока вы не окажитесь там, где начали. Сменяйте направление каждое повторение и выполняйте порядка 5-20 повторений, в зависимости от ваших текущих способностей. Изменяйте движения, притормаживайте, останавливайтесь и т.д. Вы ограничены только воображением или тем, что вы сможете найти в Google, когда речь идет о тренировке проворства. Просто сохраняйте дистанцию короткой и концентрируйтесь на снижении центра тяжести за счет сгибания бедра и колена, когда изменяете направление.
Шаг 3: Не игнорируйте кондиционную подготовку.
Дистанцию, которую необходимо будет преодолеть за относительно короткий промежуток времени, невозможно предсказать. Но скорее всего, он не будет короткий и вам придется нести все, чем вы дорожите на себе. Поэтому слезайте с эллипса и потратьте время на бег, как завещал господь. Возьмите что-нибудь тяжелое и поднимайтесь на ближайшую гору время от времени. Просто не переусердствуйте с тренировками на медленную длинную дистанцию, так как они вмешаются в первый шаг. Один или два раза в неделю приблизительно по 20-60 минут будет достаточно. Потратьте большую часть своего времени на выполнение интервальных тренировок. Вместо постоянного неторопливого бега на 2 мили, пробегите 400 метровые спринты с 1 или 2 минутами отдыха между каждым. Это позволит вам тренироваться в гораздо более быстром темпе и предоставит многие преимущества тренинга на длинные медленные дистанции без эффекта уничтожения силы.
Шаг 4: Тренируйся естественно.
Если вам необходимо поднять машину, перевернутую торнадо, чтобы освободить ребенка, у вас не будет времени, чтобы перебрать мусор и найти ваш верный страховочный пояс, тяжелоатлетическую обувь, наколенные бинты, кистевые бинты и iPOD. Привыкайте тренироваться без всех этих вспомогательных приспособлений и становитесь сильнее без них.
Шаг 5: Закаляйтесь.
Однажды я пытался отправить группу атлетов на 3 мили бега, включающие в себя восхождение по грунтовой тропе на вершину холма. После описания этого «фантастического тренировочного сценария конца света» одному атлету, мне сообщили, что они не будут участвовать, потому что ошеломлены возвращением назад после того, как поднимутся на вершину. Позвольте мне сказать кое-что, когда за всеми нами придут инфицированные бешенством гризли, их не будет беспокоить, плоская ли местность или нет.
Не можете плавать? Боитесь воды? Просто боитесь, что это испортит ваши волосы? Возможно, это будет единственное безопасное место, когда роботы захватят наш мир. Все знают, что их электроника придет в негодность при контакте с водой, поэтому вам лучше дружить с водой время от времени. Встречайте свои страхи лицом на тренировке и преодолевайте их.