понедельник, 18 января 2016 г.

Синдром усталости надпочечников: признаки и лечение


 Недостаточность надпочечников или синдром надпочечниковой усталости – это новый для меня термин, ранее я его не встречала. Но это состояние изучается медиками, описываются способы борьбы с ним. Называют его еще синдромом напряжения 21-го века. Что это за синдром, давайте с ним знакомиться.

Что такое надпочечниковая усталость
Этот синдром имеется у 80% людей в мире! Возникает он под влиянием хронического стресса и образа жизни, когда организм пытается избавиться от физического, психологического или эмоционального стресса. В результате стресса, хронического заболевания, у людей могут возникнуть первые признаки появления надпочечниковой усталости.

Первые признаки появления надпочечниковой усталости
Это могут быть

1) Ломота в теле.
2) Трудности с концентрацией внимания.
3) Капризность и раздражительность.
4) Постоянная усталость
5) Гормональный дисбаланс
6) Тяга к сладким и соленым продуктам.
На эти симптомы люди (да и врачи) не часто обращают внимание. А эти симптомы - начало надпочечниковой недостаточности. И они могут быть основной причиной отложения лишнего жира в организме и низкой энергетики организма.

Что надо знать о надпочечниках

1.Надпочечники расположены над почками.
Они очень небольшого размера и являются частью эндокринной системы.

2.Они участвуют в производстве более 50 гормонов.
Многие из них имеют большое значение для жизни.

3.Надпочечники работают в тесном контакте с гипоталамусом и гипофизом в системе.
Она известна как гипоталамо-гипофизарно-надпочечниковая система.

4.Надпочечники играют огромную роль в реакции на стресс.

Как это происходит?

1) Мозг регистрирует угрозу.
2)Надпочечники стимулируют образование гормона адреналина.
Этот гормон помогает реагировать на угрозу, увеличивая приток крови к мозгу, сердцу и мышцам.
3)В коре надпочечников освобождаются кортикостероиды.
Которые направлены на то, чтобы ослабить процессы пищеварения, ответа иммунной системы и других функций, не являющихся необходимыми для немедленного выживания.

5.Надпочечники отвечают за баланс гормонов.
1) Глюкокортикоиды.
Это гормоны, которые обеспечивают баланс сахара в крови, влияют на энергетику и пищевой метаболизм, помогают справиться со стрессом и управляют иммунным ответом. Пример – гомон кортизол.

2) Минералокортикоиды – гормоны, которые поддерживают нормальное давление крови, отвечают за состав крови, сохраняя баланс соли и воды.
Пример – альдостерон.

3) Половые гормоны – эстроген и тестостерон.

4) Адреналин – гормон, который влияет на здоровье сердца, гарантирует, что все части тела получают кровь и превращают гликоген в глюкозу в печени.

Что может вызвать состояние надпочечниковой усталости?
Когда организм не может справиться со стрессом, когда надпочечники не справляются со своими функциями, тогда и возникает состояние надпочечниковой усталости.
Это состояние может приниматься за предшественников других распространенных заболеваний и аутоиммунных болезней.

1.Врачи считают, что усталость надпочечников может быть вызвана следующими причинами
1) Острым стрессом.
Это могут быть смерть близкого человека, развод, операции и др.
2) Воздействие токсинов окружающей среды и другие загрязнения.
3) Длительный стресс, влекущий за собой чувство беспомощности.
Это может быть из-за финансовых трудностей, плохих отношений или условий на работе или других условий.
4) Недостатка сна
5) Плохого питания.
6) Отсутствия физических упражнений.

Симптомы усталости надпочечников
1. Усталость с утра, проблема проснуться.
2. Депрессия
3. Мышечная слабость
4. Плохое внимание
5. Потеря костной ткани
6. Воспаление
7. Усиление симптомов аллергии
8. Проблемы со сном
9. Раздражительность
10. Усталость
11. Желание есть сладкое
12. Выпадение волос
13. Увеличение веса
14. Напряжение мышц

Если вы отмечаете у себя эти симптомы усталости надпочечников, то знайте, что есть естественные способы их лечения и поддержки надпочечниковой системы.

Что можно предпринять для исцеления усталости надпочечников?

1.Лечение надпочечников усталости должно включать в себя следующее:
1) Снижение нагрузки на тело и ум.
2) Устранение токсинов.
3) Рекомендуется избегать негативного мышления.
4) Только позитивные мысли.
5) Питание здоровой пищей

Питание при усталости надпочечников

1. Продукты, которые надо избегать.

1) Кофеин.
Он может помешать циклу сна и затруднить восстановление надпочечников.

2) Сахар и подсластители.
Исключите искусственные подсластители, фруктозу, кукурузный сироп. Избегайте сладких продуктов, крупы, конфет, сладостей. Используйте свежий мед и стевию.

3) Избегайте продуктов, обработанных в микроволновой печи.

4) Исключите гидрогенизированные масла, такие как соевое, рапсовое, кукурузное, подсолнечное.
Они могут вызвать воспаления в организме, в том числе и в надпочечниках.
Используйте хорошие жиры - органическое топленое масло, оливковое масло, кокосовое масло.

2. Продукты полезные для здоровья надпочечников
Перечислю наиболее полезные продукты для надпочечников, которые ученые называют суперпродуктами.

1) Кокос
2)Оливки
3) Авокадо
4) Морская соль
5)Крестоцветные овощи (цветная капуста, брокколи, брюссельская капуста и др.).
6) Жирная рыба
7) Цыпленок и индейка
Орехи (грецкие, миндаль)
9) Семена (тыква, чиа, льна)
10) Морские водоросли
Эти продукты помогают преодолеть недостаточность надпочечников, потому что они богаты питательными веществами, такими как здоровые жиры и клетчатка, и с низким содержанием сахара.

Какие БАДы помогут преодолеть усталость надпочечников
Вот перечень БАДов, которые помогают при усталости надпочечников.

1. Ashsagandha (Ашваганда)
2. Рыбий жир (Омега 3)
3. Магний
4. Витамин В5
Витамин В5 стимулирует производство гормонов коры надпочечников.

5. Витамин В12
6. Витамин С (натуральный, не аскорбиновая кислота)
7. Витамин D3
8. Цинк

Эти пищевые добавки могут улучшить ваше здоровье. Но с приемом минералов и витаминов надо быть осторожными, больше о них знать. Так как слишком много лжи вокруг информации о них.
Но вы можете уделить больше внимания приему продуктов, содержащих эти минералы и натуральные витамины.

Для нормализации работы надпочечников необходимо снижать уровень стресса
Что для этого надо делать? В литературе встретила рекомендации, делюсь ими с вами и рекомендую им следовать.

1. Когда чувствуете, что устали – отдыхайте.
2. Сон 8 – 10 часов ночью.
Ложитесь спать в 10 – 11 часов вечера и не нарушайте биологические ритмы сна и отдыха.
3. Живите так, чтобы каждый день у вас был смех, который хорошо снижает стресс.
4. Питайтесь здоровой пищей и регулярно, исключите сахар и кофеин из своего питания.
5. Делайте регулярно физические упражнения.
Даже умеренные физические упражнения. Знайте, что ходьба может помочь.
6. Избегайте злых и недовольных людей.
Старайтесь вести беседы только с положительно настроенными людьми.
7. Найдите время для себя.
Делайте расслабляющие маски, принимайте успокаивающие ванны.
8. Ищите поддержку (у психолога, друзей), когда случаются травмирующие переживания.
9. Ведите «разговор с самим собой» в течение минуты. Эти слова могут успокоить тело.
Слова, которые мы говорим, имеют большое влияние на наш организм и нашу способность его исцелять. Будьте добры к себе.
10. Старайтесь избегать говорить негативные вещи себе и другим.
Старайтесь выбрать в свое окружение позитивных людей и сами будьте позитивным к себе и другим.

Как быстро можно восстановить недостаточность надпочечников
Восстановление усталости надпочечников может занять некоторое время. Ведь болезни появляются не сразу, они медленно развиваются, но быстро появляются. Восстановление также занимает определенное время.

1.Ученые – медики установили, что восстановление может длиться
- 6 – 9 месяцев при малой усталости надпочечников
- 12-18 месяцев для умеренной усталости
- до 24 месяцев для тяжелой усталости надпочечников.
Медики рекомендуют сделать твердые изменения в питании и образе жизни для достижения устойчивых результатов. Питайтесь правильно, спите достаточно, делайте физические упражнения, живите радостно и будьте здоровы!

Rules of Posture

  by Eric Cressey

Today's guest post comes from Physical Therapist Chris Leib. Enjoy! -EC
chrisl
Recently, there has been plenty of discussion regarding the efficacy of the idea of posture and whether attempting to improve it is a useful tactic for decreasing pain. This discussion has been perpetuated by research indicating that there is a surprisingly poor correlation between pain and posture. The evidence seems to be pretty damning on this topic, which raises questions about whether looking at pain as an outcome measure actually makes sense when discussing posture. Moreover, even more basic questions still need to be asked regarding the very definition of posture.
When discussing these inquiries, it’s important to understand that the current research has demonstrated that pain is far more complex than previously thought, and that a single model of physiological stress will not be sufficient to demonstrate why some people experience pain and some do not. A discussion of pain science is too complicated to be brushed over in the present discussion; however, it must be understood:

Just because proper posture hasn’t been highly correlated with pain doesn’t mean it’s not important. 

When looking deeper into the studies cited above, it becomes clear that there is not a consensus definition of posture. Instead of looking at the constantly changing nature of posture, many of these studies defined posture by using various markers of static structure. Taking this fact into consideration, one must ask the following question: If no agreement is reached as to what proper posture is, how can it be well studied?
In my experience over the past decade as both a strength and conditioning professional and physical therapist, my own definition of proper posture has evolved considerably. Utilizing these years of clinical experience and the current research, I would like to set forth the following 4 Rules of Posture.
Rule #1: Posture May Not Cause Pain, But Improving Posture Can Help to Decrease Pain.
Although there is poor evidence that various definitions of poor posture are associated with increased pain, it’s obvious through clinical assessment that a change in posture can decrease pain when it is present. Go to any physical therapy clinic and you will find patients in pain getting education regarding postural changes that improve their symptoms on the spot. Pain can be a great indicator of what the body feels is a stable position. Often, immediate positive changes are made just by getting the person into a different position.
A common example is the individual with neck pain who has pain when sitting slouched with his or her head forward. Frequently, a combination of education and ergonomic adjustment can abolish this excruciating pain in shorter order. Now, this isn’t to say that the quick fix always “cures” the problem, but it does gives the person more feelings of control over making change with regard to their pain, which actually goes a long way. This sense of control has been demonstrated to be a positive indicator of recovery from and the ability to cope with chronic pain .
Rule #1 is the only rule in which we’ll discuss pain. As I noted, the research on pain indicates that the science is far too complex to discuss isolated associations. Clinically, pain can be a good feedback indicator of postures and positions that a person’s body finds unsafe. This feedback helps determine the best positions for the person to train in and, with time, adopt.
The subsequent three rules will discuss posture in relation to functional and physical performance-based movement quality.
Rule #2: Support Yourself Actively and Passively.
This rule will illustrate the difference between passive and active postural stability, as well as the appropriate balance that’s needed between the two. Let’s get some definitions out of the way first.
Generally speaking, passive stability is using something other than balanced muscular effort to adopt and maintain a desired position. Passive stability can either be anatomical or external in nature. Anatomical passive stability utilizes one’s passive stability structures such as joint capsules, cartilage, and ligaments to find stability in a position, while external passive stability utilizes an external item for extra support when attempting to maintain a position. When dealing with passive stability of any type, the common denominator is finding a stable position while decreasing relative muscular effort.
Active postural stability, on the other hand, refers to the use of muscles to maintain a desired position. In order to optimize muscle activity during static and dynamic postures, the attachments of the muscles must be positioned so that the muscles contract in a balanced way. In addition, the position should minimize energy expenditure against the pull of gravity.
For clarification on how best to determine optimal positioning based on the above definitions, let’s illustrate a common static and dynamic example.
i. Static postural stability: Sitting in a chair
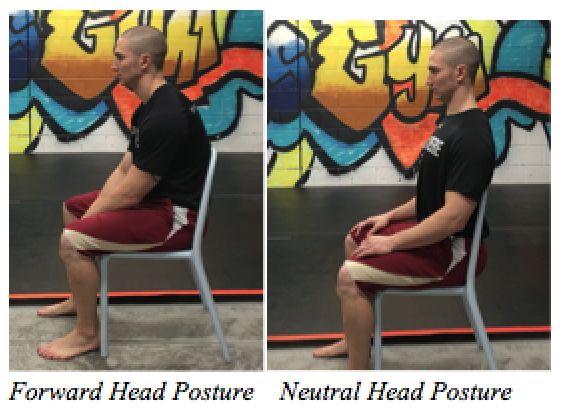
No matter what, this common static position will never be ideal for postural stability due to the severe muscle imbalances inherent to sitting with your hips and knees in 90 degrees of flexion. However, sitting with the head and shoulders substantially in front of the line of gravity makes a bad situation even worse. The further forward the head and shoulders travel out in front of this line, the more effort the muscles that hold up the head and trunk must exert. More importantly, because the muscles in this case are overstretched and in a poor position to function in a balanced way, less resilient structures such as ligaments and joint capsules/cartilages are forced to pick up the slack.
Thus, the most optimal default position in sitting is the one that minimizes the effort of your muscles and stress to your other more passive structures by allowing the head and shoulders to balance effortlessly in the line of gravity. (Feel free to take this opportunity to observe your own posture. Are your head and shoulders neatly stacked or forward like the pass from the 2000 Music City Miracle?)
NeckPosture
ii. Dynamic postural stability: Deadlifting a heavy load from the ground
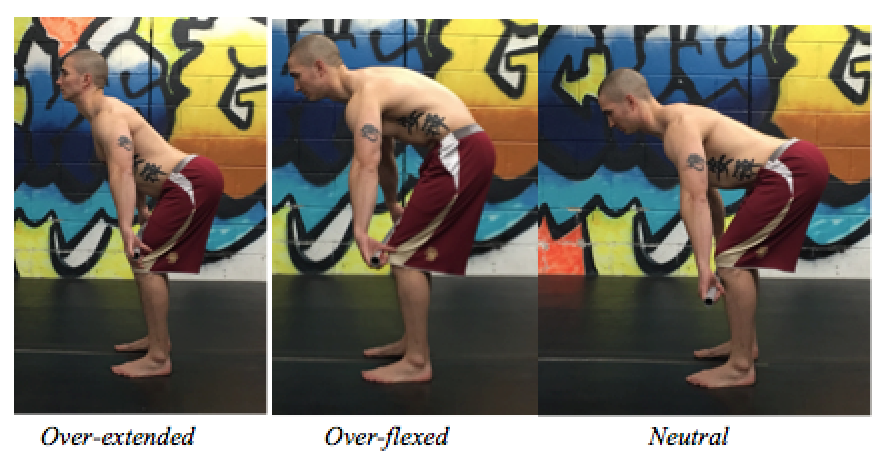
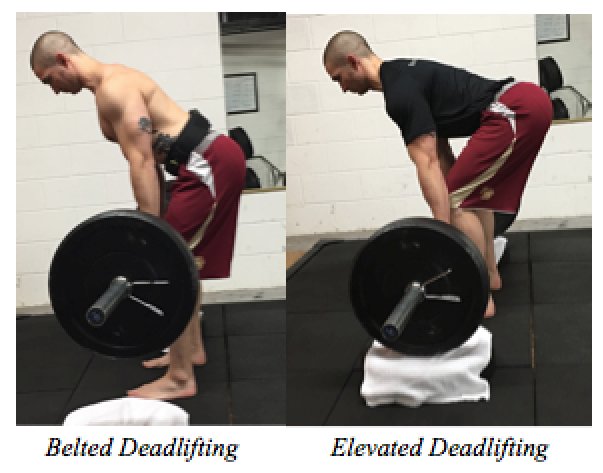
In this dynamic example, the muscles of the hips, lower back, abdomen, and thorax will be in the most balanced position to lift the load when the pelvis is in a neutral position. That is to say, the lower back should neither be flexed nor extended. In this position, the muscles of the lower back are well balanced with that of the abdomen, and the hip extensors have a better opportunity to contract during the lift.
If the lift were initiated with the lower spine in an extended position, the position can still indeed be stable; however, the stability would come from passive anatomical structures such as the lumbar facet joints and ligaments of the anterior spine. This position increases compressive forces to the lower back and decreases the contractile ability of both the abdominals and hip extensors, as both of these muscle groups are now in an over-lengthened position.
DL posture
Therefore, the optimal position for the dynamic movement of deadlifting is the one that allows for the hip/trunk flexors and hip/trunk extensors to work in the most balanced fashion (see video below). Moreover, setting up the movement and transitioning the bar in such a way that the load stays as close to the body as possible minimizes the downward pulling effects from gravity much like the head and shoulders staying over the midline of the body in the previous sitting example.
When attempting to understand how best to balance active and passive stability within a specific task, we must take into consideration four factors: (1) the available tissue mobility in order to get into the position required; (2) the external objects manipulated or used for positioning; (3) the duration of the task; (4) the intensity of the task.
Let’s return once again to our two examples:
i. Static postural stability: Sitting in a chair
For static sitting, we must first assess ranges of motion like thoracic extension, shoulder internal/external rotation, and scapular retraction/depression/posterior tilt. In doing so, we’re able to determine whether the desired position can be assumed without pain or excessive compensatory muscle effort. Moreover, we must know the type of seat the client will be utilizing and what activities he or she will be doing while sitting (i.e. typing, driving, etc.).
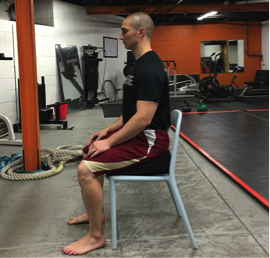
In terms of duration and intensity, sitting will typically fall under the category of a low intensity activity done for long durations. The longer the duration, the more muscular endurance necessary to maintain a desired position. If any of the above factors are not optimal, external passive support in the form of a lumbar cushion, posture shirt, or corrective tape may be necessary to enable the client to attain a more favorable posture without excessive effort.
seated
(Passively elevating the hips to decrease the effort to maintain an upright torso)
ii. Dynamic postural stability: Deadlifting a heavy load from the ground
With deadlifting, mobility limitations in the hips and trunk can often limit an individual’s ability to adopt and maintain the optimal stable position described above. In addition, the intensity of the load or duration of the set must not exceed the amount of muscular force the individual is able to generate, or else even a solid initial position will be lost.
In cases where mobility restrictions are a limiting factor, passive support can come in the form of apparatuses that decrease the range of motion of the movement (i.e. elevating the load onto blocks or a rack). When approaching maximal loads or durations, passive support may take the form of stability belts and braces in areas most susceptible to positional failure.
2DLs
3. Posture is the Product of Your Movement Variability.
Posture is often discussed as a single static element that represents one’s lack of mindfulness or genetic misfortune. Clinical experience and the current scientific literature say this belief is not only wrong, but also a harmful notion to the process of making postural change. One shouldn’t feel guilty or unfortunate that he or she is demonstrating an unskillful posture. Instead, there should be an understanding that posture is not a single static entity, but rather task dependent and constantly changing.
The secret to good posture is that you shouldn’t need to work for it when you are at rest. You see, your static postures during sitting, standing, and walking are a product of your cumulative movement throughout the day. Our bodies are built to adapt to the positions and activities we take on most frequently. If any of these positions and activities are done is excess, all our positions and movement can become imbalanced. This imbalance is what is deemed by many as poor posture, but in reality it is just the body doing what it does best: adapting.
In order to prevent postural imbalances, it is unwise to attempt to simply make ergonomic adjustments to the positions we sustain too frequently. Instead, we must consider our whole body of movement throughout the day. If we focus on proper positioning in training, it will inevitably transfer to our static postures. In this way, programming for any strength, conditioning, or fitness routine must involve a strong focus on developing positions that promote muscular balance (active postural stability) and task transference, as opposed to simply task completion.
For example, there are many ways to push yourself up from the ground when doing a push-up, but there are positioning subtleties that can either promote balanced muscular stability or feed habits of chronic positioning that we already practice too frequently throughout the day (see video below). Thus, an individual’s movement practice should be about movement quality and variability as much as about cultivating strength and conditioning.
Mindless prescription of physical activity (i.e. 30-60 minutes of aerobic exercises; 3 sets of 10 of machine based resistance exercise) prioritizes strength and conditioning capacity over movement capability and variability, hoping that by blindly improving one’s quantity of routine movements the quality of movement will also improve. Don’t get me wrong, in moderation, more movement is better than less movement. However, too much of the same movements can create similar problems as too little movement.
4. Counterbalance Your Life.
The idea of increasing movement quality and variability goes way beyond one’s time at the gym. To allow for increased ease of active postural stability, the common patterns of one’s entire day need to be understood so that behavioral change can be implemented. This is not to say that if we sit all day at work then we need to get a new job. That’s just not practical. Nor does it mean that we must be obsessed with maintaining an upright posture or “drawing our abdomens in” all day long. It simply calls for awareness — awareness of the positions that are most frequently adopted and strategies for counterbalancing them.
Guidelines for this awareness are three-fold:
i. Understand the chronic positions you adopt.
Often postural counterbalances are subtle and developing improved body awareness becomes much more important than simply adjusting your position. This improved body education can come in many forms, such as independent reading on anatomy and physiology, advice from a movement professional, or cultivation of a versatile movement practice as discussed above. It’s important to know that ultimately YOU have the best opportunity to understand your own body. It can be a gradual process to refine this body awareness, but once developed, understanding the positions and movements that are healthy versus harmful to your specific body becomes much easier.
ii. Separate times you must be stationary and times you choose to be stationary.
It’s important to have a plan of attack for positioning throughout your day. Practically speaking, if you sit all day at work, acknowledge it, and then minimize the time you sit when in the comfort of your home. Likewise, if you are on your feet all day, don’t be afraid to spend some time vegging out on the couch. One stationary position is not necessarily better than the other (i.e. standing is not better than sitting). It’s the one that you do most frequently that will usually lead to problems.
iii. Expand your positional repertoire.
When attempting to adopt positions different from those in which you are most comfortable, it is important to have other positions at your disposal. For example, sitting in a chair is a completely different mechanical stress than sitting cross-legged on the ground, just as standing stationary on two legs is different than weight shifting effortlessly from one leg to the other. Similar to the idea of developing more movement variability in an exercise practice, it’s important that you’re able to adopt positions besides those you do most frequently. This may be another area where the help of a movement professional is necessary so that you can become comfortable with the mobility and stability necessary to adopt different variations of sitting and standing positions.
See the video playlist below regarding positional variations for sitting (chair and ground) and standing:
In conclusion, there is plenty of disagreement and misunderstanding around the topic of posture. In my experience, this controversy is unnecessary and overblown. Any respectable strength and conditioning professional would agree that proper positioning and technique is vital when undertaking various movements in a strength and conditioning program. Why should the importance of positioning be any different in our movements throughout the day? We must understand that our bodies are constantly changing; therefore, posture should be viewed as a dynamic, ever-changing journey — not a fixed destination. Hopefully the 4 Rules of Posture set forth above allow you to better understand how to embrace this journey!
About the Author
Chris Leib of MovementProfessional.com is a licensed Doctor of Physical Therapy and Certified Strength and Conditioning Specialist with nearly a decade of experience in treating movement dysfunctions and enhancing human performance. He has written for many popular training and rehabilitation websites, and has a versatile movement background with a variety of certifications as both a physical therapist and fitness professional. Chris considers physical activity a vital process to being a complete human being and is passionate about helping others maximize their movement potential. Be sure to follow him on Facebook and YouTube.
A special thanks to Travis Pollen of www.FitnessPollenator.com for his help with this article.
References
1. Grundy, Roberts (1984) Does unequal leg length cause back pain? A case-control study. Lancet. 1984 Aug 4;2(8397):256-8. http://www.ncbi.nlm.nih.gov/pubmed/6146810

2. Pope, M., Bevins, T., Wilder, D., & Frymoyer, J. (1985). The Relationship Between Anthropometric, Postural, Muscular, and Mobility Characteristics of Males Ages 18-55. Spine, 644-648. http://www.ncbi.nlm.nih.gov/pubmed/4071274

3. Grob, D., Frauenfelder, H., & Mannion, A. (2006). The association between cervical spine curvature and neck pain. European Spine Journal Eur Spine J, 669-678. http://www.ncbi.nlm.nih.gov/pmc/articles/PMC2213543/

4. Nourbakhsh, M., & Arab, A. (2002). Relationship Between Mechanical Factors and Incidence of Low Back Pain. J Orthop Sports Phys Ther Journal of Orthopaedic & Sports Physical Therapy, 447-460. http://www.ncbi.nlm.nih.gov/pubmed/12322811

5. Dieck, G., Kelsey, J., Goel, V., Panjabi, M., Walter, S., & Laprade, M. (1985). An Epidemiologic Study of the Relationship Between Postural Asymmetry in the Teen Years and Subsequent Back and Neck Pain. Spine, 872-877. http://www.ncbi.nlm.nih.gov/pubmed/2938272

6. Franklin, M., & Conner-Kerr, T. (1988). An Analysis of Posture and Back Pain in the First and Third Trimesters of Pregnancy. J Orthop Sports Phys Ther Journal of Orthopaedic & Sports Physical Therapy, 133-138. http://www.ncbi.nlm.nih.gov/pubmed/9742469

7. Lederman, E. (2010). The fall of the postural-structural-biomechanical model in manual and physical therapies: Exemplified by lower back pain. Journal of Bodywork and Movement Therapies, 131-138. http://www.cpdo.net/Lederman_The_fall_of_the_postural-structural-biomechanical_model.pdf

8. Christensen, S., & Hartvigsen, J. (2008). Spinal Curves and Health: A Systematic Critical Review of the Epidemiological Literature Dealing With Associations Between Sagittal Spinal Curves and Health. Journal of Manipulative and Physiological Therapeutics, 690-714. http://www.ncbi.nlm.nih.gov/pubmed/19028253

9. Evidence-Base for Explain Pain, Second Edition. (n.d). Retrieved October 2, 2015. http://www.noigroup.com/documents/noi_explain_pain_2nd_edn_evidence_base_0813.pdf
10. Control, culture and chronic pain. (n.d.). Retrieved October 2, 2015.
http://www.sciencedirect.com/science/article/pii/0277953694900205
11. Garber, C., Blissmer, B., Deschenes, M., Franklin, B., Lamonte, M., Lee, I., Swain, D. (2011). Quantity and Quality of Exercise for Developing and Maintaining Cardiorespiratory, Musculoskeletal, and Neuromotor Fitness in Apparently Healthy Adults. Medicine & Science in Sports & Exercise, 1334-1359. http://journals.lww.com/acsm-msse/Fulltext/2011/07000/Quantity_and_Quality_of_Exercise_for_Developing.26.aspx

вторник, 12 января 2016 г.

BYCICLE CRUNCHES Flatten and Firm Your Abs


By Stephen E. Alway, Ph.D., FACSM
With pool parties and beach plans, there is no hiding your waist shape. However, there is no cause for panic because you can do a few things that will be effective enough to put the finishing touches on firming your entire waistline. Importantly, if you are committed to get your flatten your abs, you may want to raise your aerobic portion of your workout, to twice each day if possible. That does not mean you need to live in the gym, as the second aerobic piece could be a brisk 40-minute walk in the evening. The goal is to raise your metabolic rate to burn more fat, and when you do, the benefits of your direct abdominal training will be all the more evident.
The best abdominal exercises shorten the fibers in the front and sides of the abdominal wall and they do not stretch these muscles.1 Bicycle crunches will create strong shortening contractions while also challenging your core.2 The bonus for this exercise is that there is no need for any specialized equipment to effectively begin to reshape your abdominals.3
Bicycle Crunches - Flatten and Firm Your Abs

Exercise: Bicycle Crunches

1. Lie on your back on a mat. Flex your knees so that your feet are flat on the floor. Place your hands behind your head (avoid clasping or intertwining your fingers). Alternatively you can gently contact your fingertips to the temple on each side of your temple.
2. Press your lower back into the mat and tighten your abdominal muscles. Lift your head, shoulders and upper back from the floor.
3. Move your right elbow and left knee toward each other while straightening your right leg. Do not let the leg that is straightening contact the floor mat.
4. In a smooth transition, flex the hip and knee so that your right knee moves back toward your chest and twist so that your left elbow and right knee move toward each other. Straighten your left knee as the right knee is flexed.
5. Twisting the elbow to the right and left knee in the sequence is considered one full repetition.
6. Make the transition between twisting to the right and left, and flex and extend the knees in a fluid and continuous fashion, much like pedaling a bicycle (hence its name). You should work up to three sets of 25-30 repetitions.
Bicycle Crunches - Flatten and Firm Your Abs
The twist from one side, then the other as you are coming upward on successive repetitions, fully activates theinternal and external oblique muscles.6 The rectus abdominis is contracted almost constantly throughout the entire set. The smaller size and the lower attachments make the most inferior part of the rectus abdominis harder to develop. However, bicycle crunches strongly activate this lower area.
As you progress and your abdominals are getting firmer and stronger, you can make the exercise more challenging by holding a light weight behind your head as you do the exercise. However, do not cut the repetitions down just to lift a heavier weight in this exercise.
The old adage that once you learn to ride a bike you will not forget is fairly accurate when it comes to bicycle crunches. Once you get the handle on the exercise, you are going to want to keep “pedaling” your way to a firm and shapely abdominal wall. The exercise is challenging and effective but it is not terribly difficult to perform, especially once you get your legs moving smoothly. If you tighten your diet, increase the frequency of your aerobics, and hit bicycle crunches as part of your regular abdominal training (maybe even throwing in a few sets at home between workouts), you’ll be able to sculpt a new thin, flat and firm abdomen.
Illustrations by William P. Hamilton, CMI
References:
  1. Burden AM, Redmond CG: Abdominal and hip flexor muscle activity during 2 minutes of sit-ups and curl-ups. J Strength Cond Res 2013;27:2119-2128
  1. Gottschall JS, Mills J, Hastings B: Integration core exercises elicit greater muscle activation than isolation exercises. J Strength Cond Res 2013;27:590-596.
  1. Nolte K, Kruger PE, Els PS et al: Three dimensional musculoskeletal modelling of the abdominal crunch resistance training exercise. J Sports Sci 2013;31:264-275.
  1. Moore, K.L. and A.F. Dalley. Clinically Orientated Anatomy. 4th Edition. Lippincott Williams & Wilkins, P.J. Kelly, Editor. Baltimore, Philadelphia. pp. 180-186, 1999.
  1. Nelson GA, Bent-Forsythe DA, Roopchand-Martin SC: Electromyographic activity of the rectus abdominis during a traditional crunch and the basic jackknife exercise with the Ab Lounge. J Strength Cond Res 2012;26:1584-1588.
  1. Maeo S, Takahashi T, Takai Y et al: Trunk muscle activities during abdominal bracing: comparison among muscles and exercises. J Sports Sci Med 2013;12:467-474.

SINGLE-LEG SPLIT SQUATS ON A BENCH Shape Your Thighs for Summer


By Stephen E. Alway, Ph.D., FACSM
After the seemingly hours of cardio you did all winter, you might think your thighs don’t need much refining for the quickly approaching summer season. However, the thighs and hips may not be particularly firm unless they get a direct hit on a semi regular basis. That does not mean that you need to engage in endless sets of leg presses or squats, although those are pretty great exercises. Instead, to break up your routine, you might consider single-leg squats as an excellent alternative to almost every thigh exercise.
Single-leg Split Squats on a Bench - Shape Your Thighs for Summer
Not only will this exercise build thigh strength and shape, it will also develop an unprecedented level of balance better than any other leg exercise. However, the added balance component makes the single-leg bench squat much more difficult to perform than the normal squats or leg presses. If you are just starting out, you don’t even need extra weight. But after a while, you can add 10- to 15-pound dumbbells to each hand and you will start to see your thighs explode with firmness and shape.
Single-leg Split Squats on a Bench - Shape Your Thighs for Summer

Execution of Single-leg Squat on Bench

1. Stand in front of a flat bench with your hands to the sides. Stand facing away from bench. Flex the knee of one limb and place the top of foot on the bench behind you. Keep your hands on your hips to maintain your balance and body position.
2. Keep your torso upright. Flex the knee and hip of the support leg and squat down so the knee of the rear leg on the bench flexes and almost makes contact with the floor. The front knee should point in the same direction as the foot throughout the entire movement.
Single-leg Split Squats on a Bench - Shape Your Thighs for Summer
3. Return to original standing position by extending hip and knee of the forward leg. Since the gluteus maximus and hamstring muscles are strong hip (thigh) extensors, they are most active during the upward push of the single-leg squat and therefore, training these muscles will improve your overall leg power. Repeat the sequence until the desired number of repetitions is done with the first leg (e.g., 12 repetitions).
4. Rest briefly, then switch to the other leg. Repeat the same one-leg squat sequence.
5. Inhale on the way down and exhale on the way up in each squat.
As you get stronger, you can take a light dumbbell in each hand, and when 15 repetitions gets easy you can go up a little in resistance, but do not feel compelled to grab heavy dumbbells for this exercise.
It will only take a few sets of 15 repetitions before you will begin to feel the intensive difference from other exercises. This exercise is strict but safe, yet you will have to be careful that you maintain good balance throughout the exercise, especially as you start to fatigue. While the exercise is not easy, your legs should not feel so devastated that you feel the need to crawl out of the gym either. This exercise is effective without killing you, and that is the best way to see the transformation to an amazing lower body before summer.
Illustrations by William P. Hamilton, CMI
References:
1. Moore, KL and AF Dalley. Clinically oriented Anatomy. Fourth edition. Baltimore, Lippincott Williams & Williams, 1999; 531-546.
2. Maddigan ME, Button DC, Behm DG: Lower-limb and trunk muscle activation with back squats and weighted sled apparatus. J Strength Cond Res 2014;28:3346-3353.
3. Bolgla L, Cook N, Hogarth K et al: Trunk and hip electromyographic activity during single leg squat exercises do sex differences exist? Int J Sports Phys Ther 2014;9:756-764.
4. de Villarreal ES, Izquierdo M, Gonzalez-Badillo JJ. Enhancing jump performance after combined vs. maximal power, heavy-resistance, and plyometric training alone. J Strength Cond Res 2011;25:3274-3281.
5. Kok LY, Hamer PW and Bishop DJ. Enhancing muscular qualities in untrained women: linear versus undulating periodization. Med Sci Sports Exerc 2009;41:1797-1807.
6. Ugalde V, Brockman C, Bailowitz Z et al: Single Leg Squat Test and Its Relationship to Dynamic Knee Valgus and Injury Risk Screening. PM R 2014.
7. Hooper DR, Szivak TK, Comstock BA et al: Effects of fatigue from resistance training on barbell back squat biomechanics. J Strength Cond Res 2014;28:1127-1134.

PARALLEL SQUATS ON LEG THRUST MACHINE / Tighten Your Thighs and Hips


By Stephen E. Alway, Ph.D., FACSM
You would think that after using the lower body for every aerobic exercise, this area would stay tight and toned. However, the thighs and hips can get out of shape pretty quickly. Squats on a leg thrust machine might sound ominous, but they are actually very effective for transforming soft and formless lower thighs, hips and buttocks to a lower body that is firm and fully contoured. Even though we are in the later throes of summer, it is not too late to begin this lower body transformation.
Parallel Squats on Leg Thrust Machine

Parallel Squat on Leg Thrust Machine

1. You can either use a true leg thrust machine, or if your gym does not have one, you can do the exercise by facing into the back pad of a hack squat machine. It is a good idea to warm your knees up with a few minutes of stationary cycling and stretching before beginning the exercise.
2. Place your feet about shoulder-width apart on the angled platform. If you want more emphasis on the vastus medialis— the medially located muscle of the quadriceps— you can move your feet closer together. Position your shoulders/clavicles into the shoulder pads. Grip the handles by the shoulder pads for additional upper body support.
3. Keep your head up and tighten your back. Extend (straighten) your knees to lift the weight stack and to move the safety bar out of the way. Make sure you have full control of the weight.
4. Control the weight as you lower your buttocks towards the floor by allowing your knees to flex. Continue squatting downward until the tops of your thighs are parallel to the platform (not the floor) or when your knee angle has reached 90 degrees.
5. After you have reached the parallel position at the bottom, stand up in a smooth and explosive manner. Stop just short of fully locking the knees out straight. This will maintain the tension on the thigh and hip muscles. Keep your back tight and your head up both on the way up and on the way down in subsequent repetitions.
* Do a few sets of 15 repetitions. Parallel Squats on Leg Thrust Machine - Tighten Your Thighs and Hips
Squats on a leg thrust (or hack) machine provide an excellent approach to safely (you don’t have to worry about balance) work all four quadriceps muscles, the gluteus maximus and the hamstring muscles, even when fatigue sets in. This exercise is strict and therefore hard, but you do not have to go to the gym dreading it either.
Illustrations by William P. Hamilton, CMI
References:
1. Moore, KL and AF Dalley. Clinically oriented Anatomy. Fourth edition. Baltimore, Lippincott Williams & Williams, 1999; 531-546.
2. Pacheco L, Balius R, Aliste L, et al: The acute effects of different stretching exercises on jump performance. J Strength Cond Res 2011; +25: 2991-2998.
3. Felicio LR, Dias LA, Silva AP et al: Muscular activity of patella and hip stabilizers of healthy subjects during squat exercises. Rev Bras Fisioter 2011;15:206-211.
4. Hodges SJ, Patrick RJ, Reiser RF: Effects of fatigue on bilateral ground reaction force asymmetries during the squat exercise. J Strength Cond Res 2011;25:3107-3117. 5. de Villarreal ES, Izquierdo M, Gonzalez-Badillo JJ. Enhancing jump performance after combined vs. maximal power, heavy-resistance, and plyometric training alone. J Strength Cond Res 2011;25:3274-3281.
6. Kok LY, Hamer PW and Bishop DJ. Enhancing muscular qualities in untrained women: linear versus undulating periodization. Med Sci Sports Exerc 2009;41:1797-1807.

Как правильно выполнять прыжки на ящик (тумбу)


Прыжки на ящик эффективны для повышения общего атлетизма, но большая проблема в том, что многие люди выполняют это упражнение неправильно. Зожник перевел статью фитнес-эксперта Эрика Баха о том, как правильно выполнять прыжки на ящик, чтобы они действительно приносили пользу, а не разрушали ваши суставы.
High_Box_Jump1 зожник
Чтобы стать еще сильнее, вам нужно стать быстрее и развить взрывную силу и самый быстрый способ её развить — это выполнять прыжки на ящик.
Прыжки – отличный показатель вашей взрывной силы, атлетизма и относительной силы, которая необходима для почти любого вида спорта. И, да, прыжки помогут вам улучшить композицию вашего тела. Проблема лишь в том, что их советуют делать слишком много и выполняются они зачастую с ужасной техникой.
Большинство впечатляющих прыжков на ящик, которые вы видите, на самом деле не то, чем они являются на самом деле. 14 летний мальчик, запрыгивающий на ящик, высотой 137 см, выглядит впечатляюще, но на деле это всего лишь хорошо отработанный прыжок и отличная подвижность тазобедренного сустава, а не чистая взрывная сила.
Еще хуже, когда люди выполняют такие вот псевдопрыжки. Не умеют правильно приземляться и травмируются.
Как и любое другое упражнение, прыжки на ящик — это тренировочный инструмент, с которым надо обращаться с осторожностью, а не просто бездумно вписывать его в свою программу тренировок.

Щадящие приземления

Прыжки на ящик неспроста являются самой распространенной разновидностью прыжков в тренировочных программах – они уменьшают нагрузку на суставы, спокойно позволяют вам учиться взрывной силе и правильно и безопасно приземляться.
High_Box_Jump зожник
Если сравнить фазу приземления у прыжков в высоту, прыжков в длину и у прыжков на ящик, то прыжки на ящик оказывают гораздо меньший компрессионный стресс на коленный сустав.
Таким образом, выполняя прыжки на ящик, вы сможете развить взрывную силу и избежать при этом повреждения коленных суставов. Прыжки на ящик, по сравнению с другими вариантами прыжков, можно тренировать достаточно часто, так как они не обладают слишком мощным воздействием на весь организм.

Усиление активности центральной нервной системы

Отсутствие взрывных и скоростных упражнений в вашей тренировочной программе, может стать причиной роста весов на штанге. Нет, вы не сможете набрать мышц, выполняя высокообъемные прыжки на ящик, но таким образом вы укрепите центральную нервную систему, что позволит ей лучше и эффективнее работать во время тренировки.
Повышая эффективность работы нервной системы, вы улучшите взрывную силу, что, в свою очередь, позволит дольше и больше работать с субмаксимальными весами и, как следствие, нарастить мышечную массу.

Улучшите вашу технику

Бессистемные и беспорядочные прыжки – показатели небрежной техники. Поэтому стремись к следующему:
  • Приземляться вы должны на полную стопу, а не переносить вес на носок или пятку.
  • Колени должны находится в нейтральном положении. Их не нужно выгибать ни внутрь, ни наружу.
  • Брюшные мышцы напряжены. Старайтесь не округлять позвоночник.
  • Взгляд слегка вверх, грудь вперед.
  • Как только вы достигли высшей точки прыжка, мгновенно остановитесь и зафиксируйте вашу позицию, это позволить снизить риск повреждений.
  • Если вы прыгаете выше, чем на 50 сантиметров, то поставьте рядом еще одну коробку, немного меньше той, на которую вы запрыгиваете, чтобы вы смогли спокойно сойти с неё. Это позволит снять нагрузку с ахилловых сухожилий и предотвратит совершенно ненужные травмы.
зожник прыжки на тумбу

Чего не стоит делать, выполняя прыжки на ящик

Прыжки на ящик – великолепный инструмент, который поможет вам увеличить производительность, но любой тренировочный инструмент, который используют бессистемно может вместо положительных спортивных результатов принести только лишь вред.
Не надо делать прыжки на ящик ради улучшения общей физической формы
Когда вы используете прыжки на ящик ради улучшения общей физической формы, выполняя их в многоповторном стиле, то, к сожалению, риск травмироваться превосходит возможный положительный эффект, оказываемый на вашу физическую форму.
resistance-band-box-jumps_1 зожник
Когда новички начинают использовать это упражнение в целях улучшения общей физической формы, у них часто страдает техника приземления, что, в свою очередь, может привести к повреждению голени (когда происходит пронация стопы), а постоянно приземляясь с x-образными коленями рано или поздно закончится для них плачевно.
Выполняя прыжки на ящик в многоповторном стиле и в быстром темпе не позволит тазобедренному суставу полностью разогнуться, что не есть хорошо. Без полного разгибания в тазобедренном суставе невозможно правильно прыгнуть в высоту, пробежать спринт, хорошо выполнить приседания со штангой и полностью выпрямиться в становой тяге.
Используйте прыжки на ящик там, где им место – перед тренировкой, как упражнение на взрывную силу, а для улучшения общей физической формы лучше прыгайте на скакалке.
Не надо заниматься прыжками на ящик, если вы рядовой посетитель тренажерного зала, который основную часть своего времени проводит сидя за компьютером
У большинства фитнес-любителей невысокая физическая активность, они редко посещают зал, и их физическая форма не позволяет им выполнять высокообъемные упражнения, требующие огромных усилий. Для них норма — это сидячая работа, медленное, спокойное кардио и силовые тренировки на тренажерах.
Если вы относитесь к такому типу занимающихся, то начиная делать прыжки на ящик, предварительно досконально не изучив технику упражнения – прямая дорога к травмам.
Прежде чем начинать выполнять прыжки на ящик, в течение двух недель попрыгайте на скакалке (только не в очень быстром темпе), а затем начните прыгать на ящик небольшой высоты, отрабатывая правильную технику приземления, прежде чем приступить к более серьезным нагрузкам.

Составление программы прыжков на ящик

Во-первых, если вам больно при выполнении упражнения, не надо его делать. Если вы не можете прыгать на ящик правильно, начните с малой высоты. Если упражнение не соответствует вашим тренировочным целям, лучше оставьте его.
Щадящая природа прыжков на ящик (при условии правильного выполнения) замечательно подходит занимающимся силовым тренингом. Прыжки на ящик для них – отличный инструмент для повышения атлетизма и взрывной силы и при этом они не несут в себе тот же риск травмироваться, как прыжки в высоту.
Прыжки на ящик – взрывное упражнение и его следует выполнять непосредственно перед тренировкой с отягощениями, но после разминки. Начните выполнять 2-3 подхода по 3-5 повторений статических прыжков на ящик (запрыгиваем на ящик по всем правилам, но спускаемся с него аккуратно, без прыжков).
boxJump зожник
Запомните: большой объем не важен. Важна высокая производительность. От двух до четырех подходов с 3-5 повторениями – вот что нужно для большинства людей.

Пример прогрессии нагрузок

Выполняйте прыжки на ящик 2 раза в неделю после динамической разминки.
Неделя 1: прыжки со скакалкой 5-10 минут (перед или после тренировки) три раза в неделю.
Неделя 2: 2х5
Неделя 3: 3х4
Неделя 4: 4х4
Неделя 5: (повышаем высоту ящика) 3х5
Неделя 6: 4х4
Неделя 7: 4х3
Неделя 8: (повышаем высоту ящика) 3х3
Самое важное — это полное разгибание тазобедренного сустава и правильная техника приземления, а не высота ящика. 
Оставьте свое эго за дверями спортзала, потому что по прыжкам на ящик не проводят никаких чемпионатов.
Без полного разгибания тазобедренного сустава, вы минимизируете весь тренировочный эффект этого упражнения, не развиваете в полной мере взрывную силу и атлетизм. А также очень глупо выглядите со стороны.
Источник: t-nation.com