
суббота, 10 сентября 2016 г.

7 BASIC BOSU BALANCE EXERCISES


7 Basic BOSU Balance Exercises | Elizabeth Kovar | Expert Articles | 2/3/2016


  •  
The BOSU is an effective tool for training both static and dynamic balance, as well as training motor skills, kinesthetic awareness and proprioception. When training on an unstable surface, the core automatically fires and contracts to keep the body upright. Thus, the BOSU challenges individuals to build strength and balance simultaneously. Beginning exercisers should have solid balance skills on the ground before using the BOSU ball. 
You can manipulate balance exercises for your clients with the four primary BOSU balance challenge variables. These variables can be used separately or together to regress or progress an exercise, or to make the exercise different. The four variables are:
  • Movement
  • Eye gaze
  • External stimulus (equipment, trainers touch, wall)
  • Contact points (toes, hands, feet, knees)
With a single exercise, you can use tiny progressions to make clients feel more comfortable with the BOSU. This basic balance sequence provides progression tips to help you adapt the exercises to the fitness levels of your clients, and helps them build the foundation they need to pursue more challenging exercises. The sequence also includes a combination of static and dynamic balance to promote balance in transition, which helps build the foundation your clients need to be able to pursue more challenging exercises. 

SHIN BALANCES
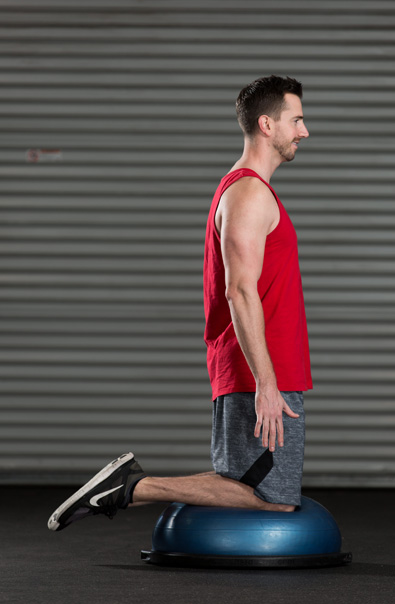
Position the client with shins on top of the BOSU with a neutral spine. Place the toes on the ground and keep hands in front of the shoulders; hold this position. To progress the exercise, lift the toes off the ground, close the eyes or catch a ball thrown by the trainer. 

STATIC AWARENESS BALANCE
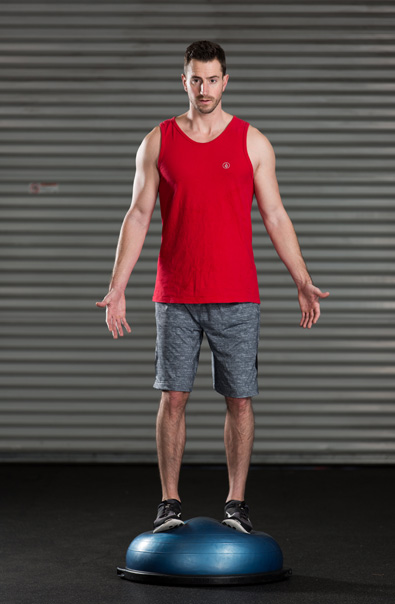
Position the client upright on the dome with the feet hip-distance apart, near the second and third ring on the dome. Place the hands by the sides with palms facing forward. Cue the client to focus on a focal point on the floor or wall directly ahead. Hold the position. The purpose is to bring awareness to the position, the unstable surface, the movement of the feet and ankles and the contraction of the core and breath. To progress the exercise, cue the clients to close one or both eyes. 

ATHLETIC STANCE WITH HAND TRACKING
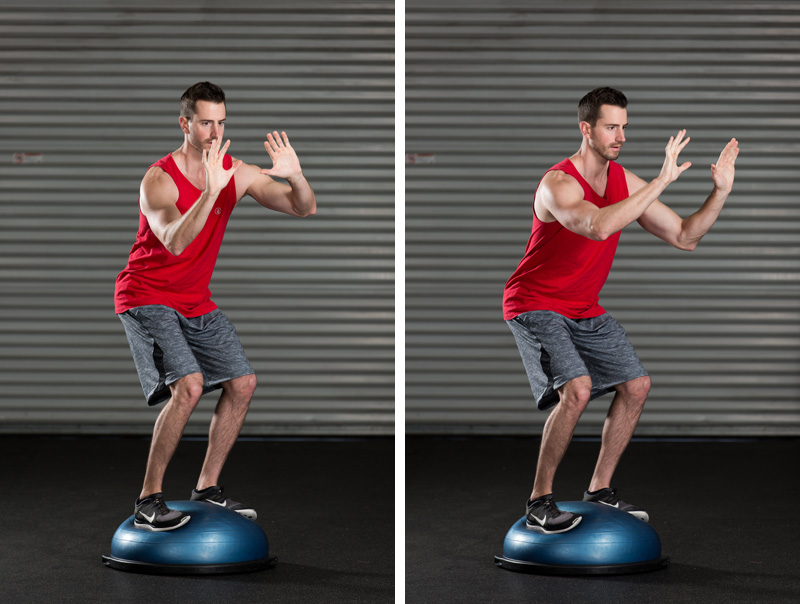
Position the client upright on the dome with the feet hip-distance apart, near the second and third ring on the dome. Position the body into a squat or an athletic stance. Place the hands in front of the face with bent elbows and palms facing forward. Begin to move the hands to the right and left, while allowing the torso and head to rotate with the movement. Track the hands with the eyes. To progress the exercise, keep the torso and head still while only moving the eyes. 

STANDING ABDUCTION TOE TAPS
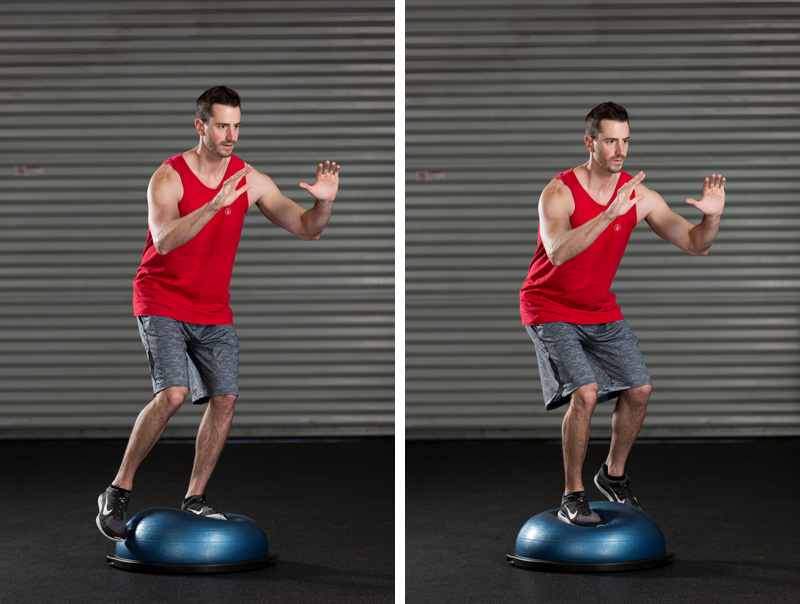
Position the client upright on the dome with the feet hip-distance apart, near the second and third ring on the dome. Place the arms into an athletic position in front of the body with a 90-degree bend at the elbows. Cue the client to lift the right foot off the dome and tap the foot on the side of the dome. Return to center and repeat with the left leg. To progress the exercise, place the foot on the floor next to the dome and lower the body into a slight squat position. 

STATIC LUNGE
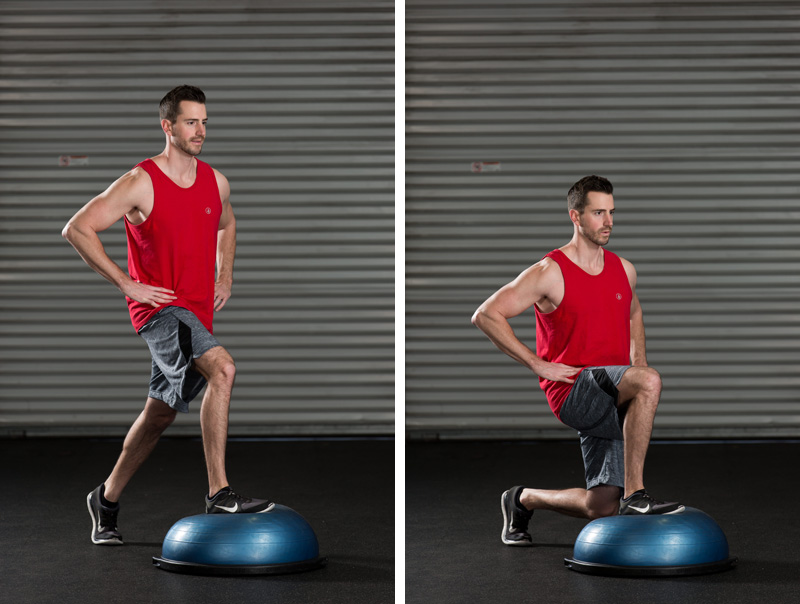
Position the client with the right foot on the dome. The arch of the foot should be on the center “bullet point.” Keep the hands on the hips or in front of the body with bent elbows. Lift the heel of the left foot and lower the left knee into a lunge position. Complete a set on the left leg and then switch to the right. 

WALK UPS
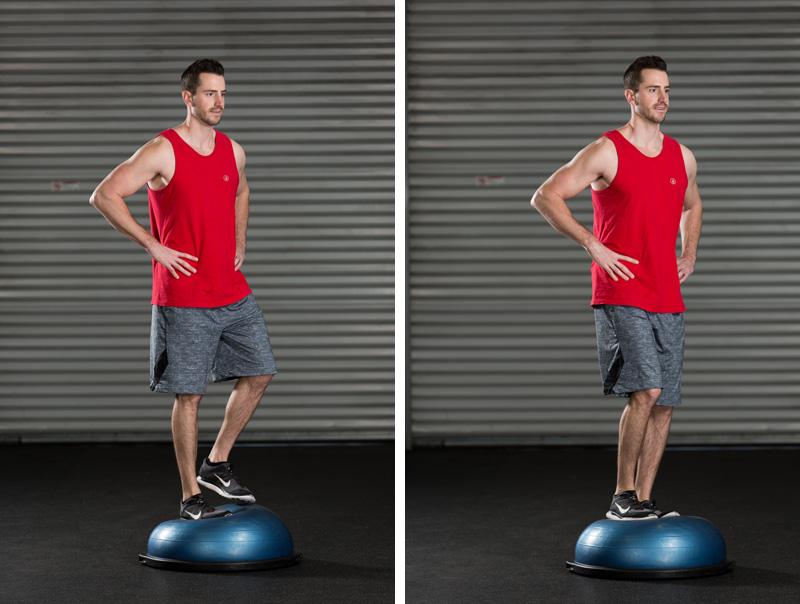
In a repetitious manner, cue the client to walk up and down on the dome. Clients can lead with one foot for a certain length of time or alternate the feet. The client can use a body bar or wall to assist with balance. To progress the exercise, cue the client to perform step-ups where only one foot is on the dome instead of two. 

LATERAL WALK OVERS
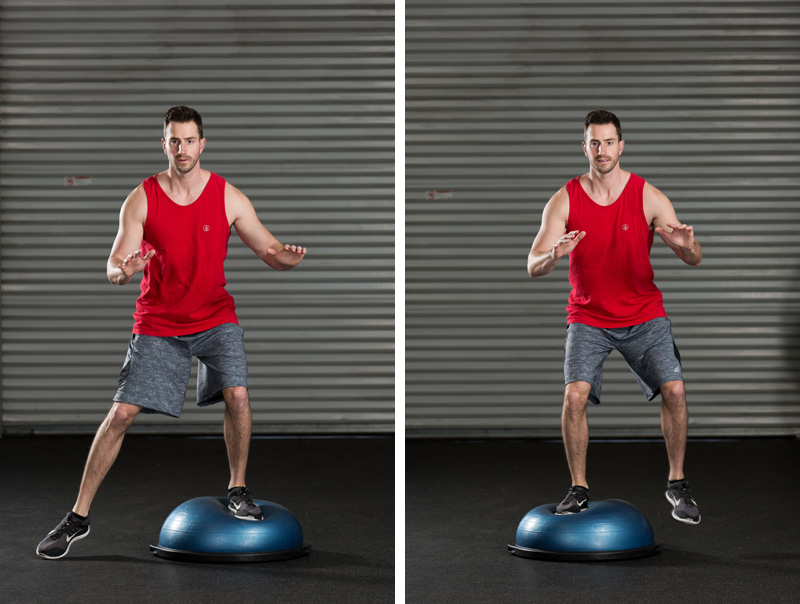
Have the client stand next to the dome. Cue the client to walk the right foot on top, followed the left, and to exit the dome on the other side. Continue walking up and over the dome. This exercise trains for lateral shuffles, which is the progression.

четверг, 1 сентября 2016 г.

Turn Your Feet OUT For a Bigger Squat

 http://www.barbellrehab.com/2016/05/feet-out-bigger-squat.html

What You Need to Know:
  1. Squatting with the feet straight forward requires more mobility, but it is NOT the most effective way to load this movement for most individuals
  2. During the squat, the entire lower extremity, including the thigh, lower leg, and foot should be in a straight line to optimize loading potential. 
  3. The squat involves moving the barbell in a linear path. Attempting to willfully externally rotate the hip or shove the knees out beyond the line of the foot to create torque during the movement complicates the lift and wastes energy, leaving pounds on the platform.
  4. The degree of toe out during the squat will vary depending on the individual’s stance width, hip anatomy, and lift variation.
  5. The vast majority of professional squatters, both powerlifters and Olympic athletes, squat with SOME degree of toe out. Why shouldn’t you? 
Foot position during the squat is imperative, as it serves as a vital base of stability. However, it seems as if there are conflicting points of views on whether to turn your feet out before you squat. This article aims to clear up some common misconceptions! 


Feet Forward vs. Feet Out…What’s the Difference
A squat to depth with the feet straight forward requires more mobility…period. This is why many coaches and physical therapists recommend this method. In fact, one of the main, often overlooked, mobility requirements to achieve a full, feet forward squat is sufficient tibial internal rotation. Here’s a quick video on how to self-assess your tibial internal rotation.

Regardless of the squat variation, the hip should be in some amount of abduction. If the knees track in line with the abducted hip, tibial internal rotation is necessary in order to maintain a forward foot. However, if the feet stay turned out, being in-line with the knee wouldn’t require this large amount of tibial internal rotation. The entire lower extremity would be in a straight line. Why does this matter?

Increased Mobility vs. Optimized for Loading
Although the feet-forward squat DOES require additional mobility, it comes at a cost of decreased capacity to LOAD. In order to squat effectively, the foot should be in line with the abducted hip/femur. This is the most mechanically efficient position from which to squat. The knee is essentially acting purely as a "hinge" and is not "twisting" excessively under load. In this model, no energy is lost rotating joints that don’t REALLY need to be rotated.

Why do we abduct the hip during the squat? Squatting with the hip in some degree of abduction/external rotation not only increases the ROM of the hip, it puts the adductors in a more mechanically efficient position to contribute to hip extension. More muscles contributing to hip extension means a bigger squat!  

Notice how the foot and leg are in a straight line with the abducted femur. This is optimal for loading. 

The Toes Forward Squat Encourages Poor Knee and Hip Position
During the squat, the entire lower extremity acts as a kinetic chain. In order to keep the feet forward while simultaneously abducting the hip, one must internally rotate (twist inward) the tibia. If the tibia is internally rotated, especially under load, this can create a ripple effect up the entire lower extremity making it that much more difficult to maintain the hips and knees in the correct position.

Despite all the intention to keep them tracking in line with the hip, keeping the feet straight forward encourages the knees to cave medially. The knees caving medially (valgus) also encourages the hip to internally rotate, which can lead to that dreaded “hip pinching” sensation during squats. This is a sure fire way to not only keep your wimpy squat, but to predispose yourself to injury as well. Set your foundation with the feet turned out to encourage proper knee and hip position.

The Problem With the “Screw the Feet” and the “Knees Out” Cues
Proponents of the feet forward squat say that this position allows one to create torque with the hip external rotators to prevent the arch of the foot from collapsing during the squat. Furthermore, by actively “screwing the feet” and shoving the knees out, one can ensure optimal arch control AND knee position. However, coaches should use BOTH of these cues with caution.

It’s one more thing to think about under load. For someone who does NOT struggle with excessive valgus collapse (knees caving excessively inwards) why are we giving these unneeded cues? Anyone who’s ever squatted heavy KNOWS that overcomplicating a movement can lead to a poor performance. Now, not only are you worrying about not dying under a heavy load, you’re also thinking about unneeded motion. This is simply not psychologically efficient. Save these cues ONLY for those who are struggling with excessive valgus collapse during squats.

Excessive foot supination. Pushing out the knees and screwing the feet while simultaneously keeping the toes forward can encourage excessive foot supination and a VARUS force on the knee. The last time I checked you’re not supposed to squat by pushing off the lateral aspect of your foot. Ensuring the foot stays in line with the femur, and wearing appropriate shoe-wear (don’t get me started on the whole barefoot Vibram squat craze of the early 2000s) will NOT encourage foot pronation, and is optimal to promote a balanced force distribution through the feet while squatting.

Aggressively screwing the hips and shoving the knees out can encourage foot supination 

No you won’t walk with “duck feet.” One of the main concerns with squatting with the feet turned out is fear that the trainee with end up "walking like a duck." However, standing and walking with “duck feet” a.k.a with the toes pointed outward, is usually the result of one’s bony hip anatomy, NOT a muscular adaptation caused by squatting too often with the feet turned out. 

Forcing someone to squat with the feet forward who typically walks and stands with the feet turned out ends up doing more harm than good. With that being said, I should note that there will be a SMALL subset of people who may feel more comfortable with the feet pointing forward. I assure you, however, that this isn’t the norm.

How Much Should I Turn My Feet Out?
The degree of toe out will vary depending on bony hip anatomy, stance width, and squat variation. This will typically result in a range of 15-40⁰ of foot flare during the squat. For narrower stances and front squat/high-bar variations, the degree of toe out will be less due to less hip abduction and a more upright trunk angle. For wider stances and the low-bar variation, the degree of toe out will be more to ensure the foot stays parallel to a femur that is in greater abduction. Again, we are ALWAYS after making sure the lower extremity is all in the same plane. This is the most effective way to load the squat. 

The Vast Majority of Professional Lifters Squat with SOME Toe Out
In an article “The Keys to Stronger Squats,” Bret Contreras analyzed the squats of 41 of some of the stronger squatters in the world. Regarding the degree of toe out he states:

“All lifters have some degree of foot flare. None of these lifters squat with their toes pointing straight ahead. As the stance widens, hip external rotation and foot flare tends to increase” - Bret Contreras
If 41 of the world’s strongest squatters have at least SOME degree of toe out. Why is there still this recommendation of pointing the feet straight forward? 

Conclusion
Squatting with the feet straight forward is a great mobility test but it is an inefficient way to load the squat. In a mechanically efficient, loaded squat, the entire lower extremity should be in straight line. This maximizes force production and optimizes joint mechanics. Additionally, the squat involves linear barbell movement. Stop over complicating it by unanimously using the "knees out" or "screw the feet" cues for those who don't struggle with excessive valgus collapse. The vast majority of professional squatters utilize SOME degree of toe out. It’s time that you start too!

This article was written with the help of physical therapist and researcher, Dr. Scotty Butcher, PhD, BScPT, ACSM-RCEP. Through his company, Strength Rebels, Dr. Butcher aims to provide education and programs that redefine typical rehabilitation and fitness practices through strength and conditioning. Follow Strength Rebels on Facebook and YouTube to learn more! 


About the Author

Dr. Michael Mash, DPT, CSCS, FMS is a physical therapist and strength coach located in Pittsburgh, PA. He started his company, Barbell Rehab, with the mission to bridge the gap between physical therapy and strength & conditioning by implementing more barbell lifts into clinical practice.

For more great content, follow Michael on Facebook and Instagram 

Stop Squatting Your Deadlifts!


While the squat may be considered the "king" of all exercises by some, the deadlift sure isn't a walk in the park. There's just something so primitive about picking up a heavy weight off the ground from a dead stop that can be just so empowering...but are you doing it correctly?

Often times the saying "lift with your knees not your back" is considered to be the holy grail when learning proper body mechanics, forcing people do go into a full squat to pick the tiniest object off the ground, but is this really true? It can be, at certain times, but when it comes to a conventional deadlift, it couldn't be more wrong.

You're Mobile Enough To Deadlift 
People erroneously believe that they need to get their hips as low as possible to perform an effective barbell conventional deadlift. Then when they can't, suddenly everyone has a "mobility" issue. The story usually goes like this:
"Oh I can't get my hips in the correct position so I need a million mobility exercises and need to smash and floss my superior and inferior gemelli for 20 minutes before I even touch a barbell" 
Here's the truth. You're probably "mobile" enough to pull from the floor, you're just setting up incorrectly. In a correct barbell deadlift, the hips start HIGHER than you think.

Stop Squatting Your Deadlifts
Here's the problem with deadlifting with the hips too low. While proponents claim it is imperative to get the hips as vertically close to the bar as possible to "save" the low-back, what they fail to realize is this actually INCREASES the horizontal distance from the barbell to the lumbar spine,


This increased horizontal moment arm (blue line in the picture above) actually DECREASES the efficiency of the lift and puts unneeded stress on the lumbar spine. This set-up is simply inefficient. With the barbell deadlift, the knees are unable to migrate forward, so the trainee results to excessively sitting back.

You're Forgetting About Your Hamstrings
In addition to increasing an unneeded horizontal moment arm, deadlifting with this hips too low also puts your hamstrings on slack, creating further inefficiency. The deadlift is a hip-hinge pattern, and in order to properly perform it, the hamstrings should have a sufficient amount of tension to allow them to produce maximal force.


As you can see in the picture above, the hips are higher thus both minimizing the horizontal distance from the lumbar spine to the bar (blue line) AND maximizing the length-tension relationship in the hamstrings to allow them to maximally produce force.

Cue "Chest Up" vs. "Hips Down"
One of the most simple cues for the deadlift to promote optimal setup is the "chest up" cue. When utilizing the "chest up" cue, the hips will often naturally assume the position they need to in order for an efficient pull. Check the video out below for proper setup of a barbell deadlift.


Cueing "hips down," on the other hand, often makes the trainee move the hips TOO LOW. What's interesting about those who set up with the hips too low, as the weight starts to get heavy, the hips will RISE to the correct level BEFORE the bar leaves the ground! This is wasted energy! Start with your hips in the correct position in the first place!

Again, we want the hips in the optimal position to minimize the horizontal distance from the lumbar spine to the barbell AND put the hamstrings in the correct length-tension relationship to produce force. Stop squatting your deadlifts, set your hips correctly, and go break a PR!

воскресенье, 28 августа 2016 г.

Энергия в организме. Откуда берется энергия во время диеты


Откуда же мы берем энергию? На самом низком уровне клеточной функции, ту форму энергии, которую ваши клетки могут использовать, называется аденозин трифосфат (АТФ). 

Для нашей большей пользы, тело производит АТФ посредством сжигания (окисление или сгорание) глюкозы из углеводов, либо жирных кислот из жиров. При определенных обстоятельствах, белок тоже может использоваться для воссоздания АТФ, непосредственно либо с помощью преобразования в глюкозу или жир (обычно белок конвертируется в глюкозу, чтобы использоваться как топливо). Чуть позже мы вернемся к этому. 

Учитывая некоторые исключения, о которых я скажу через несколько секунд, каждая ткань в организме, может использовать как углеводы, так и жир для энергии. Но что определяет какой вид топлива будет использоваться? Когда углеводы доступны (потому что вы едите больше всего именно их), тогда ткани будут использоваться углеводы, в виде глюкозы, для топлива. Когда углеводы недоступны (потому что вы ограничили себя), тело переключится на использование жиров. Этот жир может быть использован как из вашей пищи, так и из вашей задницы и живота. Это еще один нюанс, который чаще всего забывают при использовании методов для сброса веса/жира: когда вы потребляете больше углеводов, то ваше тело использует меньше энергии из жира, когда же вы едите меньше углеводов, ваше тело использует больше энергии из жира. 

А что на счет исключений? Некоторые ткани в вашем теле, такие как мозг/ЦНС и парочка других, не могут использовать жирные кислоты в качестве энергии, они могут потреблять лишь глюкозу. И мозг это самое важное, о чем я хочу поговорить здесь. Как обычно (и это неверно) водится, что мозг может использоваться лишь глюкозу в качестве энергии, и это действительно так, если вы рассматриваете глюкозу, аминокислоты и жир как источники энергии. Но таким образом мы забываем о четвертом источнике энергии – кетоны (так же известны как кетоновые тела). Кетоны созданы из расщепления жира посредством работы печени и выполняют работу топлива для мозга в период голодания или урезания углеводов. 

Я хочу заметить, что после нескольких недель кетоза (состояние, в котором кетоны накапливаются в крови в качестве топлива, которое использует мозг), мозг может получать порядка 75% всей основной энергии из кетонового обмена веществ. Остальные 25% приходятся на глюкозу.

This Man Stretched 10 Minutes a Day for a Month. Here’s What Happened


Turns out, a loose muscle is a strong muscle.

  
Modified Pigeon
PHOTOGRAPH BY BEN GOLDSTEIN
Like most guys, I hated stretching. Why waste time sitting around when I could be out running?
It hurt to learn that I was wrong—throbbed like hell, actually. I hurt my hiptrying a leg workout and going running the same day, and had to shut down.
I called Doug Kechijian, D.P.T., of Resilient Performance Physical Therapy in New York City. A stretching expert, he told me that everyone has imbalances and mobility restrictions. We sit too much and don’t put our bodies into enough different positions.
His prescription? Ten minutes a day of mobility moves.
They felt more like kung fu than calisthenics. Take the modified pigeon stretch.
“Most people stand with their hips shifted to the right, which causes their left hip to tighten up,” Kechijian says. This pose helps redistribute that weight.
As I sank into it, the painful area in my hip felt like it was being pulled apart—in a good way.
Other moves seemed meant for contortionists. Instead of reps, each was done for a series of extremely deep breaths, a signal for your body to release muscle tightness.
I felt relief after the first day, so I kept the circuit up. On gym days it was my warmup. On rest days, I did it in the office or at home in front of the TV. I ignored the odd looks from my coworkers and girlfriend, who dubbed Kechijian “the witch doctor.”
It was totally worth it. Within a month my pain was a memory. 
Then one night, as I sank into the pigeon pose, I noticed my girlfriend staring at me. “Damn, the witch doctor got you jacked,” she said.
Want to get mobilized? Try the stretching moves below. You need just 10 minutes. That’s not a tough stretch.
Here’s how to do it: Perform each exercise every day for the prescribed time or number of reps. Do them before runs, and intermittently throughout your workday or while winding down on your rest days, says Doug Kechijian, D.P.T., who created this routine.
Counterweight Deep Squat
PHOTOGRAPH BY BEN GOLDSTEIN
Counterweight Deep Squat
Grab two light dumbbells and place a foam roller between your thighs. Push your knees forward and then squat until your butt is just above the floor. (Use the lightest weight that allows you to achieve this position.) Try to round your spine by “tucking” your pelvis. From that position, take 5 long, deep breaths. Stand back up. That’s 1 rep. Do 3 to 5.
Modified Pigeon
PHOTOGRAPH BY BEN GOLDSTEIN
Modified Pigeon
Get down on all fours and place a pillow or foam roller under your left knee. Lift your right knee and place it behind and to the left of your left calf. Rock your hips back and forth for 2 minutes. You should feel your left hip stretch. Switch sides and repeat.
lat hang
PHOTOGRAPH BY BEN GOLDSTEIN
Lat Hang
Hang from a pullup bar. Squeeze your glutes to slightly tilt your pelvis forward. Breathe in deeply. Breathe out as much air as you can—you should feel your lats stretch. Take 5 deep breaths. That’s 1 rep. Do 3 to 5.
Michael Easter is the Fitness Editor of Men’s Health. The article This Man Stretched 10 Minutes a Day For a Month. Here’s What Happened originally appeared on Men’s Health