понедельник, 8 июня 2015 г.

OLYMPIC WEIGHTLIFTING PROGRAM MODIFICATION FOR INJURY

GREG EVERETT 

http://www.catalystathletics.com/article/1915/Olympic-Weightlifting-Program-Modification-for-Injury/

One of the most common questions we get at Catalyst Athletics is how to modify a program to work around an injury. It can be frustrating, and I’ve seen a lot of people give up on training altogether in response to an injury, but there is nearly always a way to continue training in a way that will allow you to improve something you need to work on while allowing the injury to heal. Depending on the injury, this can require some serious imagination, but it’s not usually that difficult if you’re interested in finding a solution.
 
The first rule is to avoid aggravating the injury—we want to recover and get back to normal training as quickly as possible, and this means ensuring we’re not protracting the recovery period by continually re-injuring ourselves. That’s not being tough, it’s being stupid. Keep a long term perspective and remind yourself that a short setback is a lot better than a long one.
 
Figure out what movements you can’t perform, and then figure out your list of priorities to work on. If you’re lucky, these won’t coincide. If they do, you’ll have to move down the priority list until you get to the first elements that don’t affect the injury.
 
Once you have in mind what you’re going to emphasize during this period, you can start rewriting the program. Essentially we’re simply going to replace what we had to remove with the new work for our chosen priorities—if we’re removing work from our training program, that’s opening up space for something else. Take advantage of this rather than just pulling out what you can’t do and spending the extra time you now have moping around.
 
I’m going to use myself as an example, as I conveniently just injured myself last week. I sustained a minor tear in my right iliacus during a split jerk. The bad news is that I can’t do anything in a split position (extra bad for me since the jerk is my worst lift); the good news is that I can do anything else. I can feel it a little bit sometimes when squatting, but not in a way that suggests it’s aggravating the injury.
 
Here is a look at a week of my original program:
 
Monday
W/U: High-knee walking lunge / back extension hold
Snatch Long Pull + Tall Snatch – 3+3
Block Snatch Pull + Snatch (knee) – 1+1
Snatch Pull on Riser
Jump to Split
Jerk Recovery
Weighted back extensions / abs
 
Tuesday
W/U: High-knee walking lunge / back extension hold
Back Squat
Jerk Bnk + Jerk – 1+1
Push Press
SLDL
Back Squat Jump
Abs/Beach
 
Thursday
W/U: High-knee walking lunge / back extension hold
Clean Long Pull + Tall Clean – 3+3
Power Jerk + Jerk
Block Clean Pull + Clean (knee) – 1+1
Clean Pull on Riser
Pause Front Squat + Front squat – 1+2
Weighted back extensions / abs
 
Saturday
W/U: High-knee walking lunge / back extension hold
Back Squat
Snatch + Overhead Squat – 1+1
Clean + Power Jerk + Jerk – 1+1+1
Lunge
Back Squat Jump
Weighed back extensions/Abs/beach
 
 
So I have several exercises on a few days that I can’t do:
 
Jump to Split
Jerk Recovery
Jerk Bnk + Jerk
Power Jerk + Jerk
Clean + Power Jerk + Jerk
Lunge
 
In addition, I can’t do ab work with hip flexion, so I’m pretty much doing crunches and planks. If you thought ab work was boring before, limit yourself to those two exercises and see how you feel.
 
I’ll tackle the easy changes first. All jerks have to be power jerks now. This is basically my worst nightmare. (I did consider splitting with my right leg forward—but a few minutes of that reminded me why I split with my left leg forward.) But the good thing is that my biggest problem with the jerk is not driving it high enough. Being forced to do more and heavier power jerks is probably going to turn out to be as helpful as it is unenjoyable. The question is can I just make a straight trade with jerks for power jerks—in this case, yes, because the weights I had planned are within my ability to power jerk (by that I mean they’re under my best single—doesn’t mean it will be easy). The exception will be the third week of this block when I will take these exercises up to true maxes. This will likely limit what I can do somewhat, but again, the effort to try to do this all with powers will probably have a very beneficial effect on my jerk. So we now have:
 
Jerk Bnk + Jerk = Power Jerk Bnk + Power Jerk
Power Jerk + Jerk = 2 Power Jerk
Clean + Power Jerk + Jerk = Clean + 2 Power Jerk
 
The jump to split is used to help me work on more aggressive foot transition into the split, balance in the split, and the strength to lock that position up quickly. Since I’m a power jerker now (at least for a few weeks—hopefully not longer), I just need to work on something similar for the power jerk. I chose to do power jerk recoveries—taking the bar from power rack pins from a fairly low power jerk receiving position height for triples. This will strengthen that lower receiving position for me, which is not great currently, and have the added benefit of additional upper body strength and stability work for the jerk in general, which certainly won’t hurt. If I can get stronger and more confident in a lower receiving position, I can power jerk more. And in the worst-case scenario where I have to power jerk at nationals, I’d like to be able to embarrass myself as little as possible.
 
Since I can’t do a jerk recovery, I switched these to jerk supports. It’s a pain after power jerk recoveries to strip the bar, pull the bar out of the rack, move the pins two holes higher, replace the bar, and reload it, but I’ll be OK. Switching to jerk supports from the higher pins allows me to then take the weights up considerably heavier for 5-second singles (for example, I did 3 triples at 170 for the power jerk recoveries, and then worked up to 220 on the jerk support—no way I could have done 220 from that lower pin position).
 
For the lunges, I’d really like to preserve some single-leg work because it’s a weakness of mine, but I can’t get into a lunge position with my right leg back. So instead, I’m doing single leg squats on a ply box with my non-squatting leg hanging straight down along the side of the box. It’s not quite the same, and won’t give me the hip flexor strengthening for the rear leg that’s part of the benefit of the lunge, but it’s better than sitting in the corner and crying about it.
 
This will cover me for this first mesocycle (3 4-week mesos leading into nationals). Hopefully after this, I’ll be back to splitting. If not, I’ll modify the next mesocycle as needed. If I can’t split for that meso, I’m going to have to make a decision on whether or not to commit to power jerking at nationals so I can train accordingly and be prepared. I sincerely hope that’s not the case—I don’t need any help making my jerk worse.
 
This is an example of a pretty minor injury with relatively easy modification. Years ago I sprained my back badly enough that I couldn’t even lean over the sink to wash dishes without falling over. I couldn’t squat, pull or anything that required any inclination of my trunk. After a week, I was able to do lunges as long as I kept my torso vertical, and add some weight eventually. I could do upper body work that didn’t involve leaning over. In other words, while I did have to stay out of the gym for a few days initially, I was able to get back and train in some fashion pretty quickly.
 
Remember that in the case of injuries, not training isn’t just a problem for your physical capacity—it’s a psychological problem. Training in some way keeps you focused and motivated and in the right mindset. Just quitting and staying out the gym completely destroys your momentum and puts you in a position to have to get yourself back up to speed from zero in ALL respects, not just the one or few you had to change to work around the injury. Be as pissed off as you want about getting hurt, but find a way to react productively instead of self-destructing.

The 17 Best Glutes Exercises

Target your body's largest and most powerful muscle group with these expert-approved moves


1. Stepup

"The setup is one of the best butt-building exercises in existence," says BJ Gaddour, C.S.C.S., author of Men's Health Bodyweight Muscle Burners.

It's a motion that we perform every day—going up and down stairs and stepping on and off curbs, he says. "If you can't properly perform it with a slow and controlled tempo, then you have no business lunging, squatting, running, or jumping."

DO IT: Place one foot on a sturdy box or step with your weight placed on the center of your foot. Push your hips back and then stand straight up, squeezing the glute of your supporting leg at the top of the movement.

Hold this position while keeping your hips and shoulders square and your body tall. Push your hips back again, and slowly lower your trailing foot to the floor, taking 3 seconds on the way back down to the starting position.

Once you've perfected this pattern, you can hold a pair of dumbbells in your hands. 


2. Hip Thrust

There's no better way to turn on your glutes than the hip thrust. "It's like a plank for your backside," says Gaddour. "It's super safe to practice and incredibly easy to learn, and you can do it anywhere, anytime."

Gaddour recommends doing hip thrusts for at least 20 seconds for every 20 minutes that you're in a seated position during the day.

DO IT: Lie on your back with your knees bent at 90-degree angles. Place your feet flat on the floor hip-width apart. Then crunch your abs and tilt your pelvis back so that your lower back is flat against the floor. Maintain this pelvic tilt throughout the entire exercise.

Push through your feet and raise your hips as high as you can without arching your lower back. Hold this position for a couple seconds, then slowly reverse the movement.

Make it harder by elevating your shoulders, elevating your feet, or reducing your base of support by placing your fingertips on your forehead.


3. Single-Leg Hip Thrust

Once you've mastered the hip thrust on the previous slide, move on the single-leg version.

"Lifting your hips one leg at a time requires a great deal of glute stability and strength," says Gaddour. "It will also help you iron out any strength and flexibility imbalances between sides of your glutes and hips."

DO IT: Lie on your back with the foot of your working leg placed flat on the floor and underneath your knee so that it's bent at a 90-degree angle. Bend the knee of your non-working leg toward your chest.

Crunch your abs and tilt your pelvis back so that your lower back is flattened against your hands or floor. Mainstain this pelvic tilt throughout the exercise.

Push through the foot on the floor and raise your hips as high as you can without arching your lower back. Pause, and then slowly reverse the movement.


4. Barbell Hip Thrust

The barbell hip thrust may be the king of all glute exercises, says Bret Contreras, C.S.C.S., a sports biomechanist known in the fitness industry as the Glute Guy.

"It activates the upper and lower glutes to a greater degree than any other exercise," he explains, "and it's known for developing a deep burn in the gluteal muscles." Progress to this exercise after you've perfected the bodyweight versions on the two previous slides.

DO IT: Place your upper back against a box or bench with your knees bent and feet flat on the floor. Put a padded—the thicker the padding, the better, says Contreras—loaded barbell across your hips so your glutes are near the floor. Then squeeze your glutes and raise your hips until they're in line with your body.

Keep your back in neutral the entire time, making sure not to arch your lower back during the movement. Return to the starting position and repeat. 


5. Barbell Squat

The back squat is generally known as a quad exercise, but it can build your backside just as well.

"As you squat, you're stretching your glutes under load," explains Contreras. "Then you need to produce a forceful glute contraction to propel your body 'out of the hole' to standing."

DO IT: Hold a barbell across your back using an overhand grip. Keeping your head up and chest high, push your hips back, bend your knees, and lower your body until your thighs are at least parallel to the floor.

Make sure your knees track over your feet and don't collapse inward. Push back to the starting position.


6. Hip Hinge

The better you are at the hip hinge, the better you will be at every lower-body exercise. Squats, lunges, deadlifts, jumps, and stepups all start by hinging back at your hips, preloading your glutes and hamstrings, says Gaddour.

The key to hip hinging is little to no movement at the knee and lower back. You are only moving at the hips, keeping your spine neutral.

DO IT: Stand with your feet hip-width apart. Set your head in a neutral position with your ears aligned with your shoulders, hips, and ankles, and maintain this position as you hint back and bend forward.

Keep your knees soft with a slight bend, and push your hips and hamstrings back as far as you can until your torso is parallel to the floor. Picture yourself closing a door with your butt.

Pause, and then push your hips forward and come to a full stand. Squeeze your glutes at the top of the movement. 


7. Barbell Deadlift

The deadlift works the entire backside of your body. Do it right, and it'll help you build stronger, more sculpted butt, says Contreras.

"That's because the hip hinge—which is a prerequisite to proper deadlifting mechanics—is completely carried out by the glutes and hamstrings," he says. (See the previous slide for a description of the hip hinge.)

DO IT: Load a barbell and roll it against your shins. Bend at your hips and knees and grab the bar with an overhand grip, your hands just beyond shoulder width.

Keeping your lower back naturally arched, pull your torso up and thrust your hips forward as you stand up with the barbell. Lower the bar to the floor and repeat.

"When you lock out the weight at the top of the movement, make sure to squeeze your glutes," says Contreras. "This will help push your hips forward so you can lift more weight." 


8. Walking Dumbbell Lunge

As you sink down into the lunge, the hips on your lead leg must deeply bend, explains Contreras. This stretches your glutes and places a high load on them at the most difficult part of the movement. That's why the walking dumbbell has a nasty reputation for preventing people from sitting down the next day, he says.

DO IT: Stand holding a pair of dumbbells and take a long step forward with your left foot. Push up into a standing position, bringing your back foot forward. That’s 1 rep.

Alternate the leg you step forward with so that you’re “walking” with each rep.


9. Back Extension

You may perform back extensions for your lower back, but the movement can be altered to target your butt muscles, according to Contreras.

By turning your feet outward at a 45-degree angle, you shift the load to your glutes, he says. Make sure you are fully contracting your backside by squeezing your glutes at the top of the movement every rep.

DO IT: Hook your heels into a back extension station, turning your toes away from each other so that your feet are at 45-degree angles from your calves.

Keeping your back naturally arched, lower your torso until your body is bent 90 degrees. Then raise your torso back up until it’s in line with your lower body, squeezing your glutes.


10. Bulgarian Split Squat

The Bulgarian split squat activates your quadriceps and builds single-leg stability. "And as you lower, the movement causes tiny tears in your glutes," explains Contreras. "Over the next couple days, your body repairs these microtears, making your muscles fibers stronger and bigger than before."

DO IT: Stand a couple of feet from a bench or step, with your back to the seat. Bend your right leg and place the top of your right foot on the bench as you place your hands behind your head. This is the starting position.

Keeping your torso upright, bend your left leg and lower your body until your left leg is bent at least 90 degrees. Push your body back to the starting position. 


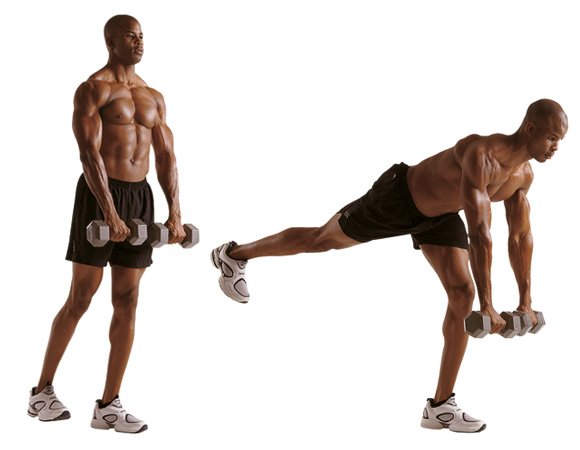
11. Single-Leg Straight-Leg Deadlift

This exercise improves your single-leg balance and targets the muscles of your glutes and hamstrings.

"As you perform this move, your hips will try to rotate away from your working leg and the toes of your nonworking leg will point out to the side," says Gaddour. "You can prevent this by squeezing the glute of your nonworking leg throughout the exercise. This will lock your hips into place."

Don't get frustrated: The single-leg straight-leg deadlift is tricky since there's a big balance component involved. Start with no weights, and then progress to dumbbells or a barbell once you master the movement.

DO IT: Grab a barbell with an overhand grip that's just beyond shoulder width and hold it at arm's length in front of your hips. Establish a tripod position with your front foot, keeping your knee soft with a slight bend.

Screw the foot of your working leg into the floor and squeeze the glute of your trailing leg to keep your hips square. Push your hips and hamstrings back as far as you can, lifting your back leg off the floor as you do so.

Your torso should be parallel to the floor with a slight natural arch in your lower back. Pause, and then push your hips forward and come to a full stand, squeezing your glutes at the top.


12. Kettlebell Swing

This movement hammers your backside, working your hamstrings and glutes explosively, says Contreras. That means you'll target your fast-twitch muscle fibers—the ones that weaken with age and that are crucial in almost every activity that you do.

To fully activate your glutes, keep your back in a neutral position and squeeze your butt at the top of the movement, explains Contreras.

DO IT: Bend at your hips and hold a kettlebell with both hands at arms length down in front of you. Rock back slightly and "hike" the kettlebell between your legs.

Then squeeze your glutes, thrust your hips forward forcefully, and swing the weight to shoulder height. Reverse the move between your legs and repeat. 


13. Cable Kickback

If you want a round, hard butt, you can't skip this move. "Many gymgoers mistakenly label the cable kickback as a 'wussy exercise,' but that's a mistake," says Contreras. The movement zeroes in on the gluteus maximus, which is the muscle that creates the shape of your rear end.

DO IT:Lower the arm of a cable machine so it's level with your ankle. Stand facing the machine with your feet hip-width apart. Put one foot through the cable handle. Keeping your chest lifted, use your glute to pull the foot with the cable directly behind you.

Don't let your back arch. Pause, and then slowly return your foot to the starting position. Do your reps with your weaker side before switching legs and performing the same number with your stronger side. 


14. Cable Standing Hip Abduction

"The cable standing hip abduction hits your upper glutes muscles, which are often neglected by most guys," says Contreras. "The stronger they are, the stronger and more sculpted your backside."

DO IT: Lower the arm of a cable machine so it's level with your ankle. Stand with one side closest to the cable machine and that foot just behind the cable. Loop your other foot through the handle, and use your glutes to pull that leg out to your side. Pause, and reverse the movement to the starting position.

Perform your reps with your weaker side before switching legs and performing the same number with your stronger side. 


15. Lateral Mini-Band Walk

A miniband might not be one of the first tools you reach for when building a stronger, more powerful backside, but it should be.

"When placed around the tops of your shins as you move side to side, the miniband hits your hand-to-reach gluteus medius, a muscle that helps rotate your thigh inward and outward," says Nick Murtha, a trainer for Men's HealthThrive. Waking up this muscle allows you to use all your glute strength when performing moves like a heavy-loaded squat or lunge, he says.

DO IT: Place both feet inside a miniband. With your feet just beyond shoulder-width, place the band at the top of your shins, right above your ankles, or around the balls of your feet.

Maintaining the distance between your feet, create a square by taking small, short steps. Take 8 side steps to your left, 8 steps forward, 8 side steps to your right, and 8 steps backward. 


16. Goblet Reverse Lunge

This exercise targets your gluteus maximus, your butt's main muscle. Done often, it'll help lift your butt so it no longer droops. "Since it's the largest muscle in your backside, targeting it will also help you make greater gains in size and strength," says Contreras.

DO IT: Cup the head of a dumbbell in both hands and hold it vertically in front of your chest, elbows pointing down. Step back with your right leg and lower your body until your front knee is bent 90 degrees.

Pause, and then push your body back to standing. Do all your reps on one side before switching legs and doing the same number on the other side.


17. Clamshell

This exercise targets your hip abductors, primarily a muscle called the gluteus medius. This muscle assists your largest butt muscle—your gluteus maximus—in raising your thigh out to the side. It also rotates your thigh outward when your leg is straight, and inward when your hip is bent.

As the name suggests, think of a clamshell opening as you do the exercise. Your glute should do all the work, so keep the rest of your body completely still as you left and lower your leg.

DO IT: Lie on your side with your knees bent 90 degrees and your heels together and in line with your butt. Open your knees as far as you can, without rotating your pelvis or back. Pause; return to the starting position. 


ГНИСЬ ИЛИ ЗАГНИСЬ: КАК СТАТЬ УНИВЕРСАЛЬНЫМ БОЙЦОМ ПРИ ПОМОЩИ ЙОГИ

Стань свидетелем занятий по «бойцовской» йоге и узнай, какая от них польза.


Фото 1 - Гнись или загнись: как стать универсальным бойцом при помощи йоги
«Делаем вдох носом», — кричит дюжий инструктор по микс-файту. Восемь мускулистых бойцов в ответ послушно раздувают ноздри, глубоко втягивая в себя воздух и одновременно опускаясь в упор лежа на потертый борцовский мат. Случайному зрителю может показаться, что в пропахшем потом зале на окраине Филадельфии проходит обычная тренировка бойцов ММА — по крайней мере, именно на эту мысль наводят покрытые шрамами и татуировками тела спортсменов. Но не тут-то было. 
«Теперь медленно выдыхаем и переходим из асаны «собака мордой вверх» в асану «собака мордой вниз», — отдает следующую команду Фил Мейглариз, обладатель черного пояса по бразильскому джиу-джитсу, преподаватель йоги и по совместительству тренер ММА.
Итак, ты стал свидетелем занятия по «бойцовской» йоге. Она была создана специально для того, чтобы ускорить твой прогресс в тренажерном зале, а также помочь побеж­дать в восьмиугольнике (подробнее см. yogaforfighters.com). «С точки зрения любого взрослого мужика обычная йога плоха тем, что он просто-напросто не может выполнить ни одной традиционной асаны», — так Мейглариз объясняет, зачем ему потребовалось создавать особенную йогу для бойцов, смешав ключевые движения из бразильского джиу-джитсу и аштанга-виньяса-йоги. Кроме того, по его словам, у многих бойцов есть проблемы с подвижностью тазобедренных суставов и эластичностью мышц задней поверхности бедра, а в традиционной йоге уделяется слишком мало времени работе с этими проблемными местами.
Комплекс «Приветствие Солнцу» — ядро методики Мейглариза. Это одновременно стретчинг мус­кулатуры, работа по повышению мобильности суставов, тренировка динамического баланса и постановка правильного дыхания. Делай эти упражнения в качестве самостоятельной тренировки в дни отдыха от штанги или в качестве заминки после силовой тренировки.

Приветствие Солнцу

Выполняй все движения по очереди, дыша только носом. В каждой позиции задерживайся на 3 глубоких вдоха. Движения, направленные вверх (четные номера), начинай со вдоха; движения, направленные вниз (нечетные номера), начинай с выдоха. Когда дойдешь до 11-го номера, начинай серию сначала. Всего сделай 3–5 таких серий за занятие. 
Фото 1 - Гнись или загнись: как стать универсальным бойцом при помощи йоги
1. Встань прямо, поставив ступни вместе. Выпяти грудь, руки опусти по сторонам.
Фото 2 - Гнись или загнись: как стать универсальным бойцом при помощи йоги
2. Плавно подними руки через стороны над головой, сцепив все пальцы рук, кроме указательных.
Фото 3 - Гнись или загнись: как стать универсальным бойцом при помощи йоги
3. Наклонись как можно сильнее вперед, не сгибая при этом ног в коленях. Помогая себе руками, постарайся приблизить свое лицо как можно ближе к голеням.
Фото 4 - Гнись или загнись: как стать универсальным бойцом при помощи йоги
4. Подними голову и туловище так, чтобы опираться о пол руками (или о колени, если дотянутся до пола сложно), ноги по-прежнему выпрямлены.
Фото 5 - Гнись или загнись: как стать универсальным бойцом при помощи йоги
5. Опираясь ладонями на пол, согни ноги в коленях и сядь на корточки. Теперь отпрыгни назад и прими положение упора лежа на согнутых руках. Колени, грудь и живот не касаются пола.
Фото 6 - Гнись или загнись: как стать универсальным бойцом при помощи йоги
6. Не поднимая таза, распрями руки в локтях и потянись подбородком к потолку.
Фото 7 - Гнись или загнись: как стать универсальным бойцом при помощи йоги
7. Подними таз вверх и постарайся прижать ступни всей поверхностью к полу. Держи спину плоской, без прогибов, и не сгибай ноги.
Фото 8 - Гнись или загнись: как стать универсальным бойцом при помощи йоги
8. Переставь ноги ближе к рукам. Держи спину, руки и ноги абсолютно прямыми. Руками опирайся о пол (или о колени).
Фото 9 - Гнись или загнись: как стать универсальным бойцом при помощи йоги
9. Обхвати ноги руками и подтяни лицо к голеням.
Фото 10 - Гнись или загнись: как стать универсальным бойцом при помощи йоги
10. Выпрямись. Подняв руки вверх через стороны, соедини ладони и сцепи все пальцы вместе, кроме указательных.
Фото 11 - Гнись или загнись: как стать универсальным бойцом при помощи йоги
11. Медленно опусти прямые руки по сторонам. Повтори все сначала.

Связки таза и их важность.


Мы не замечаем, но бывает, что при ходьбе мы поднимаем ногу не мышцами, которые для этого предназначены, а другими мышцами, например мышцами живота или мышцами и связками таза.  Это связанно с деформацией таза. Возникает боль при ходьбе и положении стоя. 
Как только человек поднимает ногу, нога поднимается и разворачивается вместе с тазом и сопровождается болью в ноге или коленном суставе. 
Почему возникает боль? Как только человек поднимает ногу, вместе с ногой начинает тянутся сакро-туберальная связка таза, как только начинает тянутся связка, возникает слабость разгибателей ноги (мышц задней поверхности ноги) с тянущейся болью и начинается скручивание коленного сустава и возникает боль в колене. Или человек говорит, я не могу поднять ногу, как только поднимаю ногу, возникает резкая боль в передней поверхности ноги, от колена до таза. Почему возникает боль по передней поверхности ноги? Как только разгибатели ноги слабеют, укорачиваются противоположные мышцы, так называемые антагонисты, в данном случае, это мышцы сгибатели ноги. А это возникает из-за резкого натяжения сакро-туберальной связки таза. У такого человека нет движения в тазобедренном суставе, у него есть движение ноги вместе с тазом, как при сгибании, так и при разгибании ноги. И при этом резко перегружается поясничный отдел позвоночника. Так как движение ноги идёт за-счёт мышц поясницы. Как следствие, может быть боль в пояснице. В поясничном отделе мышцы укорачиваются, потому, что как только идёт разгибание ноги, т.е. отведение ноги назад, человек думает, что делает разгибание ноги. Он так думает, потому, что он отвёл ногу назад, но при этом ягодичные мышцы расслаблены. У такого человека ягодичная область становится плоская или висячая. Человек поднял ногу назад поясничными мышцами (квадратными мышцами), что сопровождается болью в пояснице. В таком случае лечить спину и делать массаж спины бесполезно. До тех пор, пока не включатся ягодичные мышцы в поднятии ноги назад, человек будет поднимать ногу поясничными мышцами.
Это всё вызвано укорочением связок таза. А укороченные связки, при натяжении ещё больше травмируются. 
Почему происходит сокращение связок? Потому, что возникает слабость большой ягодичной мышцы, мышца имеет снижение тонуса, а связочный аппарат, имеет повышение тонуса. 
Но боль так же будет возникать и в тазобедренном суставе. Так как большая ягодичная мышца крепится, обволакивая капсулу тазобедренного сустав. Если большая ягодичная мышца расслаблена, то капсула сустава перегружается и у такого человека бывает ложное удлинение ноги. И когда мышца не держит сустав, то сустав выходит кнаружи, т.е. в сторону и визуально один бок будет отходить в сторону, относительно противоположного. И когда человек становится на эту ногу, то идёт травматизация тазобедренного сустава. В суставе возникает гиперподвижность. И у такого человека очень рано развиваются дистрофические изменения в суставе. Например, коксоартроз. И развивается он, как компенсация изменений в мышцах и связках.
Для того, что бы устранить эту проблему, необходим остиопатический подход в лечении большой ягодичной мышцы и связки.

суббота, 6 июня 2015 г.

Long and Loose: Six Stretches for Optimal Training

 http://www.realjock.com/article/1256


BY BILLY POLSON

Until we are injured, experiencing joint pain, or unable to perform daily functions, most of us ignore the role of stretching and flexibility in our workout programs. Even I went through years ignoring stretching and warm-ups for my body. During those years, I tore a hamstring, had to stop running for a year because of plantar fasciitis, and tore a meniscus—all injuries due to muscle imbalances in my legs causing me to use my legs and joints improperly. This in turn led to faulty movement patterns and improper wearing on my joints. All of which could have been prevented with proper stretching. So today I'd like to give you a stretching program designed to diagnose and address tightnesses in your muscles. Do this program and you'll keep yourself strong and sound for the long haul. 

The Length-Tension Relationship
The body is built as a system of levers, made up of muscles and tendons, each of them designed with a very specific ideal length-to-tension relationship. Your hip and knee, for example, are two of these lever systems. If you tend to have tight quadriceps and hip flexors (the muscles along the front of your thighs) and longer/weaker glutes and hamstrings (the muscles along the back of your thighs and your butt), the length-to-tension relationship around both of these joints would be off. This imbalance would cause your hip and knee to both work improperly, forcing your body to limit itself to smaller ranges of motion. Once you're there, any dynamic movement (suddenly running to cross the street, for instance) will force your body suddenly to move in a bigger range of motion than your muscles can handle. Your body will go to the next joint above or below the restricted joint to find that additional movement. In this case, you will probably need to use your back. This explains why so many people have back pain brought on by legs muscles that are overly tight, causing reduced range in their hips, and compensation in their back and spine. All of which can be very painful and dangerous. And that's the better outcome—in this situation your body could overly stretch, strain, or rip the tight muscles in order to force the range of motion. That can mean truly devastating injury. 

So, whether you are an athlete who thinks your body feels great, a weekend warrior who gets minor back tension after a weekly softball game, a minor fitness enthusiast who bikes once a week, or even a person who does not workout—checking yourself for muscle imbalances is vital to keeping your body properly functioning, safe, and pain free. 

Testing, Testing, One, Two, Three...
Below I have listed a quick check list of stretch tests you should perform on your body as part of your weekly workouts. I recommend trying each of the tests below to start with. If you find that you are tight in any of the areas, then follow the prescribed stretches behind each test as often as you can (daily if possible) until you are able to pass the test for the tight areas. For the areas of your body that are not tight in the tests, routinely check back in on a weekly basis or after intense workouts or new workouts/movements. 

Some tests below are best performed with the assistance of a workout partner to help with finding the true limits of your joints' range of motion. However, all tests may also be done fairly well on your own. Note that if you find that you have an imbalance between your legs for the same muscle (for example, your right hamstring is much tighter than your left), then you should perform the stretch two to three times on your tight side for every single time on your other side. The goal is to always try for symmetry throughout your body. 
TESTS AND STRETCHES
Quadriceps and Hip Flexors
Test: Lie face down on a stretch or massage table with your right leg off the side of the table in a bent knee lunge position and the left leg straight back on top of the table. You should be able to touch the back of your left heel to your butt when you bend your knee. Try the same test for the right leg's quads and hip flexors by swapping the leg on the table and bending your right knee and trying to touch your heel to your butt. This test is best done with a workout partner, but if you don't have one you can use the stretch below to test your right and left sides by measuring how far away from the wall your knee is for a proper form kneeling stretch.

Corrective Stretch: The easiest way to stretch your left hip flexor alone is to start in a kneeling position with your left knee down and your right foot up front on ground. Sitting tall with good posture, squeeze your glutes so that the front of your hip opens up. If your hip flexors and quads are very tight, this may be all you can do for starters. If this does not feel like much of a stretch, then back up to a wall and, while on all fours, place the front of your left foot on the wall and then slowly come up to the same kneeling position you started in for the easier stretch. Start with your left knee on the ground far from the wall and your left toe on the wall—just as in the floor stretch, squeeze your glutes to stretch the front of the left leg. As this stretch feels easier, back your knee up closer to the wall and sit tall again and squeeze your glutes. Make sure you are never so close to the wall that you cannot sit up straight and squeeze your glutes for this stretch. Repeat the same stretches if your right quad and/or hip flexor are tight. Hold the stretch for 20 seconds squeezing your glutes the entire time.
Hamstrings
Test: Lie on your back with both legs extended and try to raise your right leg straight into the air. You should be able to bring your right leg up to perpendicular to the floor without having to bend your knee. Perform the same test for your left leg. Again, this test can be performed with a workout partner or individually—especially if you are using a stretch strap, yoga strap, or towel wrapped under the ball of your stretching leg's foot.

Corrective Stretch: Lying on your back, wrap a towel or stretch strap under the ball of your left foot. Keep your right leg extended on the floor. Keeping your left leg straight, pull your it straight up as high as you can while keeping your knee straight. Then, slightly bend your left knee and pull your left leg a little bit higher, and straighten your left leg again for a five-second hold. Soften the knee again and raise the leg a bit higher and then push your left leg straight again for five seconds. Repeat this for five sets. Do the same on your right leg.
Hips I
Test: You'll use two different hip stretches to test your hip flexibility. First is the pigeon stretch. Start on all fours and bring your left knee a little forward, wrapping it under your body so that your left shin is perpendicular to your body. Stretch your right leg straight back as far as possible and lay your chest out over your shin with arms extended straight out forward. The goal is for your chest to be on your shin and your hips on the floor. Try the same stretch test for your right hip.

Corrective Stretch: Hold the pigeon stretch for 20 seconds.
Hips II
Test: Your second hip test is the groin stretch. Again start on all fours. Open your legs as wide as possible, with toes out and insteps to the floor, and ankles and knees at a right angle. Keeping your back flat, sit as far back as you can. Your goal on this one is to have your hips within two to three inches off the floor.

Corrective Stretch: Hold the groin stretch for 20 seconds.
Calves
Test: Ideally, you'd test your calves with a goniometer to measure the angle of your ankles. So instead we'll use a test to give you the feeling you'd get with a goniometer. Stand on a platform and drop your right heel off the back of the step, keeping your knee straight to see how far you can bring your heel down. Repeat the same stretch test on the left heel. Feel for your calves being extra tight or even more for one calf to be tighter than the other.

Corrective Stretch: Perform the calf stretch test, holding each stretch for 20 seconds.
IT Bands
Test: Again, this is a tough one to test without the assistance of a trainer or therapist, so I recommend using a foam roller as a test for tension in your IT Bands. Lie on your side on the floor, and place a foam roller perpendicular to your body under your lower hip. Let your upper leg either lie in front of your lower leg with your upper foot on the floor—or, to really put some weight on the lower leg and dig deep, stack your upper leg onto your lower leg. Propped up and walking on your elbows, slowly start to roll the foam roller down your IT Band towards your knee. You are feeling for extreme tension or knots and adhesions (aka speed bumps).

Corrective Stretch: Using the same test method above, stop and hold for a 20 count on each knot. Roll all the way until you reach the side of your knee. Repeat on opposite leg.
About Billy Polson: Billy Polson is the founder and co-owner of DIAKADI Body training gym, which was voted the best personal training gym in San Francisco by CitySearch in 2006 and 2007. A competitive swimmer and triathlete in his own right, Polson has over 15 years of experience working as a coach and trainer, and was recently named by Men's Journal Magazine (December 2005) as one of the Top 100 Trainers in America.

Тренировка от Брока Леснара


Брок Леснар - известный боец смешанных единоборств и участник многочисленных шоу рестлинга. Экс-чемпион UFC в тяжелом весе. Прежде всего, данного бойца от других отличает огромная мышечная масса. В одной из статей мы уже брали интервью у одного из борцов рестлинга - Мэтта Моргана. Теперь поведаем о тренировках Брока Леснара.
Брок вырос в пригороде Вебстера (штат Южная Дакота), где конечно же с раннего возраста учился работать. Он вставал задолго до рассвета, чтобы успеть сделать все рабочие дела еще утром. Возможно благодаря этому Леснар отличается от других накачанных спортсменов тем, что использует нетрадиционные методы увеличения силы, скорости и набора мышечной массы.
При отсутствии тренажерного зала в радиусе многих километров от его дома, Брок использует оборудование своей фермы, чтобы формировать фигуру. С помощью невероятной силы в 2000 году Леснар становится чемпионом NCAA по вольной борьбе в супертяжелом весе и вскоре после этого вступает в федерацию рестлинга WWE.
Несмотря на славу и богатство, для Брока основной ценностью в первые годы являлась его ферма. Он чувствовал, что профессиональный спорт как образ жизни - не для него, но решил двигаться дальше. Возможно врожденный менталитет или его жизненный принцип "всё или ничего", не позволил Броку бросить свои ценности, а заставил оставаться верным себе. Он почувствовал в себе потенциал оказать влияние на смешанные единоборства MMA. К тому же такие показатели, как рост, вес и сила были явно на его стороне и помогли ему стать топовым тяжеловесом в UFC.
Ежедневно Леснар потребляет огромное количество калорий, хотя, как правило, не придерживается строгих подсчетов и не ведет диетических дневников. Он принимает много белка, в том числе и протеиновые добавки, когда время не позволяет ему устроить полноценный прием пищи. Сразу после тренировки он принимает до 30 г высококачественного белка, и примерно 50 г углеводов для пополнения гликогена. На следующий день после тренировки Леснар пьет не меньше литра воды с добавлением электролитов.
Брок тренируется два раза в день четыре раза в неделю. Утренняя тренировка ориентирована на боевые навыки, вечерняя - на тренировки с отягощениями (продолжительностью 1 час). Леснар поделился с нами одним из примеров его силовой тренировки.
День 1: Грудь/Трицепс
Жим лежа (6 подходов по 12 повторений [прим. далее - 12х6])
Жим гантелей под углом (10х4)
Разводки гантелей лежа (8х3)
Кроссоверы на блоке (8х3)
Отжимания на брусьях (10х4)
Тяга блока книзу (10х4)
Французский жим во штангой лежа (10х3)
День 2: Спина/Бицепс
Подтягивания на турнике широким хватом (6х4)
Подтягивания на турнике средним хватом (6х4)
Подтягивания на турнике узким хватом (6х4)
Тяга блока к животу сидя (6х4)
Становая тяга на прямых ногах (6х4)
Становая тяга (6х4)
Бицепс со штангой на скамье Скотта (12х4)
Молот с гантелями (10х3)
Бицепс сидя на наклонной скамье с гантелями попеременно (10х3)
День 3: Плечи
Жим штанги с груди сидя (10х4)
Жим гантелей сидя (10х3)
Махи гантелями перед собой стоя попеременно (10х3)
Махи гантелями в стороны стоя попеременно (10х3)
Подъем штанги к подбородку в машине Смитта (6х4)
Шраги со штангой/гантелями (6х4)
День 4: Ноги
Разгибания ног (10х3)
Сгибания ног (10х3)
Приседания со штангой в машине Смитта с узкой постановкой ног (6х4)
Приседания со штангой в машине Смитта со средней постановкой ног (6х4)
Приседания со штангой в машине Смитта с широкой постановкой ног (6х4)
Жим ногами (6х4)
Становая тяга на прямых ногах (6х4)