суббота, 28 декабря 2013 г.

Common Rotator Cuff Injuries


People most susceptible to rotator cuff injuries are often older than 40 years of age and/or have bone spurs on their shoulder bone. There is a high incidence of rotator cuff injuries among women. These injuries can also affect younger people who often participate in new or repetitive activities, are already injured and/or have chronic weakness in their shoulder.

Rotator Cuff Tendinitis and Bursitis

Impingement can occur when the bursa and supraspinatus tendon become inflamed and swollen.
Overstraining the rotator cuffcan lead to inflammation in your shoulder joint, which can result in tendinitis (also spelled tendonitis) and bursitis. You can experience these conditions independently or simultaneously. Failure to take action against the inflammation can cause an impingement(pinching of the soft tissue), and produce further degeneration which frequently results in a major rotator cuff strain and/or tear. These injuries can often lead to surgery.
This mild inflammation can cause your rotator cuff tendons and bursa to swell and rub against or snag the acromion, or rub against a ligament at the front of your shoulder. When your arm is raised in a forward, reaching or overhead position the rotator cuff tendons and bursa can be pinched (impingement), which causes further swelling. Impingement syndrome occurs when your tendon and/bursa becomes pinched and tissue begins to break down near the humerus bone as a result of this inflammation and swelling. If this continues, your pain will get worse and your tendon may split or completely tear away from the bone.
Frequent overhead arm movements at work or during other activities can cause rotator cuff tendons to become overused.
Inflammation of your rotator cuff tendons or bursa will produceredness, swelling, and soreness in your shoulder soft tissue. Tendonitis is often due to overuse or repetitive actions common in athletes or workers who use frequent overhead arm movements such as throwing a ball, swinging a racquet, swimming, lifting weights, dusting high shelves, painting, or completing manual labor tasks. Decreased space in your rotator cuff will result from the above, as well as from anatomical differences in the shape of your shoulder bone, or arthritis. These will trigger pain, limit the use of your shoulder, and can lead to chronic tendonitis.
This condition is often referred to as Swimmer's shoulder, Pitcher's shoulder, Tennis Shoulder, or Shoulder impingement syndrome.

Rotator Cuff Instability

A muscle strength and flexibility imbalance or weakness, can cause instability and result in a subluxation or partial dislocation (your shoulder bones slide in and out of their sockets) or a full dislocation (the head of the arm bone slips out of the shoulder socket). These can cause a lot of pain and discomfort in your rotator cuff soft tissue. People with frequent dislocations often require surgery.
Success Stories
Shoulder instability which may have been present since birth or due to an injury, can also occur over time from overstraining, poor posture or inactivity. The rotator cuff is overworked, becomes weak and has difficulties stabilizing your shoulder, which in turn causes inflammation. If your rotator cuff becomes weak and tired, the head of your arm bone can squash up against the acromion and can result in a tear. This is often a major cause of rotator cuff tears in individuals over 40 years of age.

Rotator Cuff Strains or Tears

As you age, chronic degeneration can occur from repetitive motions breaking down the soft tissue and collagen (a fibrous connective tissue) in your rotator cuff. Degeneration may be caused by the development of calcium deposits, arthritic bone spurs or poor posture causing the acromion to rub on tendons or other soft tissue.
Chronic degeneration or a acute trauma can tear a rotator cuff tendon, usually the supraspinatus tendon.
Rough or repetitive arm movements, especially when your shoulder is lifted to the limit of its natural range of motion, can weaken the tendons already experiencing tendonitis. This can lead to a tear in your tendon or muscle that is often difficult to repair surgically. Imagine your favorite jeans wearing out; they get more and more worn until the edges fray or a hole appears.
A rotator cuff acute traumaresults from a sudden injury such as falling onto an outstretched arm, which can bruise, strain or tear your rotator cuff tendon or muscle at any age. Excessive force exerted by lifting or pulling something too heavy, pushing off an object vigorously with your arm, or making a forceful and abrupt forward throwing or overhead action, can also severely damage and tear your rotator cuff.
Rotator cuff injuries can also happen in conjunction with other shoulder injuries such as a fracture.

Types of Rotator Cuff Tears

partial thickness tear of your tendon or muscle is not torn all the way through. This is related to chronic inflammation or impingement which results from the development of spurs on the underside of the Acromion (often require surgery to remove the bone spur).
Success
full thickness or complete tear is torn all the way through your tendon or muscle. This generally results from acute or sudden injuries, ongoing impingement, or degeneration of partial thickness tears.
tendon torn from the bone often results from a traumatic injury or degeneration.

Rotator Cuff Scar Tissue

Scar tissue will often develop as a result of a major rotator cuff injury, tendinitis, shoulder instability and other rotator cuff injuries once acute inflammation begins to decrease. As your damaged shoulder tissues heal this dead, fibrotic tissue will develop instead of forming brand new tissue. This tissue adheres to your muscle fibers, tendons, ligaments, fascia, nerve cells and joints preventing them from moving properly and limiting your range of motion, flexibility and strength.
Scar tissue develops as damaged rotator cuff tissue heals. This can lead to re-injury or other painful conditions if left untreated.
The amount of scar tissue you develop will depend on the size, depth and location of your injury, as well as your age and current health. Leaving your scar tissue untreated may lead to future shoulder conditions and injuries such as, frozen shoulder, arthritis, tendon tears, or impingement due to a thickening of the tissue in the subacromial space.

Symptoms of Rotator Cuff Injuries

http://www.aidmyrotatorcuff.com/rotator-cuff-information/rotator-cuff-tear-symptoms.php


 A symptom is an abnormality that a person recognizes themselves, for example pain or numbness in your shoulder. Everyone's experience is different; therefore symptoms are subjective and based on an individual basis.

If you have early stage rotator cuff inflammation or tendonitis you may only experience pain and other symptoms with strenuous activity. However, if you have a rotator cuff tear you may experience more weakness and targeted pain, which interferes with your ability to sleep at night and greatly affects your mobility. If you allow your pain to persist, you will eventually experience pain at rest or with no activity at all.
Pain
Pain patterns associated with rotator cuff tendon injury vary depending on the tendon. Generally the pain can be deep within your shoulder and radiate down your arm, right to your hand.
Pain in your rotator cuff may happen gradually and is normally associated with movement from repetitive activities, overstraining, or from degeneration of the tendon. Itcan also occur immediately following a trauma, such as a fall onto your arm or a lifting injury.
It is most aggravated andintensifies when doing overhead or forward reaching activities (throwing motions or reaching for objects).
An injury to the supraspinatus tendon will often result in rotator cuff pain on top of and along the outside of your shoulder. It can radiate down the outside of your upper arm reaching down to the thumb side of your forearm.
Subscapularis pain occurs at the back (posterior) shoulder, around the scapula area and can extend up to the top of the shoulder. Pain may also extend down the back (tricep area) of the arm.
If the infraspinatus tendon is injured, pain is felt at the front of the shoulder and deep within the shoulder joint. Depending on the severity, pain may reach down the outer part of the arm and into the hand.
Teres minor tendon pain develops in the back of the upper arm near the shoulder joint in a very localized area. Pain may extend up your arm or you may experience tingling all the way down to your fingers.
People with rotator cuff injuries generally find the pain becomes worse at night, especially when lying on the affected shoulder. This pain can range from mild, to moderate, to sharp, although it can be difficult to pinpoint.
Supporting your arm with a pillow while youleep can take some pressure off your rotator cuff and reduce pain.
Generally the amount of pain you experience will depend on the extent of your injury but in any situation you will probably find some relief if you use a pillow to support your arm while you sleep.
Weakness
Weakness in your rotator cuff makes it difficult for you to raise your arm above your head, or extend your arm in front or to the side of you. You will often find it difficult to complete routine tasks such as reaching behind your back, putting your shirt on, or combing your hair. This is frequently noticed with complete rotator cuff tears.
Limited Flexibility
The loss of mobility and/or decreased range of movement in your shoulder area can indicate a rotator cuff injury. This is often accompanied by stiffness in the joint area, which is sometimes referred to as "frozen shoulder".
Crepitus
Another key symptom of a rotator cuff injury is Crepitus (the clicking, grating, crackling or popping sounds heard and experienced in your shoulder joint when you move your upper arm around). This tends to result from two rough surfaces coming in contact and grinding against one another, especially where cartilage has worn away. These noises tend to occur when you are overexerting yourself, such as pushing a heavy object.
Swelling and Inflammation
Recurring or constant inflammation and swelling around the Rotator Cuff or near a bone spur on your shoulder blade will also indicate an injury. Often this will be a result of tissue catching on the bone or being pinched between the bones.

Rotator Cuff Tendinitis and Bursitis Symptoms

If you have Rotator Cuff Tendinitis and Bursitis you will generally experience some of the above symptoms as well as red, sore, and swollen tendons or bursa. There is generally a gradual onset of pain, which flares up when you move your shoulder in any direction, especially overhead or out to the side.
Your ache will often originate from deep inside your shoulder and you will feel tenderness in a general area; this pain will often be worse at night.
A mild popping or crackling in your shoulder joint often indicates rotator cuff bursitis. As mentioned previously, if left untreated this can lead to a chronic tear. Rotator Cuff tendonitis and bursitis are very common in women 35 – 50 years of age.

Rotator Cuff Instability Symptoms

If you have Rotator Cuff Instability you may feel your arm slipping in and out of your shoulder socket, and/or you may experience a "dead arm" feeling when you raise your arm over your head or move it away from your body. This Rotator Cuff instability may cause you to experience pain and unsteadiness. If you have a dislocation, your arm bone will slip or be forced out of the socket, resulting in immediate inflammation, loss of mobility, and a possible tear. This is very painful.

Rotator Cuff Strain and Tear Symptoms

If you have a chronic or acute Rotator Cuff Strain or Tear you will experience most of the above symptoms. You will notice that your pain will be targeted in specific areas, especially when you lift your arm overhead or away from your body. You will also not be able to sleep on your injured shoulder. A strong crackling or popping sensation in your shoulder often indicates a tear.
If the tear occurs with a traumatic injury you may experience a sharp and sudden pain, a snapping sensation and an immediate weakness in your arm. This is known as an Acute Rotator Cuff tear. You will experience specific tenderness over the point of the tear and your range of motion will decrease immediately, as a result of muscle spasm, bleeding, or pain. You will also not be able to raise your arm out to your side without assistance. This sharp pain will generally last for a few days; however the other symptoms may carry on indefinitely. Rotator Cuff strains or tears occur most often in athletes and people over 50 years of age.
Chronic Rotator Cuff tear is usually found on your dominant side and is worse at night, which will interrupt your sleep. You will notice that your shoulder muscles will weaken and atrophy (decrease in muscle mass), and the stiffness and pain in your shoulder will get worse over time. Your range of motion will also decrease until you are unable to lift your arm out to the side or over your head without assistance. This condition is very common in women, and generally affects people over the age of 40 years.

Should You Seek Medical Attention?

This is up to your discretion; however any continued discomfort in your shoulder should be investigated, as it can lead to long term damage. If you experience any of the symptoms below, it is recommended that you seek professional medical attention:
  • You are unable to work due to the pain or limited range of motion
  • You are unable to move your shoulder or arm at all
  • You are unable to reach to the side or overhead after 2-3 days
  • Your pain and/or inflammation lasts for more than 2-3 days

Rotator Cuff and Shoulder Anatomy


The shoulder has an incredible range of motion, but this means that it is also very prone to injury. The shoulder can easily slip out of alignment by a few millimeters, become weak due to regular wear and tear, or become completely dislocated during a fall. The joint where the upper bone (humerus) of the arm meets the shoulder (scapula and acromion process) is called the rotator cuff. The rotator cuff is the most vulnerable part of the shoulder and is where most shoulder injuries occur. To better understand what is happening inside your rotator cuff it is helpful to understand the different parts of the shoulder.

What is the Rotator Cuff?

The rotator cuff is a group of 4 tendons and related muscles that form a cuff at the shoulder joint where the humerus meets the scapula.
The Rotator Cuff muscles are connected individually to a group of flat tendons, which fuse together and surround the front, the back, and the top of the shoulder joint like a cuff on a shirt. The tendons attach the muscles to the bone and allow movement in the shoulder, as well as providing strength to hold the ball in its socket. They are involved in all shoulder motions: when the muscles contract, they pull on the rotator cuff tendon, causing the shoulder to rotate upward, inward, or outward, hence the name Rotator Cuff.
The Rotator Cuff ligaments attach bone to bone and provide stability to the shoulder joint bones. Between the bones, muscle and other soft tissue there are several bursae (fluid filled sacs) and synovial fluid (lubricates your joint), which permit smooth gliding between the joint. They also protect the rotator cuff from the bony parts of the shoulder blade.

Rotator Cuff Tendons and Muscles

The 4 muscles and tendons of the rotator cuff are called the supraspinatus, subscapularis, teres major, and infraspinatus. These tendons and muscles work together to stabilize the glenohumeral joint and move the humerus in the shoulder socket.
Although many people refer to the rotator cuff as a general area in the shoulder, your rotator cuff itself is a group of 4 tendons located at the top of your humerus. These tendons are called the subscapularis tendon, the supraspinatus tendon, the infraspinatus tendon, and the teres minor tendon.
These tendons come together to surround the front, back, and the top of the shoulder socket acting as a 'cuff' to connect your humerus to the rotator cuff muscles. When you contract the attached muscles (subscapularis muscle, the supraspinatus muscle, the infraspinatus muscle, and the teres minor muscle), they pull on the tendons causing the shoulder to rotate up or down, back or front, in or out; hence the name 'rotator' cuff.
These muscles, along with the teres major and the deltoid,keep the shoulder's ball and socket joint firmly in place and are responsible for stabilizing the shoulder. These muscles work together as a unit rather than individually.
As a result, rotator cuff injuries usually involve more than one of these muscles or tendons. If any of the 4 main rotator cuff tendons or muscles become injured it will greatly affect the stability of shoulder.
The supraspinatus muscle and tendon assists with raising you arm out to the side.
The supraspinatus is the most frequently torn of all the rotator cuff tendons. It is the uppermost muscle of the rotator cuff and is located at the back of your shoulder blade. It passes beneath the acromion and runs towards the greater tubercle at the top of your humerus joining at the top of the cuff by the supraspinatus tendon. Your supraspinatus muscle primarily helps you to bring your arm directly out to the side(known as abduction) although it assists you with other shoulder motions as well.
The subscapularis muscle and tendon assist with rotating the arm and shoulder toward the body.
The subscapularis is the largest and the strongest of all your rotator cuff muscles. It completely covers the front of the shoulder blade. This muscle is attached to the front of the humerus which allows you to move your upper arm inward toward the center of your body (known as internal rotation).
The infraspinatus muscle is located at the back running from the bottom of the shoulder blade across to the top of the humerus. This muscle works with the teres minor muscle to move your arm outward, away from the center of your body (known as external rotation).
The infraspinatus and teres minor muscles and tendon allow you to rotator your arm away from the body.
The teres minor muscle sits below the infraspinatus and runs at the same angle attaching just below the greater tubercle of your humerus bone. The teres minor also assists with the outward rotation of your arm from the center of your body (know as external rotation).
Other main muscles in the shoulder area include:
  • the deltoids
  • the subclavius
  • the trapezius
  • the teres major
  • serratus anterior
  • pectoralis minor
  • sternocleidomastoid
  • levator scapulae
  • rhomboids

Shoulder Bones and Ligaments

The bone structures inside the shoulder that are significant to the rotator cuff include the humerus, the scapula, the acromion process, the clavicle, the greater tubercle, and the glenoid cavity.
The bones and ligaments of the shoulder and rotator cuff are designed to allow an incredible range of motion in the shoulder joint.
The humerus (upper arm bone) runs from your elbow to your shoulder and meets at the rotator cuff with a ball-like end known as the greater tubercle. This is the 'ball' part of the ball and socket joint in your shoulder.
The scapula (shoulder blade) is a triangular shaped bone with 2 bony projections at the top, right at your shoulder cuff. One of these projections is referred to as the acromion and it sits above the humerus. The other is called the coracoid processand it sits in front of the acromion and below theclavicle. Where your humerus meets your scapula there is a very shallow concave 'socket' known as the glenoid cavity(also called the glenoid fossa).
Ligaments are soft tissue bands that connect one bone to another. The joints of the shoulder that are primarily responsible for movement are held together by several strong ligaments. They include the coracoclavicular ligaments, the coracoacromial ligaments, the superior transverse scapular ligament, the coracohumeral ligament, the acromioclavicular ligament, and the glenohumeral ligaments.

Shoulder Joints

Inside the shoulder there are three joints; the glenohumeral joint, the acromioclavicular joint (A/C joint) and the sternoclavicular joint.
The glenohumeral joint is a joint where the greater tubercle (humeral head at the top of the arm bone) meets the shoulder socket of the scapula, called the glenoid cavity or glenoid fossa. Inside the joint, the labrum (a form of cartilage) cushions the humeral head against the glenoid.
The glenohumeral joint in the shoulder is surrounded by the tendons of the rotator cuff. This shoulder joint provides stability while allowing a large range of rotation and movement.
This joint is considered a ball and socket joint however the 'socket' is not as deep as similar joints in your body. Instead, the humerus sits against the glenoid cavity similar to how a golf ball sits on a tee. Since the ball does not fit directly inside socket of the glenohumeral joint, it is thelabrum, muscles, and tendons that hold the ball of the humerus against the glenoid fossa providing stability between your scapula and your humerus.
Due to this shallow socket and the scapula 'floating' above the rib cage (connected to the clavicle by ligaments, muscles and tendons) your shoulder is able to move around freely in several directions. This makes the shoulder the most mobile joint in the body. However, this also makes it the least stable joint and the one most prone to injury.
The acromioclavicular joint (A/C joint) is a gliding joint between the clavicle and the acromion. The acromion is a bony projection that comes off the scapula and forms the point at the outside edge of your shoulder. The acromioclavicular joint allows you to rise your arm over your head. If this joint dislocates it is commonly known as a separated shoulder.
The sternoclavicular joint, where the collar bone meets the sternum (breast bone) is not considered as important for shoulder movement.

Bursae in the Shoulder

In your shoulder joint there are 4 main bursae; the subacromial bursa, the subcoracoid bursa, the subscapular bursa, and the subdeltoid bursa.
The 3 main bursae in the shoulder are the subacromial bursa, the subcoracoid bursa, and the subdeltoid bursa. They function as cushions in the shoulder to protect the soft tissue from the acromion and coracoid process.
Bursae (plural for bursa) are fluid filled sacs that act as cushions to help the bones and soft tissue move smoothly within the joint. Your bursae also act as padding to protect your soft tissue from the bony points on the scapula, coracoid, and acromion.
The subacromial bursa is the most susceptible to bursitis in the shoulder. It's located in the subacromial space, between the acromion and the humeral head (greater tubercle), and is used frequently during shoulder movement to reduce friction. The risk of impingement of this bursa in the subacromial space is high because the area is small.

What Causes a Rotator Cuff Injury?

Rotator cuff injuries are very common, especially in people over 40 years of age. Most problems involve damage and irritation to the rotator cuff soft tissues(muscles, ligaments, tendons and bursa) rather than the bones, as they move frequently within a tight space.
A rotator cuff injury usually begins as inflammation caused by some form of small but continuous source of irritation, such as repetitive overhead motions from sporting activities, work tasks or daily chores, which can lead to tendonitis, tendinosis, frozen shoulder, impingement, or bursitis.
If you do not address the cause of the inflammation, a partial or complete tear (rupture) can develop in your rotator cuff due to chronic wear and tear of the tendon. A tear may also result at any age from an acute or single traumatic event, such as a fall onto an outstretched arm.

Shoulder Impingement Syndrome


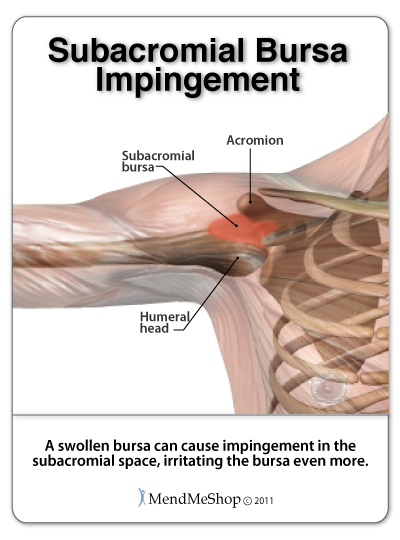
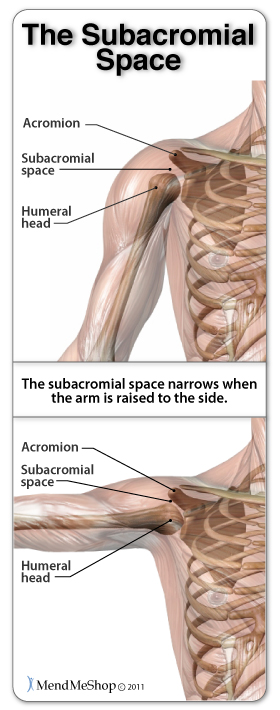
Shoulder impingement syndrome occurs when soft tissue in the subacromial space(considered the 'roof' of the shoulder blade) is pinched.
Shoulder Impingement Syndrome occurs when the subacromial space lesses due to misalignment, abnormal bone growths, thickening of the tendon, or swelling in the bursa.
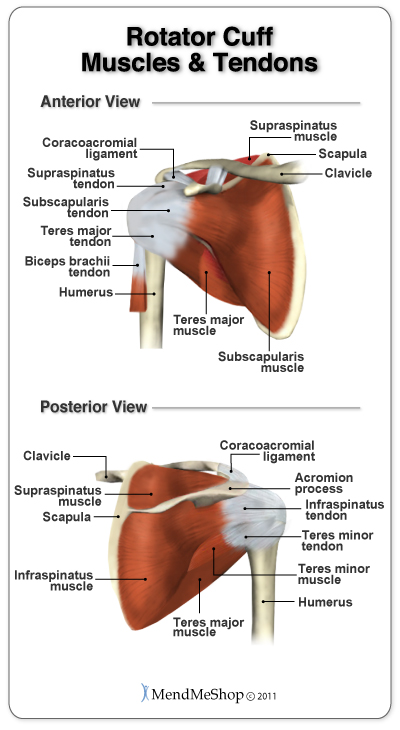
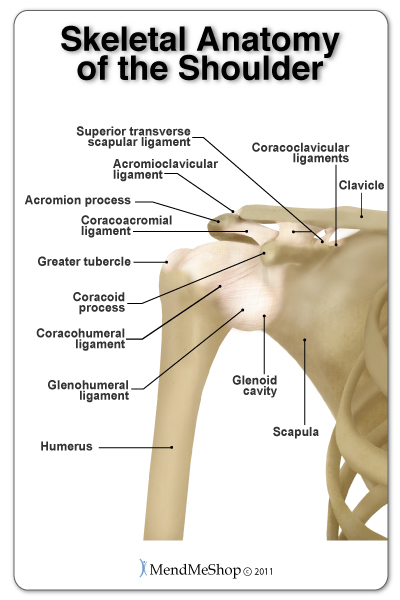
The subacromial space is an area in the shoulder that's approximately 1/2 an inch wide between the humerus (upper arm bone) and the acromion (a boney projection of the scapula).As you raise your arm, the greater tubercle (head of the humerus) moves up towards the acromion process and the amount of space in the subacromial space is naturally reduced. When the shoulder is healthy and everything is functioning properly this narrowed space is not a problem.
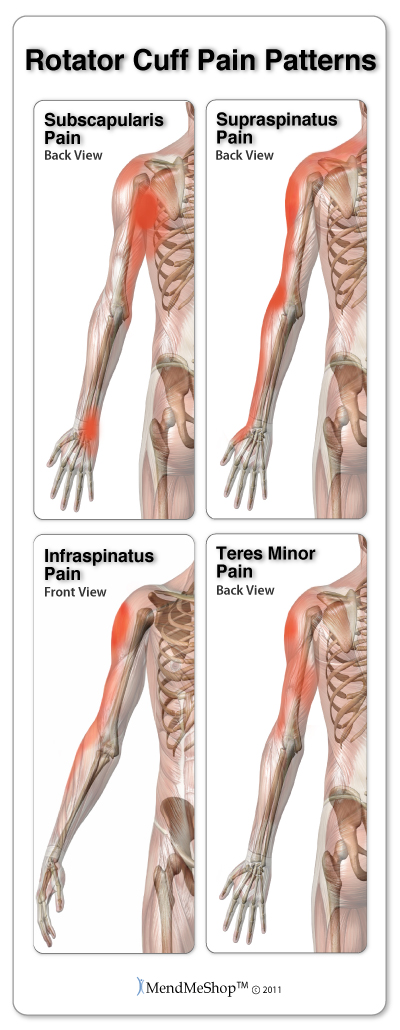
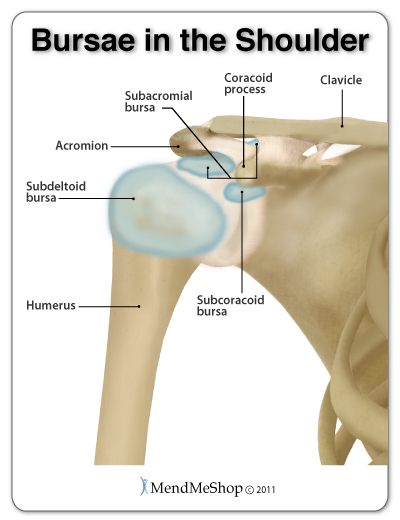
The supraspinatus tendon and thesubacromial bursa lie within the subacromial space. Therefore, these tissues are at the greatest risk of being pinched between the humerus and acromion process when you lift your arm. If the soft tissue in the subacromial space is swollen or the acromion is abnormally shaped, pinching or rubbing of the supraspinatus tendon may occur and/or it can cause a lot of irritation in the subacromial bursa. This pinching of the supraspinatus tendon or subacromial bursa causes the pain of shoulder impingement syndrome, which becomes worse as inflammation increases.
Abnormal narrowing of the subacromial spacecan happen as a result of bone spurs, thickening or calcification of the coracoacromial ligament, a curved or hooked acromion, a misaligned glenohumeral joint, or osteoarthritis spurs on the acromioclavicular joint. Alternatively, if the soft tissue within the space is larger than normal the space becomes even more narrow. This can occur with subacromial bursitis, or swelling orthickening of the supraspinatus tendon.
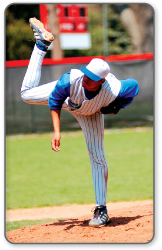
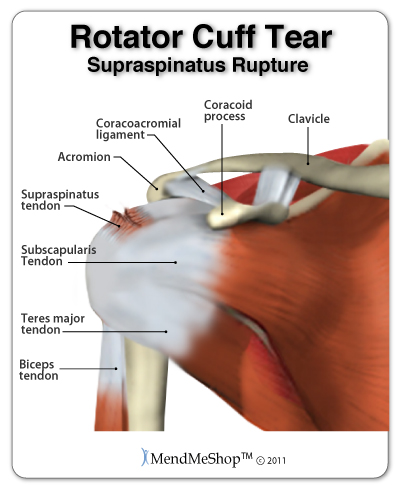
This condition is also referred to as swimmer’s shoulder, pitcher's shoulder, painful arc syndrome, supraspinatus syndrome, and thrower's shoulder. Because it can mimic the symptoms of a rotator cuff tear, tendonitis, tendosynovitis, bursitis or other shoulder problems, it is wise to see a doctor to determine the cause of your shoulder pain.

Symptoms of Shoulder Impingement Syndrome

Typical symptoms of impingement syndrome are the gradual development of shoulder pain over time.
Shoulder Impingement Syndrome causes a painful arc between 70°  and 120° . Treating the swelling and inflammation early can reduce the risk of busitis, tendinitis, bone spurs, and calcification of the tendon.
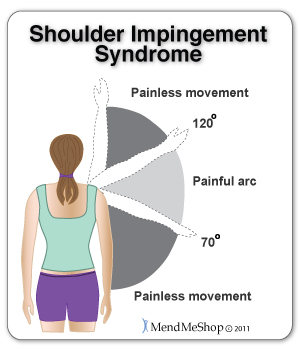
Pain usually occurs when reaching behind your back (internal rotation) or when lifting your arm. As you raise your arm, the pain is noticeable between 70° and 120°, but not when your arm is straight up or pointing down. This is because when you begin to raise your arm (abduction) there is no pinching, but during the lift, the top of thehumerus moves closer to the acromion, limiting the space.
With an external impingement, you with feel pain at the front and/or side of the joint when making a throwing motion.
If you experience pain when holding your arm out to the side (abducted) or turning it outward it would indicate you have an internal impingement.

3 Stages of Shoulder Impingement

There are three distinct stages of shoulder impingement that all have different symptoms.

Stage I

In stage I of impingement you will feel a slight ache after repetitive overhead movements. Inflammation will occur within the joint but at this stage it can be treated. Treating the pain and inflammation with cold compression will help to reduce inflammation and swelling. However, if the impingement is caused by an abnormal bone growth or misaligned joint, the cause may need to be fixed with surgery to avoid the impingement from continuing.
Shoulder Impingement Syndrome pinches the subacromial bursa and supraspinatus tendon within the subacromial space.

Stage II

Stage II of impingement is when the inflammation has progressed and scar tissue starts to form on the supraspinatus tendon and subacromial bursa. This makes the tissue thicker and more prone to further injury. As the tendon and bursa become thicker and more susceptible to impingement, it becomes difficult to break the cycle.
During stage II you will experience more pain when doing overhead activity and possibly while sleeping. It isimportant to treat the scar tissue and inflammation to prevent more chronic problems and to perform appropriate exercises, that will not pinch the supraspinatus tendon or subacromial bursa, tomaintain as much range of motion as possible.

Stage III

Stage III of impingement progresses to the stage where abnormal bone formations cause further complications. The subacromial space can be limited by bone spurs, calcification of the supraspinatus tendon, and even osteophytes (small bone growths) that grow on the acromion and/or head of the humerus. This restricts the space available for the tendon to pass through the subacromial space even more, creating stiffness, lack of mobility in the shoulder, and lots of pain.
At this stage, surgery may be one of the only options in order to remove the bony formation, and return to a normal range of motion and less pain in the shoulder.

Diagnosis

Visiting your doctor when you have shoulder pain is always recommended, as there are many possible causes of shoulder pain. Sometimes, one set of symptoms can result in multiple diagnoses. An x-ray and a MRI are often needed in order to diagnose a shoulder ailment properly.
A hooked acromion process is often the source of irritation to the supraspinatus tendon and subacromial bursa.
test for shoulder impingement syndromeis to reach the affected arm behind you towards your lower back, as if to get something out of your back pocket. If you feel sharp pain with this motion, it is possible you have shoulder impingement syndrome and you should see your doctor.
You doctor may refer you to a physical therapist. Many people see great improvements in physical therapy with shoulder related problems and are able to treat the condition with conservative measures such as cold compression, and Blood Flow Stimulation Therapy.

Causes

  • Tendonitis of the rotator cuff tendons

  • Subacromial (shoulder) bursitis

  • Genetic predisposition (small space between the acromion and humerus)

  • Curved or hooked acromion

  • Bone spurs in the shoulder

  • Shoulder instability

  • Biceps tendinopathy

  • Other rotator cuff issues

  • Dysfunctional shoulder blade (scapula) movement

Treatments - What You Can Do!

If you have shoulder impingement syndrome rest is highly recommended. Avoid activities that cause pain or may have caused the impingement and begin cold compression treatments as soon as possible.
Scar tissue develops as damaged rotator cuff tissue heals. This can lead to re-injury or other painful conditions if left untreated.
The trick to healing your inflamed supraspinatus tendon and subacromial bursa is getting it to heal with minimal scar tissue - something the Shoulder Inferno Wrap® is great at! Without treating the scar tissue on the tendons and bursa in the subacromial space, thickening of the tissue can occur leaving you at risk. However, if you heal your shoulder impingement properly and treat scar tissue build up, your chance of recurring impingement or chronic shoulder conditions later on is much lower than average.
There are healing tools that can help treat your supraspinatus tendonitis and speed up the healing process so you can get back to a life without pain and risk of further injury. Blood Flow Stimulation Therapy (BFST®) will treat scar tissue and promote blood flow to heal your tendonitis faster and more completely than any other methods available.

Freezie Wrap® Cold Compression Therapy

To decrease inflammation and relieve the pain of shoulder impingement syndromedoctor's recommend cold compression therapy. Cold compression therapy willrelieve pain and swelling and will reduce, or even eliminate, the need for NSAIDs. Our Freezie Wrap® products, in our opinion, will provide you with the most effective Cold Compression Therapy available for the home market.
The Shoulder Freezie Wrap treats pain, swelling and inflammation caused by shoulder impingement syndrome while reducing tissue damage.
The Shoulder Freezie Wrap® is the cold compression tool you need to treat your supraspinatus tendon, subacromial bursa and other shoulder tissue in an effective and convenient way.
Cold Compression Therapy works byinterrupting and slowing nerve and cell function in the injured area and reducing swelling that can block blood vessels. This is important because once blood vessels are blocked or damaged, they can no longer carry oxygenated blood through your tendon and tissue cells begin to break-down. Without cold compression therapy cellular break-down and tissue damage continues as the cells do not get the oxygen they need to survive. By limiting the amount of damage done to your supraspinatus tendon, you also limit the amount of healing that needs to occur. This is a very important step to get rid of shoulder impingement faster and with less pain!
The deep cooling effect provided by the Shoulder Freezie Wrap® not only reduces tissue damage, because the cold wraps gently numb the nerves the wraps alsoreduce pain!
The Shoulder Freezie Wrap® uses a supercharged cooling gel pack, that chills in the fridge, not in the freezer like ice or other freezer packs, giving you deep cold therapy without the risk of 'cold burns'or cryoburn. The medical-grade wrap keeps the cold directly off your skin preventing cryoburn while delivering cold right where you need it.

Inferno Wrap® Blood Flow Stimulation Therapy

After severe inflammation and swelling is reduced, begin treating your rotator cuff with Blood Flow Stimulation Therapy (BFST®). BFST® increases the amount of blood that flows naturally to your shoulder to nourish your subacromial bursa and supraspinatus tendon to speed healing.
Shoulder Inferno Wraps speed the healing of rotator cuff tendon injuries and tears.
The rotator cuff naturally receives a limited blood supply and when you stop moving your shoulder because it hurts the blood flow is reduced even further, limiting your body's natural ability to heal itself.
By treating your rotator cuff tendon with BFST®you can increase your body's blood supply to the shoulder and increase your body's natural healing power.
An Inferno Wrap® is the tool you need to treat your sore shoulder because it speeds healing and relaxes the surrounding muscles.
With BFST®, tissues are safely and gently stimulated. Your body responds with a rapid increase in blood flow to the rotator cuff,increasing the supply of oxygen and nutrients to injured tissue cells to promote healing. Our Shoulder Inferno Wrap® provides effective, non-invasive, non-addictive pain relief and healing with no side effects.
In addition, the improved blood flow whisks away dead cells and toxins that have built up from your damaged tendon and bursa. When you stop moving your arm and shoulder due to shoulder pain, your muscles and other tissue can become weaker and dead cells and toxins in the area can cause further tissue deterioration - this can lead to atrophy. By clearing the area of toxins and increasing the amount of oxygen and nutrients to your muscles and other tissue, the risk of atrophy (muscle weakness and/or deterioration) is greatly reduced. Keeping your upper arm, shoulder and rotator cuff tissue as healthy as possible throughout the healing process will allow you to improve shoulder strength again once your pain has gone and your shoulder impingement syndrome is gone.
Not only does the Inferno Wrap® aid in reducing inflammation and improving healing, it helps to prevent long term complications. Pain, lack of mobility, tendinosis, or a complete rupture in the rotator cuff are some of the more common long term complications that can occur when shoulder impingement syndrome goes untreated. By treating your rotator cuff with our BFST® device, scar tissue becomes softer and the supraspinatus tendon, subacromial bursa, and other tissue becomes stronger and more elastic, reducing the risk of chronic problems in the future.
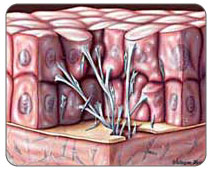
During the healing process, scar tissue builds on the supraspinatus tendon. This scar tissue can cause the tendon to thicken, decreasing the area in the subacromial space and increasing the chance of impingement.
In addition, scar tissue can also bind the tendons and ligaments together within the joint capsule and surrounding the rotator cuff. The inflexible scar tissue limits the movement of these tendons and ligaments that were once elastic and allowed the shoulder its large range of motion. As a result, movement of the entire joint is limited making it difficult to lift your arm or to reach for objects. If left untreated, the shoulder may 'freeze' (a condition called frozen shoulder or adhesive capsulitis) altogether making movement impossible. At the very least, scar tissue leaves your tendon weaker than a healthy tendon, leaving your rotator cuff at greater risk of further deterioration and possible tearing.
Fortunately, you can treat your subacromial bursa and supraspinatus tendon with the ShoulderInferno Wrap® to soften scar tissue and improve the motion and flexibility of your shoulder.
Once the inflammation of your shoulder impingement has been reduced, nourishing and strengthening the supraspinatus tendon and surrounding area is recommended. Using Blood Flow Stimulation Therapy will speed your recovery and heal your rotator cuff more completely preparing it for strengthening exercises. Talk to your doctor or physical therapist to find out which exercises are appropriate for your situation.
With these simple and safe home treatment therapies - Freezie Wrap® cold compression therapy and BFST® therapy, you will notice significantly reduced pain and an incredible improvement in your rotator cuff range of motion.
Remember: We recommend that you consult your doctor and/or physiotherapist before using any of our outstanding products, to make sure they're right for you and your condition.
During your recovery, you may have to modify and/or eliminate any activities that cause pain or discomfort in your shoulder until your pain and inflammation settle and you gain more mobility and strength in your shoulder. The more diligent you are with your treatment and rehabilitation, the faster you will see successful results!

Surgery

Surgery for shoulder impingement is sometimes required to make more physical space for the supraspinatus tendon to slide. This can be done a number of ways; removing part of the acromion, making the space between the acromion and humerus physically larger, or removing the subacromial bursa. Your doctor or surgeon willdiscuss your options with you and talk to you about the procedures and what to expect from the surgery.
Recovery time for the surgery will depend a number of different factors including your healing ability, diet, rest, and the type of procedure done during surgery. Your doctor will advise you on your recovery, and will let you know if/when physical therapy can be started.
Following shoulder impingement surgery, using cold compression and and BFST® will shorten the time you require to heal. It addition, by treating the scar tissue that builds as your surgical site heals, your tendon, bursa and surrounding tissue will be healthier and more elastic to prevent future problems from developing.

пятница, 27 декабря 2013 г.

Swimmers: Exercises for improving Shoulder Durability


Today I want to share a few  exercises for improving the motor coordination and durability of a swimmer’s shoulder. While there is a lot more to a complete shoulder care program ( thoracic spine mobility, tissue quality, breathing, core stability etc.) this post will focus on durability from a motor control as well as strength perspective.
A commonality shared amongst swimmers and triathletes is the tendency to be lattisimus dorsi, pectoral,  and rhomboid muscle dominate. Perhaps not always from a pure strength standpoint, but certainly from  a pattern overload and neural stimulus one. Swimming, pull ups, swim benches, and horizontal rowing all heavily recruit the lat. and rhomboid.  It’s important to acknowledge that these muscles, while important for force production when pulling, can hinder a relaxed recovery and hand entry if over- facilitated.  Furthermore, it’s quite common for athletes to experience pain and various impingement syndromes during the overhead phase of a swim stroke.
This is not a complete solution for the overhead athlete
Excessive focus on retraction and depression of the shoulder blades via rows and the like has the potential to impede fluid motor control  of scapular upward rotation when raising the arm overhead.  During overhead activity,  it’s important to maintain the path of instantaneous center of rotation inside of the shoulder joint.  This dynamic “joint centration”  is achieved through scapular upward rotation and the combined reflexive efforts of the rotator cuff muscles.  Refer to this previous post for more on the importance of Scapula Rotation. In addition to encouraging scapular upward rotation, it’s important to focus on achieving and maintaining a posterior tilt throughout movement, not simply during fixed postures.
arm overhead should = active scapular upward rotation

If the muscles and motor programming responsible for upward rotation and posterior tilt are inhibited, injured, or are weaker than their downwardly pulling counterparts, then shoulder issues  can arise.  This 2011 observational study of 78 swimmers noted altered movement in  scapulo-humeral rhythm over the course of a swim training session in 82% of it’s asymptomatic participants. To ensure that my athletes have adequate upward rotation control, strength and endurance I use exercises that emphasize the position of, well, upward rotation.
Before perusing exercise, it’s important to check an athlete’s ability to both actively and passively flex the shoulder 180 degrees overhead. Once an athlete has demonstrated proficiency in the desired thoracic and trunk positioning combined with sufficient flexion and scapular upward rotation, then we progress and challenge the ability to maintain those efforts.
Here are a few mini band exercises that can be used as a warm up or as a foundation for progressing overhead control. <note: can be done without a resistance band>
The face pull with external rotation is a great exercise for encouraging and strengthening mid-range upward rotation as well as posterior tilt. With the arms abducted 90 degrees and focusing on external rotation, the often over dominant latissimus dorsi is forced into a position of mechanical disadvantage. This allows for better recruitment of the muscles contributing to upward rotation and posterior tilt.
Overhead shrugs are an easy exercise to incorporate to strengthen and encourage the position of end range upward rotation. The shrug will aid in strengthening the upper trapezius which can often be over dominated by the latissimus dorsi.   With a kettle bell or dumbbell held fully flexed and extended overhead you simply shrug and elevate the shoulder blade. Be certain to avoid any compensatory side bending or protruding of the head and neck. It’s important to focus on the eccentric  lowering of the weight. Oftentimes an overly active lat. and rhomboid will want to pull the shoulder blade down much like a rubber band under tension. Be sure to slowly lower the weight and maintain control over the full range of motion while keeping a firm grip.
A bottoms up kettle bell press allows you to train complete scapular upward rotation. With the kettle bell held in the inverted bottoms-up position, the emphasize is shifted from strength to one of more stability. This allows you to safely use lower weights and still get a big effect will training upward rotation. Like the overhead shrug, be sure to slowly lower the weight.
Bottoms up press
The overhead carry or ‘waiter’s walk’  challenges the athlete to statically control upward rotation while the rest of the body moves dynamically below them. Maintain tall posture and keep the elbow fully extended. To increase the grip challenge and reflexive rotator cuff demand, hold a kettle bell in the bottoms up position.
If you’re a swimmer or triathlete with a history of nagging shoulder issues, perhaps you might want to try laying off the rows, chin ups, and lat pull downs for a bit and focus on improving your upward rotation. If you or an athlete have overly active upper trapezious muscles and the tendency to shrug inappropriately during exercises, then this approach may not be well suited.
For more information on approaching the swimmer’s shoulder check out The Shoulder: What every swimmer should know. blog serries  For more information about the Strength Training Studio programs and services offered in Waltham, MA – check out the home page www.saycoperformance.com

Mike Eves' Whole Body Fitness Plan


Featured Coach - Kettlebells

Fitness doesn’t just happen. You have to make it happen. Joining a gym won’t automatically make you fit and neither will buying the latest fitness gadget. It’s all up to you, but that’s the real beauty of it: we all have the ability to get fit and get strong. Give me a cold garage with a dodgy light and minimal equipment every time. The only limitations are the ones you impose on yourself.

The truth is that you can train anywhere, be it in that cold that cold garage or the great outdoors. Most bodyweight exercises such as pull-ups, push-up, sprawls, or burpees can be done anywhere, anytime. The only thing that really matters is that you consistently strive to improve, and once you commit yourself to doing that, everything else is a done deal.

Need proof? Then join me on my four-week whole body fitness plan. In week one, we’ll explore kettlebells and bodyweight training, week two brings in the sledgehammer, week three introduces the Indian club and mace, and in week four we’ll add in sandbags and medicine balls.

Week 1: Kettlebells and Bodyweight Training

mike eves, training plan, free workouts, bodyweight workouts, kettlebell workoutThere are hundreds of kettlebell and bodyweight exercises, but that does not mean you should do them all. Too much variety creates an illusion of progress. Instead, concentrate on the most comprehensive and fundamental exercises. Most of your training should be about practice. Aim to be proficient at the exercises and perfect them (this could take years) by turning them into an art form. By training this way you involve a focus component by integrating the mind and body. If you train movements, not muscles, the mind and body will thrive.

The key kettlebell exercises that we will introduce to the plan over the coming weeks are the single arm swing, the clean, the press, the clean and press, the long cycle, the snatch, and some supplementary exercises like renegade rows, Turkish get ups, and windmills. We’ll also throw in (quite literally) somekettlebell juggling for a bit of fun too.

I’m a great believer in training every day. The human body is not supposed to be sedentary.Have a daily ritual of exercise that will turn into habits that constantly drive you forward. A word of caution, though: doing high intensity and strength workouts everyday will cause you to break down. Restoration is a key factor of fitness. So on lower intensity days perform yoga, Indian clubs, or practice bodyweight exercises

Key Exercises for Week 1

There is more than one way to do an exercise. There is no true way and there is no true form.We all have physiological differences, so do what works for you and ignore what doesn’t. What is important is that you are smooth, fluid, and efficient. Poor efficiency leads to slow progress and giving up. Remember that.

Kettlebell Swing

I rarely use the double arm swing. The single arm swing is the gateway to the snatch. The swing teaches inertia and involves the whole body.

Grab the corner of the bell utilizing a finger under thumb grip. For the downswing and upswing, your head is in a neutral position. Utilize a quadruple extension on upswing - ankles, knees, hips, and torso. The torso follows the bell on the downswing to reduce grip fatigue and improve flexibility and mobility. Relax the arms, and let the legs, hips, and back do all the work. This should be a fluid motion, not rigid. Utilize either a thumb back or finger back variation on the back swing.

Swing the bell to chest level and at the top of the motion, lean the body back, elevate the shoulder via the traps, and rise up on the toes (optional). Alternatively you can kick off the front foot on the same side as the hand holding the kettlebell. Remember to have an active back swing between the legs to gain acceleration and develop flexibility in the posterior chain. Visualize the bell as going up, down, and out a chimney. Leaning the body back at the top of the motion described above helps facilitate this.

For the breathing, exhale once at the back of the downswing, exhale again at the beginning of the upswing, and then inhale at the top of the swing. You will notice that the double exhale creates a naturally strong and automatic inhalation.


Kettlebell Clean

Review the key points of the swing. When cleaning the kettlebell have an active hand. This will facilitate bell coming around hand and wrist versus over the top, and will avoid banging the wrist.

Once in the racked position, the kettlebell rests in the triangle of the forearm and bicep. Although dependent on body type, the ideal is to bring the elbow to the iliac crest of the hip to gain maximum rest. The kettlebell should rest on an angle from the inside of the thumb to the lower palm to reduce forearm fatigue. The hands should be in a false grip position while in the rack. This is a particular safety point to protect the fingers when performing the double kettlebell clean. Legs are locked, hips are forward, thoracic spine is rounded, and there should be little, if any space between the outside of the wrist and bell.

At the beginning of the downswing, remember to elevate the shoulder and toes to help absorb the force of the downswing and preserve the grip. Turn the hand upwards and yield to the kettlebell by leaning backwards so the kettlebell travels down the centerline and the arm remains connected to the body.

With the clean there are three out breaths, exhale on the downswing, inhale on the upswing, and exhale as bell lands in rack.


Kettlebell Press

Start from the rack position (review clean section). As you press the bell up, keep the forearm vertical by visualizing drawing a chalk mark with your thumb up the length of your nose. Utilize a chest/thoracic bump to initiate the press and ensure the bell is resting across the hand at a 45-degree angle. Raise the shoulder and toes before lowering to help decelerate the bell and absorb the impact as it returns to the rack position. The kettlebell should travel up and down the body’s centerline. Again, you can think of the visual of keeping the bell in the chimney.

For breathing in the press, inhale as you press the bell up, exhale on lockout, take in a deep inhale before lowering, and exhale as the bell lands in the rack position.


Kettlebell Turkish Get Up

Lying on the floor, safely move the kettlebell into a locked out position, straight up with your right hand. Your shoulder should be tight in the socket. Your right leg will be cocked, your right foot alongside your left knee. Pushing off your right foot, roll onto your left hip and up onto your left elbow. Push up onto your left hand. Holding yourself up on your left hand and right foot, bring yourself up off the ground (extend the hips), and thread your left leg back to a kneeling position.

You are now left knee on the floor, right foot on the floor, and implement locked out overhead in your right hand. Your arm should be locked out. You will be stronger in this position than in a flexed position where the muscles would be doing all the work. The get up is a whole body exercise and particularly a shoulder developer. It is not meant to tire your arms out.

From the kneeling position take in a deep breath, tighten up, and lunge forward to a standing position. Reverse the process to come back down to the floor. Remember that a Turkish get up is not complete until you return to the start position.


mike eves, training plan, free workouts, bodyweight workouts, kettlebell workoutKettlebell Renegade Row

Place two kettlebells on the ground, shoulder width apart. Keeping your arms extended lower yourself into a push-up position so that your shoulders are over the kettlebells. Keep your legs spread apart and drive your weight through your heels by pushing them towards the floor. Only your toes will be on the ground. Keep abs and hips stable, not allowing your back to arch.

Shift your weight onto your left side and the lift the right kettlebell to your side by bending your elbow, keeping it close in. Focus on squeezing your shoulder blade inwards, and then lower the kettlebell back to the floor. Shift your weight to the right side and lift the left kettlebell up to your side.

Hindu Push Up

To execute a Hindu push up, start with feet and hands a little more than shoulder width apart, forming the body into an upside down "V" and keeping the head, neck, and spine aligned. The arms are touching the ears in this position. From this starting position, commonly called downward dog in yoga, bend the elbows, lowering the head towards the ground and bringing the chest almost to the ground. While the hips are still about a couple of feet in the air, swoop forward to a cobra pose.

To return to the downward dog position in a Hindu push up, from the cobra pose, raise the abdomen into a normal plank position, and then push your hips up and head backwards into downward dog.


Scorpion Push Up

Begin to do a standard push up or a basic variation of the push up. When you finish lowering yourself, raise one leg off the floor bend your knee towards your back and to the opposite side. Do individual sets for each leg or alternate between legs.

Hindu Squat

Stand with feet shoulder width apart, hands straight out in front of you. Pull your hands into your chest. Push your hands down toward the floor, behind your rear end, as you squat down. As you squat down, also lift your heels into the air. You will be balancing on the balls of your feet. Reverse the sequence to stand up and return to the starting position. The Hindu squat is a very interesting squat variation. It is a fast-paced bodyweight squat that works your legs and really works your heart and lungs.

Sprawl

Sprawl is in some ways similar to a burpee. As your hands and hips go down your head goes up. Your hips must go all the way to the ground. Your hands should push outwards and should not be turned in or straight ahead. Do not sprawl your elbows out. Use the recoil in your hips to explode back upwards to the starting position. Smooth out the whole exercise and keep it athletic and fluid.

Coming up in the Whole Body Fitness Plan:
  • Week 2: Extended kettlebell sets and sledgehammer training
  • Week 3: Introducing Indian clubs and the mace into your training
  • Week 4: Sandbag training, medicine ball training, and triple treats